Author name: Janine Weiss

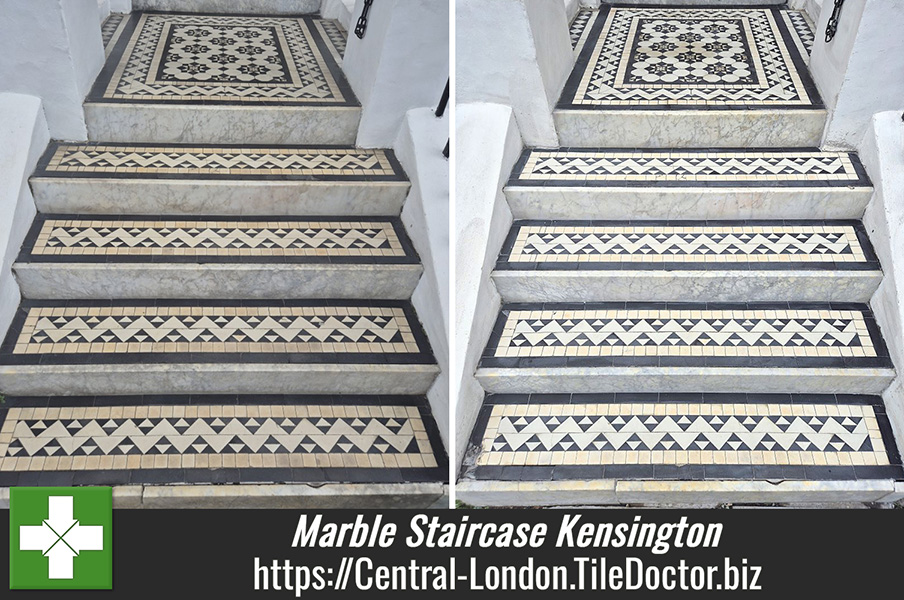
Marble Staircase Renovation Kensington London

Professional Renovation of a Marble Staircase in Kensington

We were recently contacted by a property management company responsible for maintaining several residential buildings in the Kensington area regarding a Marble staircase at one of the properties they manage. The company were not satisfied with the condition of the staircase, which had become dull and worn over time, losing the clean bright appearance the Marble originally had.

Although Marble is a highly durable natural stone, it can gradually lose its original appearance through heavy use and incorrect maintenance. As Marble becomes worn over time, it begins to hold dirt and contamination within the surface micro-pores, causing the stone to lose clarity.
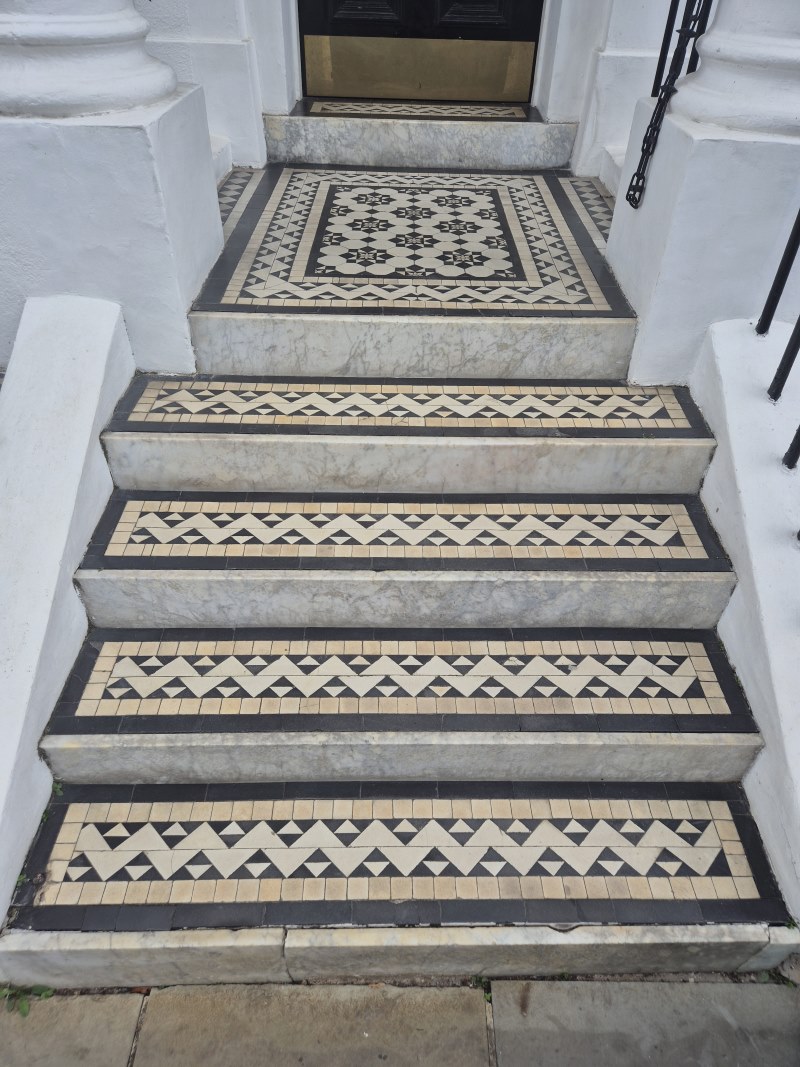
Marble Staircase Before Renovation Kensington

Household cleaning products and basic polishing treatments aren’t sufficient to properly restore heavily worn marble and we have found the best method is to mechanically polish the stone using a set of diamond burnishing pads of different grits from coarse to fine. This is relatively straight-forward when working on a large floor however a staircase is much trickier.

Undeterred I put forward a plan that would utilise smaller pads and tools and set a date for the work to start.

Deep Cleaning a Marble Staircase

The first stage involved deep cleaning the staircase using Tile Doctor Pro-Clean which is a strong alkaline cleaning agent that’s safe to use on Tile and Stone. It breaks down ingrained dirt, residues, and surface contamination without affecting the marble, ensuring the surface was properly prepared before restoration began.

Once cleaned, the staircase was restored using the Tile Doctor diamond burnishing system. The process began using lower grit diamond burnishing pads before progressing through finer grits to gradually refine the marble surface and restore a smoother, more even finish throughout the staircase. The restoration sequence consisted of 400, 800, and 1500 grit diamond burnishing pads.

Due to the level of wear and contamination within the Marble, several areas required repeated treatment and multiple passes using the diamond burnishing pads before a consistent finish could be achieved.

Because staircases contain edges, risers, and detailed sections, smaller hand-held machines and diamond tools were also used throughout the process to ensure a consistent finish across all areas.

Once the refinement stages were complete, the Marble was finished using the final 1500-grit stage of the Tile Doctor diamond burnishing system to enhance clarity, brightness, and natural reflectivity without the use of topical coatings or artificial shine products.

Sealing a Mable Staircase

Once the staircase was thoroughly cleaned and dry it was sealed using Ultra Seal from the Tile Doctor range. This is a penetrating impregnating sealer designed to protect the Marble against future staining, moisture penetration, and re-soiling while maintaining the natural breathability of the stone.

Following the restoration process, the Marble staircase was noticeably improved, with a much cleaner and brighter appearance throughout. The restored finish improved the overall brightness of the hallway and brought back the natural character of the Marble.
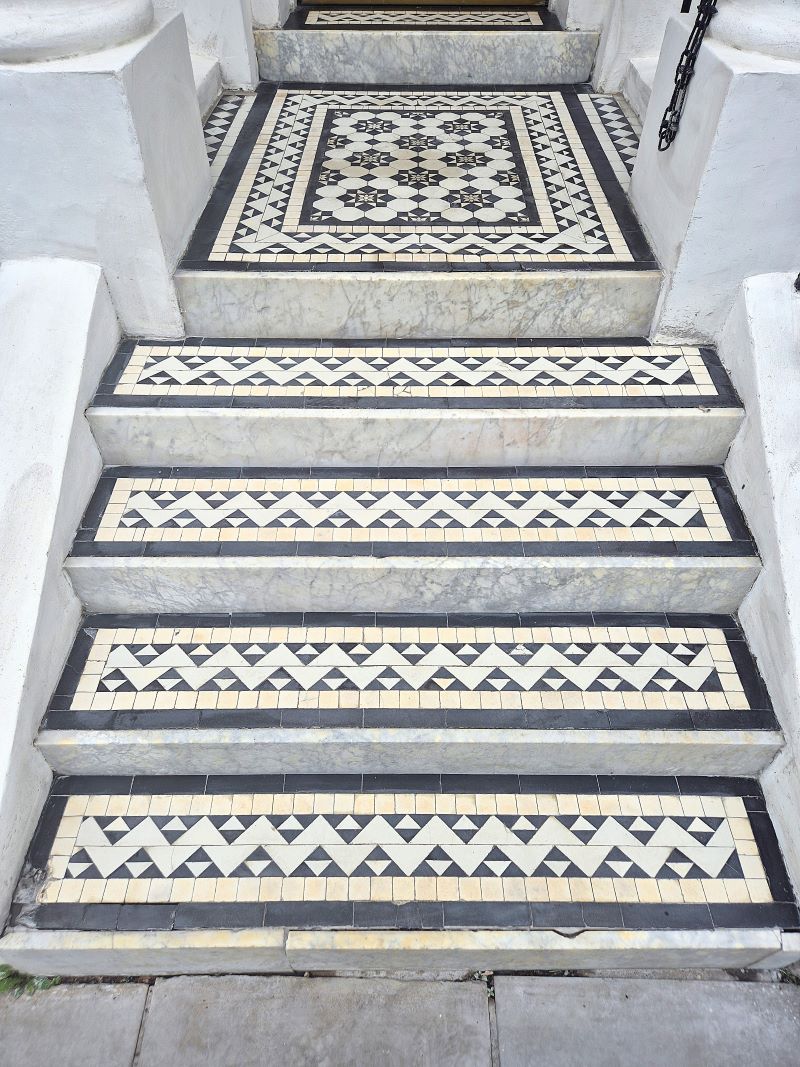
Marble Staircase After Renovation Kensington

The property management company were pleased with the result and satisfied that the staircase had been successfully restored without the need for expensive repairs. For future maintenance cleaning I recommended the use of Tile Doctor Neutral Tile Cleaner, it’s a mild yet effective cleaning product that doesn’t contain anything that might impact the grout colourant.


Professional Restoration of a Marble Staircase in Central London

Professional Renovation of a Marble Staircase in Kensington Read More »
Porcelain Floor Tile and Grout Renovation Oxford Street London W1

Bathroom Tile and Grout Renovation at Oxford Street Store London W1

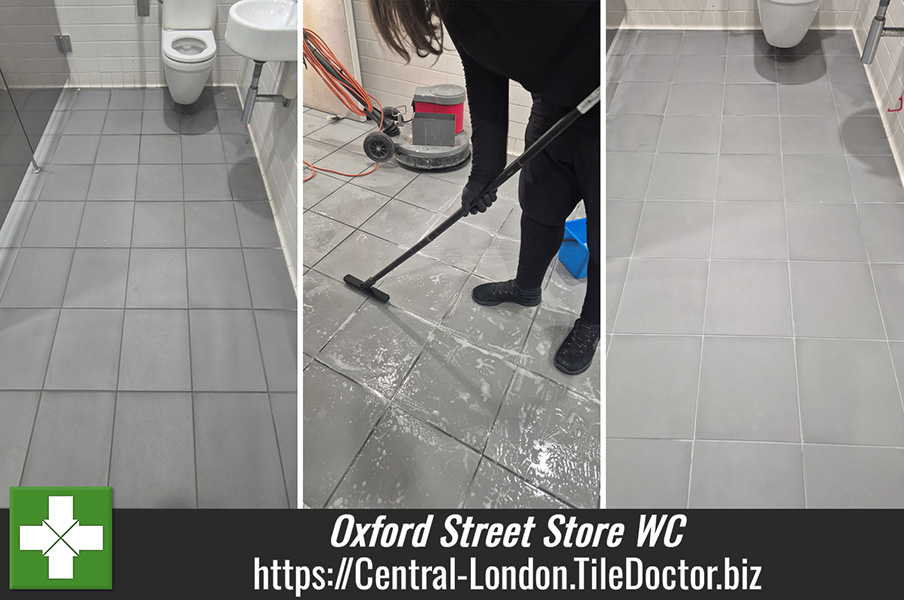
Recently we were tasked by a well-known department store on Oxford Street to renovate the Porcelain Tile and Grout in the staff bathroom. The tiles were heavily soiled, and the grout lines were deeply ingrained with dirt and discolouration, making the space look untidy and unhygienic despite the reasonable condition of the tiles.

Porcelain Floor Tile Before Cleaning Oxford Street London Porcelain Floor Tile Before Cleaning Oxford Street London

Porcelain tiles are impervious and so very easy to clean and maintain, grout however is a different matter as the rough cementous surface easily traps dirt. This is exacerbated by the smooth porcelain tile as dirt becomes washed off the tile straight into the grout line where it becomes trapped turning it black over time.

We do have a solution for this problem though; it involves deep cleaning the grout and then colour sealing it with a Tile Doctor Grout Colourant which are available in 11 different colours and shades. The colourant also adds a protective barrier to the grout preventing discoloration.

Porcelain Floor Tile Before Cleaning Oxford Street London Porcelain Floor Tile Before Cleaning Oxford Street London

Deep Cleaning Porcelain Floor Tiles

To start, a strong dilution of Tile Doctor Pro-Clean was sprayed onto the tile. This is a professional-grade alkaline cleaner specifically designed to lift embedded dirt, grease, and grime from tile and grout. Then after ten minutes it was scrubbed with a rotary machine fitted with a carbon brush. This worked the cleaner into the tiles and grout to break down years of built-up soil and tackled the toughest dirt removing a significant amount of grime in the process.

Porcelain Floor Tile During Cleaning Oxford Street London Porcelain Floor Tile During Cleaning Oxford Street London

There was still more to do however so to ensure a thorough clean and prepare the tiles for the next stage, the tiles were cleared again using more Pro-Clean and with a black scrubbing pad. This combination of Pro Clean and mechanical agitation safely lifted all remaining grime from the glazed porcelain without damaging the tile surface, leaving it fully prepared for the grout treatment which came next.

Grout Cleaning and Restoration

The grout did respond to the tile cleaning however it was too ingrained and stained to restore with cleaning alone. The customer did not want the inconvenience of regrouting which is messy and takes a long time so I recommended the colour seal option mentioned earlier. We find recolouring as the best option when it comes to improving grout and providing long-term protection.

Because the grout was heavily soiled, it needed 2 and some places 3 coats of white colourant to achieve a consistent and even finish across all lines. This professional-grade product recolours and seals the grout simultaneously, giving it a refreshed, uniform finish and protecting it against future staining, wear, and discoloration.

Porcelain Floor Tile After Cleaning Grout Colouring Oxford Oxford Street London Porcelain Floor Tile After Cleaning Grout Colouring Oxford Street London

The result was a revitalised back-of-house bathroom, with the porcelain tiles looking cleaner and grout lines bright, consistent, and protected. With this being a staff toilet, we were able to work during the day which isn’t always possible when working in public areas. The customer was extremely happy with the outcome, a professional, long-lasting clean that made the space look far more presentable.

For future maintenance cleaning I recommended the use of Tile Doctor Neutral Tile Cleaner, it’s a mild yet effective cleaning product that doesn’t contain anything that might impact the grout colourant.

Porcelain Floor Tile After Cleaning Grout Colouring Oxford Oxford Street London Porcelain Floor Tile After Cleaning Grout Colouring Oxford Street London


Professional Restoration of a Ceramic Tiled Bathroom in Central London W1

Bathroom Tile and Grout Renovation at Oxford Street Store London W1 Read More »

Victorian Tiled Hallway Floor Restoration Islington

Original Victorian Tiled Hallway Repaired and Restored in Islington

We recently visited a property in Islington to quote for renovating a beautiful Victorian tiled hallway floor. The client appreciated the character of the Victorian tiles but was concerned about the dirt that had accumulated over time. The tiles were original and the request was to restore the floor’s appearance and make it easier for them to maintain going forward.

Victorian Tiled Hallway Floor Before Restoration Islington

Victorian tile floors are known for their durability and were commonly installed in high-traffic areas, which is why many of them are still found in homes today more than a century later. However, over time ingrained dirt can build up within the tile surface, particularly in areas that see regular foot traffic. At this stage, normal household cleaning products are rarely effective, as they usually only remove surface dirt and cannot penetrate the deeper contamination trapped within the tiles.

Victorian Tiled Hallway Floor Before Restoration Islington

After inspecting the floor to understand all the issues we worked out a detailed quote for its renovation which was agreed and a date was set for the work to start.

Repairing and Cleaning an Original Victorian Tiled Hallway Floor

Before cleaning, we also addressed a few loose tiles. These were carefully lifted, any
debris removed, and the tiles were re-fitted securely to ensure the floor was stable
before the restoration work continued.

Victorian Tiled Hallway Floor During Repair Islington

Once the repairs had set the cleaning process started with the application of a strong dilution of Tile Doctor Pro-Clean. This is a professional alkaline tile and grout cleaner designed to break down embedded dirt, grease, and general grime. The product was given sufficient dwell time so it could work its way into the tile and grout and start breaking down the dirt before the floor was mechanically cleaned.

A rotary floor machine fitted with a diamond burnishing pad was used to work
the cleaner into the floor and release the dirt. Burnishing pads do more than simply clean, they also refine the tile surface and remove dullness caused by years of built-up residue. The dirt is pulled out of the tile into the cleaning solution turning it black in the process.

Victorian Tiled Hallway Floor During Cleaning Islington

As the cleaning progressed, the soiled cleaning solution was rinsed away and extracted with a wet vacuum. There was a lot of dirt trapped in the tiles and after several cleans using various grades of burnishing pads, I was confident we were able to remove most of the ingrained dirt. This significantly improved the appearance of the Victorian tile
leaving it looking noticeably fresher and brighter while still maintaining its original period character.

Sealing a Victorian Tiled Hallway in Islington

After the cleaning stage was completed, the floor was left to fully dry for three days
to ensure that no moisture remained before sealing. Once the floor had completely dried, Tile Doctor X-tra Seal, a high-quality impregnating sealer was applied. This product is externally rated so it’s ideal for protecting porous hallway tiles; it works by occupying the pores to prevent dirt from residing there, this ensures it remains on the surface where it can be easily cleaned away. The new sealer also lifts the appearance of the tile and will make future maintenance cleaning much easier.

Victorian Tiled Hallway Floor After Restoration Islington

The result was a much cleaner and revitalised Victorian tiled hallway floor ensuring the original charm and character of the tiles was clearly visible again. The client was very pleased with the outcome, and the floor now looks refreshed, and ready to be enjoyed for years to come.

Victorian Tiled Hallway Floor After Restoration Islington

For aftercare I recommend they use Tile Doctor Neutral Tile Cleaner, which is safe to use on sealed tiles. Many of the products you find in supermarkets are simply too strong and can remove the sealer so it’s always best to read the label before purchasing.


Professional Victorian Tiled Hallway Repair and Restoration in Islington

Original Victorian Tiled Hallway Repaired and Restored in Islington Read More »

Bathroom Metro Tile Grout Renovation Notting Hill

Renovating Grout in a Black Metro Tiled Bathroom in Notting Hill

We were called to a beautiful property in Notting Hill to restore and refresh the grout in a tiled area that had lost its vibrancy over the years. The grout lines had become discoloured and dirty, making the tiles look tired and worn. The homeowners wanted to bring back the fresh, clean look of their tiles and give their space a more modern and polished appearance.

Bathroom Tile Grout Before Grout Colouring Notting Hill

Happy to assist I was able to quickly advise them on our bathroom tile renovation service and worked out a quote for the work. Happy with the quote and keen to improve the look of the bathroom I was asked to go ahead.

Bathroom Tile Grout Before Grout Colouring Notting Hill

Cleaning and Restoring the Grout in a Tiled Bathroom

To begin, the grout lines were thoroughly cleaned to remove built-up dirt, grime, soap scum, and hard water deposits. This step is crucial for ensuring that the grout colourant adheres properly for a long-lasting finish. We used Tile Doctor Grout Colourant Pre-Treat Cleaner for this step, it’s a powerful, ready-to-use cleaner designed specifically for preparing grout. The cleaner not only removed soil and residue but also lightly etched the grout to enhance the bonding of the grout colourant.

Once the grout lines were fully cleaned and prepped, we applied a professional-grade Tile Doctor Grout Colourant. This colourant revitalizes the grout, making it look fresh and new again. The homeowner chose a neutral, modern shade that perfectly complemented the tiles and gave the space a fresh, cohesive feel. Tile Doctor Grout Colourant is available in eleven different colours, so can be colour matched to your bathroom.

Once the grout colourant had fully cured, we inspected the entire tiled area to ensure the grout lines were perfectly coloured. Any small touch-ups were done to guarantee a flawless finish. The homeowner was thrilled with the uniform, clean look of the tiles and grout.

The transformation was remarkable. The grout lines, once grey and discoloured, now had a clean, fresh appearance that restored the overall beauty of the tiled area. The grout colourant revitalized the space, giving it a uniform finish. The homeowner was delighted with the results and as the colourant forms an impermeable protective barrier over the grout it would now be much easier to maintain.

Bathroom Tile Grout After Grout Colouring Notting Hill

There is a Tile Doctor Grout Colorant kit available which comes with everything you need to colour grout including the pre-treat cleaner and grout colourant.

The tiles here were already factory sealed so did not need any sealing. We are quite often asked to replace the silicon sealant, but in this instance, it was not required.

Bathroom Tile Grout After Grout Colouring Notting Hill


Professional Restoration of a Ceramic Tiled Bathroom in Derbyshire

Renovating Grout in a Black Metro Tiled Bathroom in Notting Hill Read More »
Dull Marble Bar Top Polishing Mayfair

Dull and Marked Marble Bar Top Polished at a Mayfair Night Club

We received a request from a prestigious private members’ club in Mayfair to restore a Marble bar top, which was dull and had been left extensively stained with use. Once a stunning centrepiece, the surface had lost its natural sheen and elegance and no longer reflected the grand nature of the establishment.

Dull Marble Bar Top Before Polishing Mayfair Club

The club wanted it revived to the high standards expected of such a refined setting and wanted our opinion on what could be done to bring the Marble back to life. Tile Doctor have developed numerous products and methods for dealing with all sorts of Tile, Stone and Grout issues and having worked on Marble worktops before I was confident of producing a good result.

Marked Marble Bar Top Before Polishing Mayfair Club

Cleaning and Polishing Damaged Marble Bar Top

The first and most critical step was to conduct a deep clean to remove ingrained dirt, residues, and the effects of unsuitable cleaning products that had etched into the stone over time. To do this Tile Doctor Pro-Clean was applied to the Marble top and left to soak in for ten minutes. This product is an alkaline, multi-purpose cleaner, stripper and degreaser designed specifically for cleaning natural stone surfaces like Marble.

The Pro -Clean was then scrubbed in lightly by hand with a focus on removing alcohol residues, oils and other dirt from the surface before moving on to the next step of honing the stone. The Pro-Clean was wiped away and the surface rinsed with water to remove any remaining residues.

Once the surface was free of dirt and contamination, we moved to the honing stage which further cleans and polishes the stone. We use a set of diamond-encrusted burnishing pads of varying grits for this which slowly and methodically restore a deep shine to the Marble. Work starts with a coarse 400-grit pad that gradually erases scratches, scuff marks, and imperfections that had built up over time. For a Bar Top like this we use smaller 6-inch pads fitted to a rotary hand buffer.

The diamond abrasives are extremely effective at smoothing out the surface while maintaining the integrity of the stone. The grit progression—from coarse to fine—helps refine the surface to a smooth, reflective state, gently bringing the natural polish back without causing further damage.

Sealing a Polished Marble Bar Top

Naturally the management wanted the polished appearance to last as long as possible so the next step was to apply Tile Doctor Shine Powder which adds a deep durable shine. This polishing powder is designed to restore the natural gloss of marble and smooth out surface imperfections. It effectively erased the dull spots caused by alcohol spills, ensuring a smooth, glossy finish and bringing the marble back to its original shine.

With the marble now looking beautifully smooth and polished the last step was to apply a sealer to the stone to protect against stains and spillages. The best product for this was Tile Doctor X-Tra Seal which is an impregnator that soaks in to the stone adding protection from within. It’s externally rates so ideal for surfaces that are often wet and offers a premium high-performance protective seal that will keep the Marble looking beautiful for many years to come.

Dull Marble Bar Top After Polishing Mayfair Club

The result was nothing short of stunning. What was once a damaged stone surface is now a gleaming Marble showpiece that perfectly complements the club’s sophisticated, high-end interior.

The restoration process, though time-consuming and intricate, was well worth it and was completed in time for opening later that day. The owner was thrilled with the transformation, and the Marble bar top once again stood proudly as a focal point in the club.

For aftercare I recommended Tile Doctor Stone Patina Spray which is a spray and buff cleaner that is designed to enhance the natural beauty and lustre of polished stone worktops.


Professional Polishing of a Marble Bar Top in Central London

Dull and Marked Marble Bar Top Polished at a Mayfair Night Club Read More »

Bleach Stained Multicoloured Sandstone Patio Renovation Little Venice

Bleach Discoloured Sandstone Patio Renovated in Little Venice

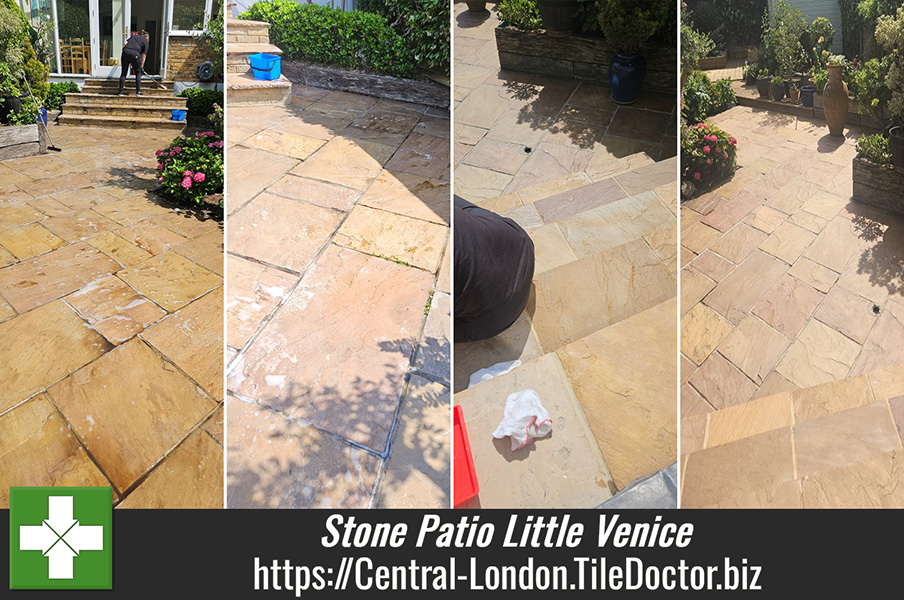
Earlier this year the owner of this Sandstone patio at a property in Little Venice wanted to spruce up the stone ready for summer and so cleaned it with bleach. Unfortunately, the sandstone flagstones didn’t respond as expected and became discoloured leaving them in a worse condition.

Multicoloured Sandstone Patio During Cleaning Little Venice

This was a real shame as these Sandstone pavers were of the multicoloured variety which are really lovely and usually full of colour and character. Fortunately, I was able to re-assure the owner that natural stone is a very forgiving material and I was confident of restoring the beauty to the patio. I worked out a detailed quote for the work which included materials which was accepted. The weather was excellent back then, so it wasn’t long before I was able to return to work on the patio.

Cleaning a Multicoloured Sandstone Tiled Patio

The owner had already done a reasonable job of removing dirt and algae from the stone, so we were able to move straight onto making sure it was free of any previous protective coatings. To do this I used a strong dilution of Tile Doctor Remove and Go which was left to soak into the stone for ten minutes before being worked in with a black scrubbing pad fitted to a rotary machine. It was clear to me some sort of topical sealer had been used in the past, and it took a while with several re-applications to make sure all of it was removed.

Multicoloured Sandstone Patio During Cleaning Little Venice

During the various stages of cleaning and scrubbing the patio was being rinsed with water to remove the soiling which was extracted with a wet vacuum. Once finished the patio was inspected and any stubborn areas spot cleaned with Tile Doctor Pro-Clean. Once done the patio and mortar looked really clean but all that scrubbing and cleaning had removed all the colour from the stone turning it almost grey. I wasn’t worried about that though as I knew the new sealer would put the colour back in the stone.

A lot of water was used during the cleaning so after that was complete the patio was left to dry off in the baking sun.

Sealing a Multicoloured Sandstone Tiled Patio

On our return the Sandstone was tested with a moisture meter to confirm it was dry and then sealed with a coat of Tile Doctor X-Tra Seal which is an oil-based impregnating sealer that soaks into the stone to protect it from within. The oil content of the sealer also does a great job of putting the life back into the stone and bringing out the colours.

Multicoloured Sandstone Patio During Sealing Little Venice

Once complete the patio looked fantastic and the owner was super excited about the new look. With the Patio being sealed I warned the client about using bleach again to clean to stone as this would damage the sealer, however I don’t think this is likely to happen again. Instead, I recommended using Tile Doctor Neutral Tile Cleaner which is a mild yet effective product that won’t impact the sealer.

Multicoloured Sandstone Patio After Renovation Little Venice


Professional Restoration of a Multicoloured Sandstone Patio in London

Bleach Discoloured Sandstone Patio Renovated in Little Venice Read More »

Scroll to Top