Author name: Jackson Davis

Covering Central London, Jackson Davis is your local specialist for tile cleaning, stone cleaning, grout cleaning and tile, stone and grout sealing covering the restoration of all types of stone and tiled flooring including Ceramic, Limestone, Marble, Porcelain, Quarry, Sandstone, Slate, Terracotta, Terrazzo, Travertine and Victorian tile

Limestone Kitchen Floor Renovation Marylebone

Gruby Limestone Kitchen Floor Renovated in Marylebone

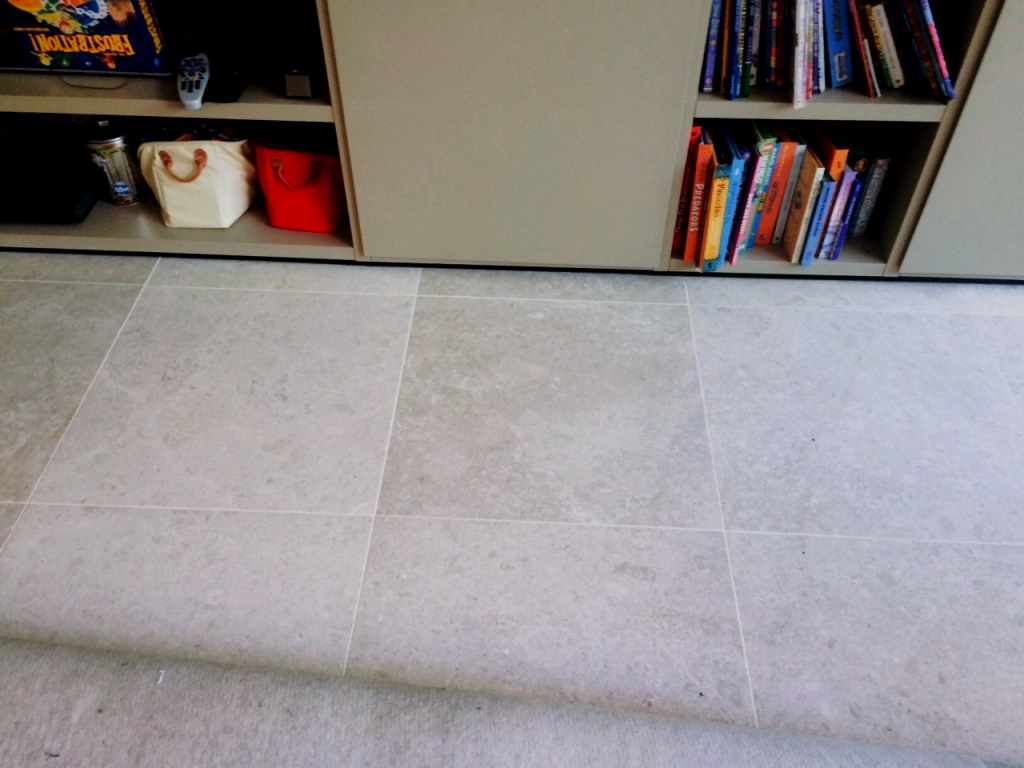
The pictures below are of a Limestone tiled kitchen floor at a property just off Marylebone High Street in Central London. My client has a dog, and years of walking back from Regents Park through West London streets back into the kitchen floor has led to it becoming very dirty.

Over the year the sealer had worn down and this had allowed dirt to become lodged in the natural pits that are common with Limestone. The dirt had then become ingrained in the stone turning it black in places and resulting in a very undesirable appearance. The other problem that can play a part here is dog urine which is naturally acidic (uric acid) and can weaken a sealer.

Limestone Kitchen Floor Marylebone Before Cleaning

As usual I arranged a visit to the property to survey the floor and work out which method and products would be best for renovating it. From that I was able to work out an accurate quote for its renovation and later I emailed a quotation across to my client which was accepted.

Cleaning a Limestone Tiled Kitchen Floor

To get the floor clean I started by spraying a strong dilution of Tile Doctor Pro-Clean onto the Limestone tile and grout and left it to soak in for ten minutes to give it time to break down the dirt. Then the floor was thoroughly scrubbed with a rotary floor buffer fitted with a poly brush, this was followed up with hand scrubbing with Tile Doctor Pro-Clean along the grout lines. The floor was then rinsed with water and all the soiling extracted with a wet vacuum.

To further refine the appearance of the limestone a 400-grit diamond encrusted burnishing pad was run over each tile using water to lubricate. After another rinse and extraction with the wet vacuum the process was repeated with the finer 800-grit pad. My client didn’t want a high shine, so I finished on the 800-grit pad and gave the floor another rinse.

Sealing a Limestone Tiled Kitchen Floor

The floor was left to dry off overnight and the next day I returned and dry burnished the floor with a 3000-grit pad to improve its appearance even further. Dry burnishing is done using only a few drops of water and leaves the floor completely dry and ready for sealing.

To protect the now clean Limestone tile and grout from ingrained dirt it was sealed using Tile Doctor Colour Grow sealer which is an impregnating sealer containing a colour enhancing formula. A couple of coats were applied allowing thirty minutes of drying time between each coat. Impregnators work by occupying the pores within the stone thereby preventing dirt from taking up residence there.

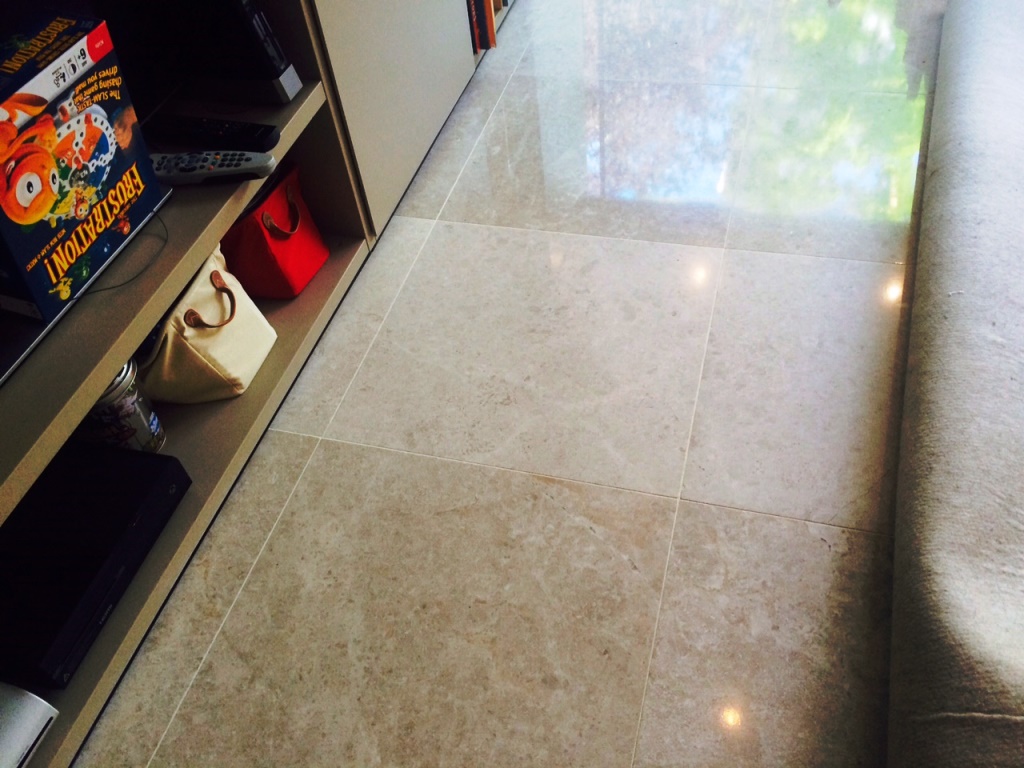
Limestone Kitchen Floor Marylebone After Renovation

The client was very happy with the work we carried out. We recommended the use of Tile Doctor Neutral Tile Cleaner which is pH neutral and will help maintain the floor and the newly applied sealant, it is mild enough to use daily, so will keep those muddy paw prints at bay!


Professional Renovation of a Limestone Tiled Kitchen in Central London

Gruby Limestone Kitchen Floor Renovated in Marylebone Read More »

Quarry Tiled Balcony Renovation Notting Hill W11

Quarry Tiled Balcony Patio Renovated for Notting Hill Landlord

The Quarry tiles in the photographs below were actually installed on the balcony of a flat in London’s famous Notting Hill W11. The property had been rented out and not surprisingly never maintained properly by the tenants.

Quarry Tiled Balcony Patio Before Cleaning Notting Hill W11

There was a lot of grime and algae on the tiles which made the patio look very uninviting. The landlord was keen to rent out the flat as soon as possible and the balcony needed a end of tenancy clean to sort it out before potential tenants were shown round.

Deep Cleaning a Quarry Tiled Balcony Patio Floor

Having been entrusted with the keys and having negotiated appropriate parking I went round on a warm day to renovate the tiles and get them in the best condition possible in advance of the viewing. Fortunately, the lift was working so after a couple of trips up and down with various items of equipment I was soon setup and ready to get going.

To get the quarry tiles clean I used a strong treatment of Tile Doctor Remove and Go which was sprayed onto the tiles and left to soak in for fifteen minutes to allow time for the solution to get to work breaking down the dirt and old sealers. Then, I ran over each tile multiple times with a floor buffer fitted with a Black scrubbing pad. I also used a stiff brush along the grout lines to get them clean, however, the staining was bad so short of grout colouring or re-grouting I was only able to make a modest improvement. The landlord just wanted the balcony to be presentable, so I stuck to getting them as clean as possible.

Once finished cleaning the now dirty cleaning solution was rinsed off with water and extracted using a wet vacuum. I was then able to inspect the floor and carry out spot cleaning where I felt more work was needed. One of the problems I found was the presence of limescale and to remove that I realised I needed to use an acidic product that would dissolve it.

To treat the limescale I gave the floor a second clean using Tile Doctor Acid Gel which was scrubbed in with handheld brushes and another fresh black pad. Once done, the tiles were rinsed again, and a wet vacuum was employed to get the tiles as dry as possible. Fortunately, the sun came around that side of the building towards the afternoon and the patio was bathed in sunlight allowing it to dry faster.

Sealing a Quarry Tiled Balcony Patio Floor

The quarry tiles needed to be completely dry before I could seal them and with the weather forecast looking good overnight and into the next day so I left them to dry off completely overnight.

The next day I returned and started by checking the tiles were dry using a damp meter. The readings were good, so I was able to start with the application of a protective sealer which for these tiles I used Tile Doctor Colour Grow.

Only a couple of coats were required however it is quite time consuming, and you have to wait 30 minutes between coats. This sealer has a breathable formula which is well suited for use on this patio, and it contains a colour enhancer which helps to bring out the colours in the Quarry tile.

Quarry Tiled Balcony Patio After Cleaning Sealing Notting Hill W11

For the regular cleaning of sealed Quarry tiles, I recommend Tile Doctor Neutral Clean which is supplied in a concentrate so a 1 litre bottle goes a long way. You can’t use strong cleaning products on sealed tiles as they will prematurely erode the sealer so Neutral Cleaner is an ideal choice.


Professional Renovation of Balcony Quarry Tiles in Central London

Quarry Tiled Balcony Patio Renovated for Notting Hill Landlord Read More »

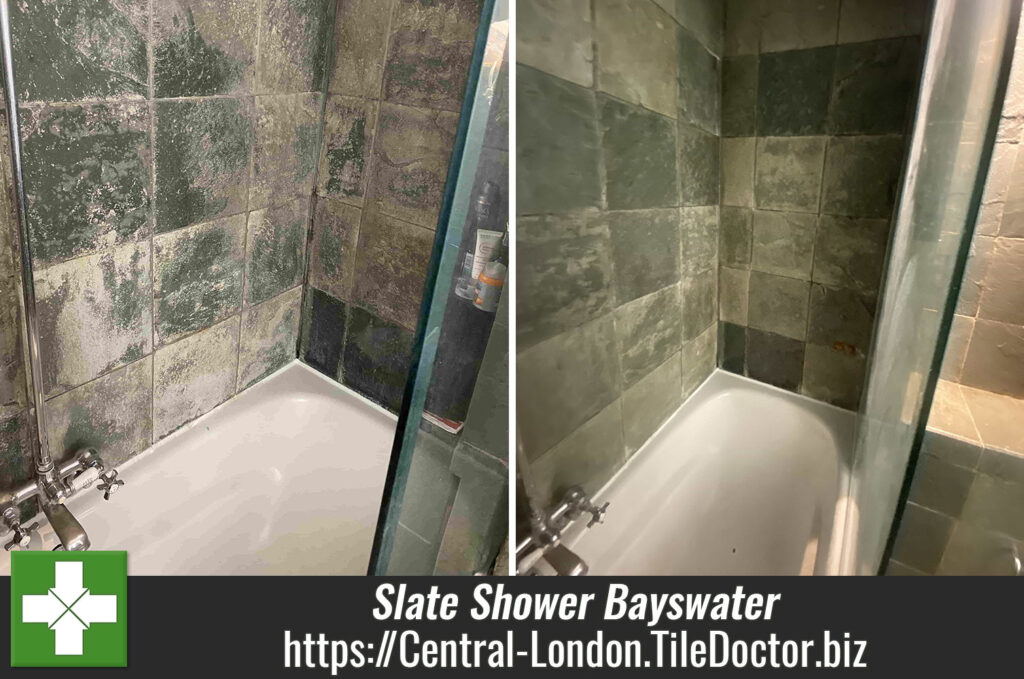
Limsescale Stained Slate Shower Renovation Bayswater W2

Limescale Stained Slate Tiled Shower renovated in Bayswater W2

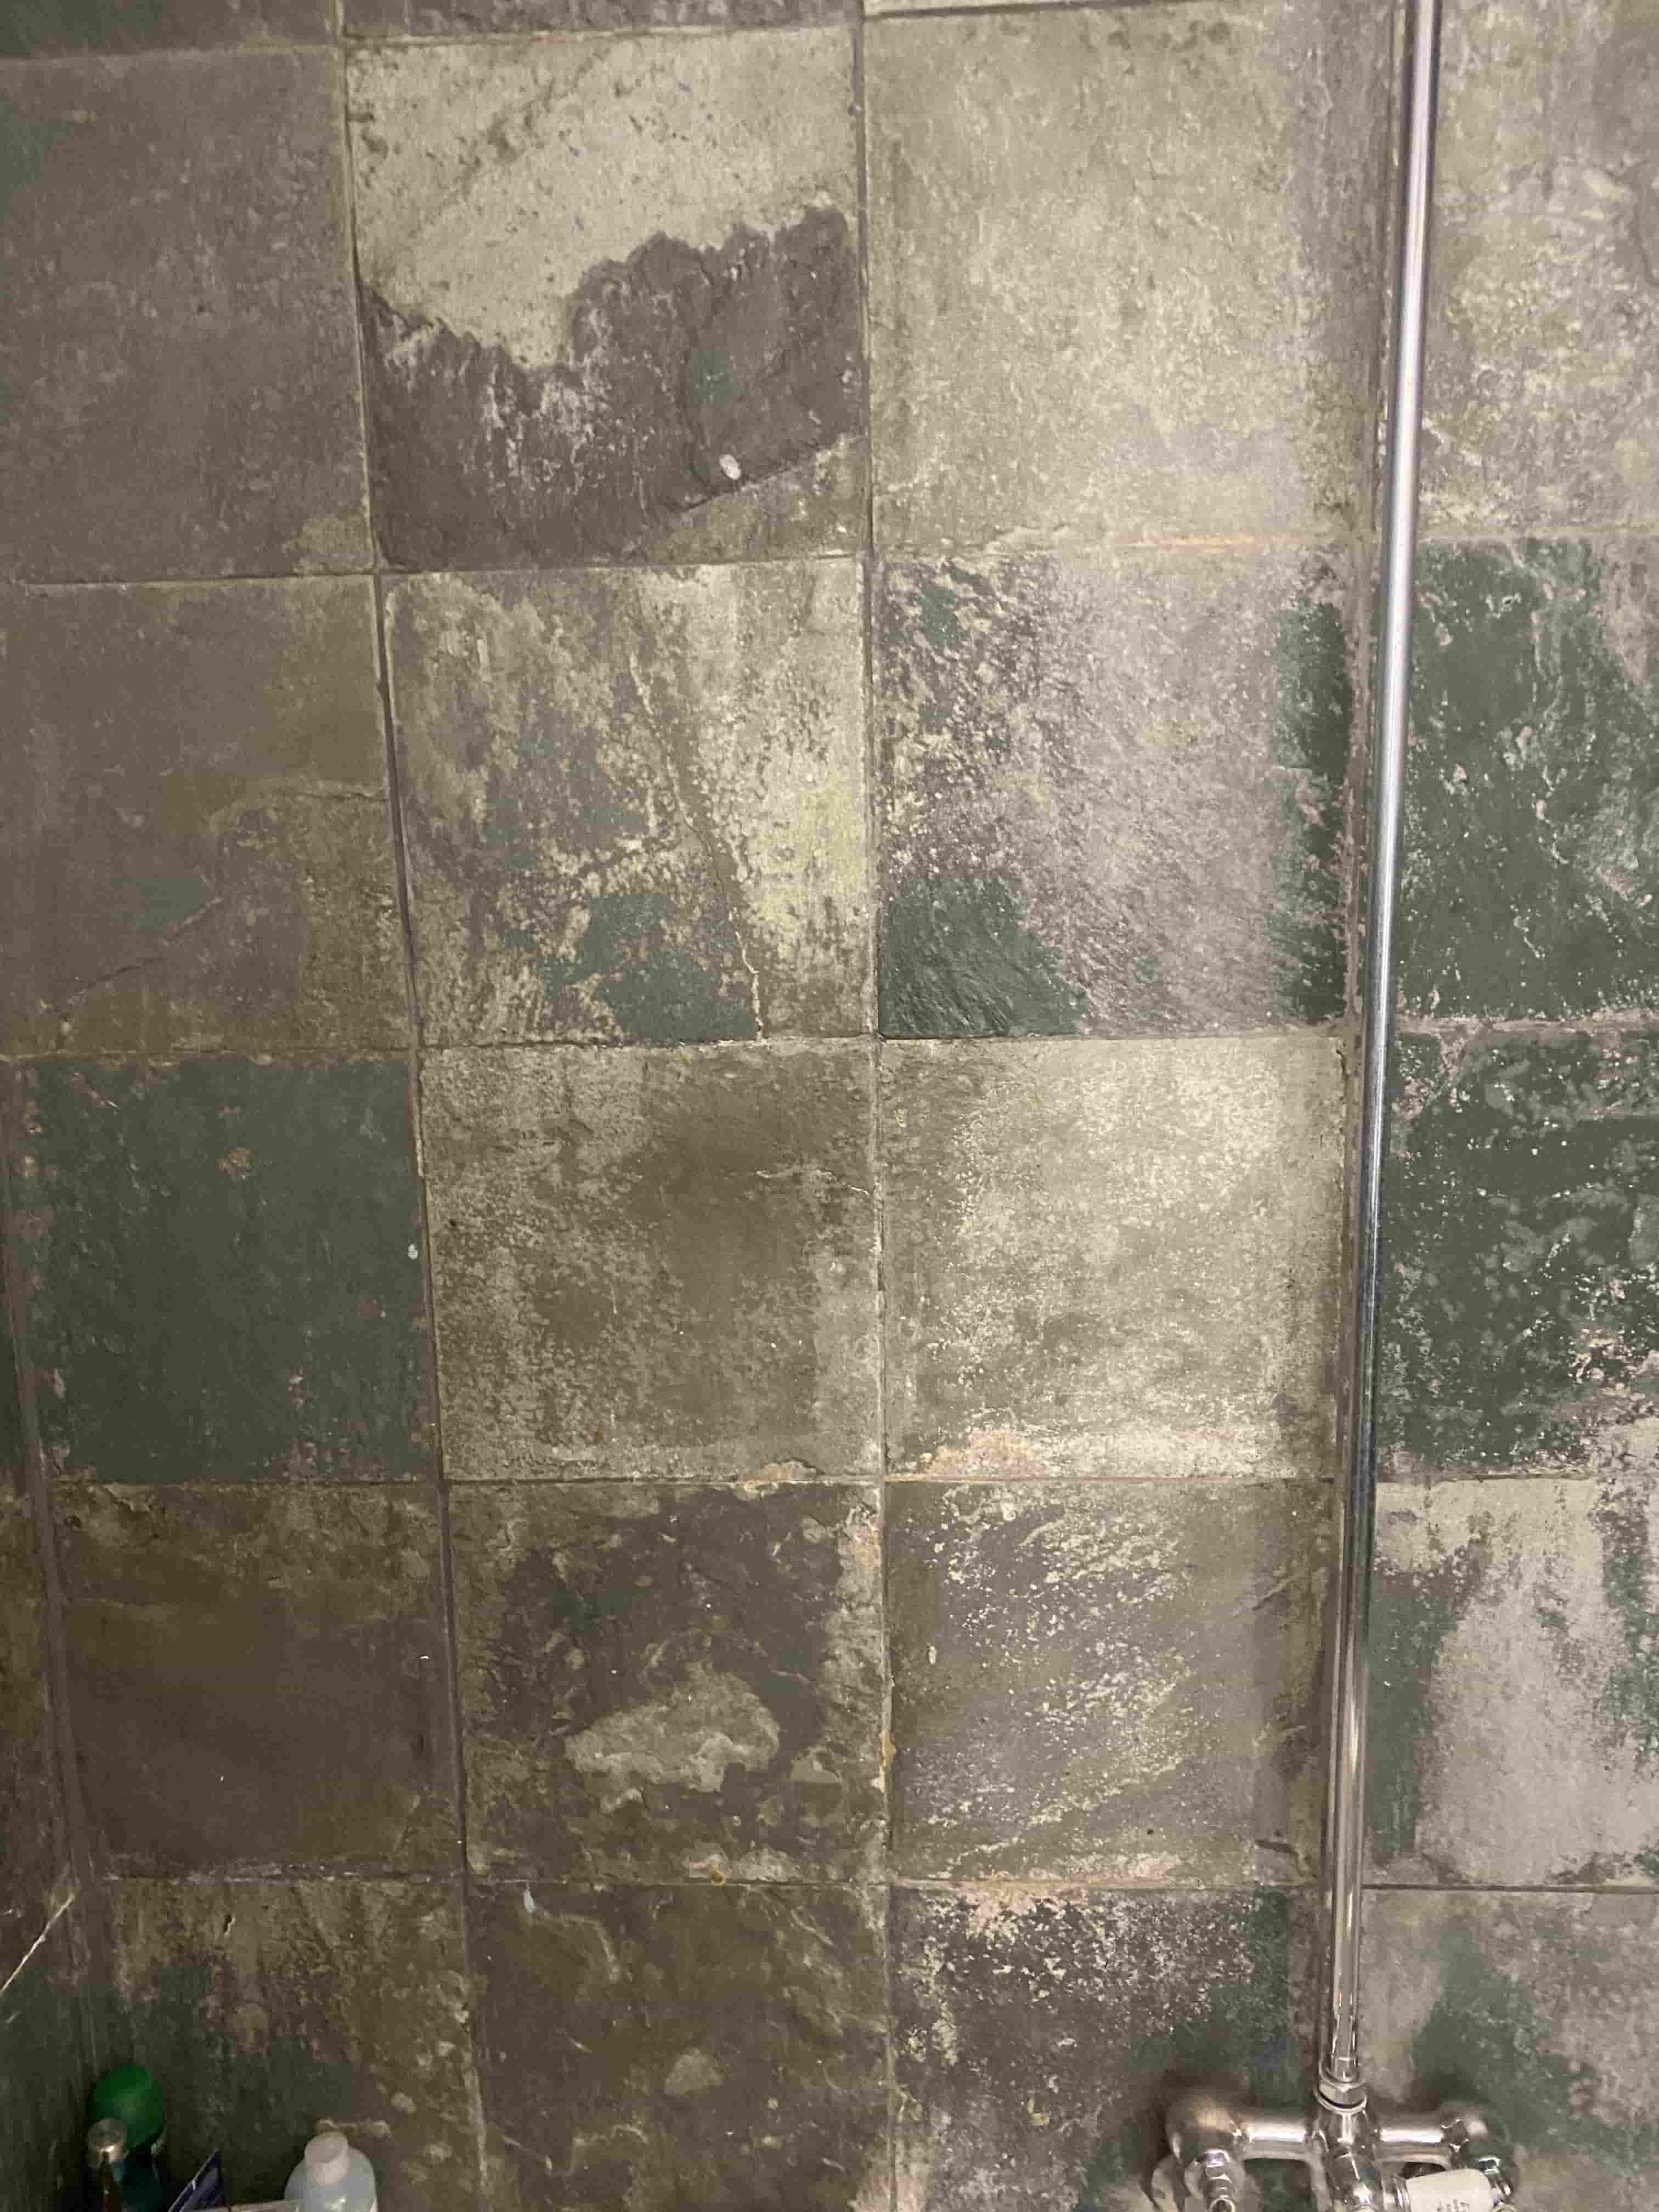
My client had rented their property in Bayswater out while they were working abroad for a year or so; on their return they discovered the tenants had not looked after it properly and had allowed lots of limescale to build up on the Slate shower tiles. The staining was so bad It was putting them off using the shower and they were very disappointed that the tenants had not taken more care.

Limescale Stained Slate Shower Before Renovation Bayswater W2

London is a hard water area which basically means the water contains a high level of calcium and magnesium which is results in limescale deposits. Thankfully Tile Doctor has several solutions for this problem including the use of acidic cleaning products. You do have to be careful with these however as some types of stone can be etched by these making the problem worse.

Limescale Stained Slate Shower Before Renovation Bayswater W2

I made an initial visit to work out the best approach to resolve the Limescale and provided a written quote to do the work. The quote was accepted and a date arranged to carry out the work.

Removing Limescale from Slate Shower Tiles

The first step in the renovation was to decant a strong dilution of Tile Doctor Remove and Go into a spray bottle and spray it onto the shower wall. Combining the product with air makes it stick better to vertical surfaces where it can dwell and break down old sealers and general dirt. This was worked into the tile using a stiff brush and then rinsed off.

Next Tile Doctor Acid Gel was applied to the tiles and worked in with a stiff brush to remove the ingrained limescale. Gel products are ideal for cleaning wall tiles as they stick to the tiles easily. Once done the slurry was rinsed off again.

At this point the stone was looking clean and free of limescale and old sealers but was still looking very unappealing. To bring back the appearance of the slate it needed resurfacing with a set of coarse diamond pads. To do this I started with the application of a very coarse 6-inch 100-grit pad fitted to a handheld buffer and lubricated with water. After rinsing away the slurry that had been generated, I changed pads to the 200-grit and repeated the process, finally moving onto a 400-grit pad. One last rinse and the tiles were left to dry out.

Sealing Slate Shower Tiles

Once the tiles were all dried out, I applied a single coat of Tile Doctor X-Tra Seal. This is a breathable impregnating sealer that soaks into the stone and being oil based adds colour and improves appearance. It’s a good idea to seal Slate used in a shower as it adds water repellency and stain protection. One coat revived the colour of the tiles, in this instance a second coat was not needed, but if applied it would have added a subtle sheen finish.

Limescale Stained Slate Shower After Renovation Bayswater W2

There was a lot of work to do, however, I managed to complete the whole area in a single but very long day. Once completed however the slate tiles looked transformed so it was well worth the effort. Certainly, my client was very happy with the work we had completed and now felt happy to use the shower again!

For aftercare cleaning it’s important not to use strong chemical cleaning products on sealed stone as they will strip off the sealer. So, I recommended the use of Tile Doctor Aqua-Pro for cleaning. This tile cleaning product is pH neutral so mild enough to use every day which will help keep the limescale and grime at bay. It has a pleasant fragrance and with a trigger spray it is easy to use for both all the family and indeed the new tenants if they go down this route again.


Professional Restoration of Limescale Stained Slate Shower Tiles in London

Limescale Stained Slate Tiled Shower renovated in Bayswater W2 Read More »

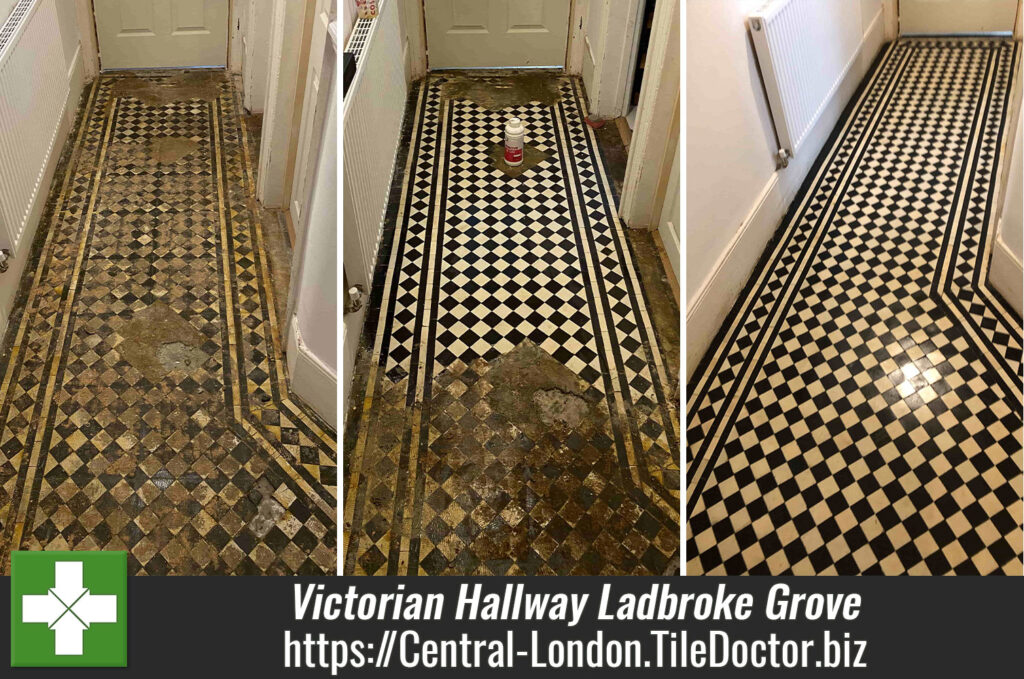
Victorian Tiled Hallway Floor Restored Ladbroke Grove

Black and White Victorian Hallway Restoration in Ladbroke Grove

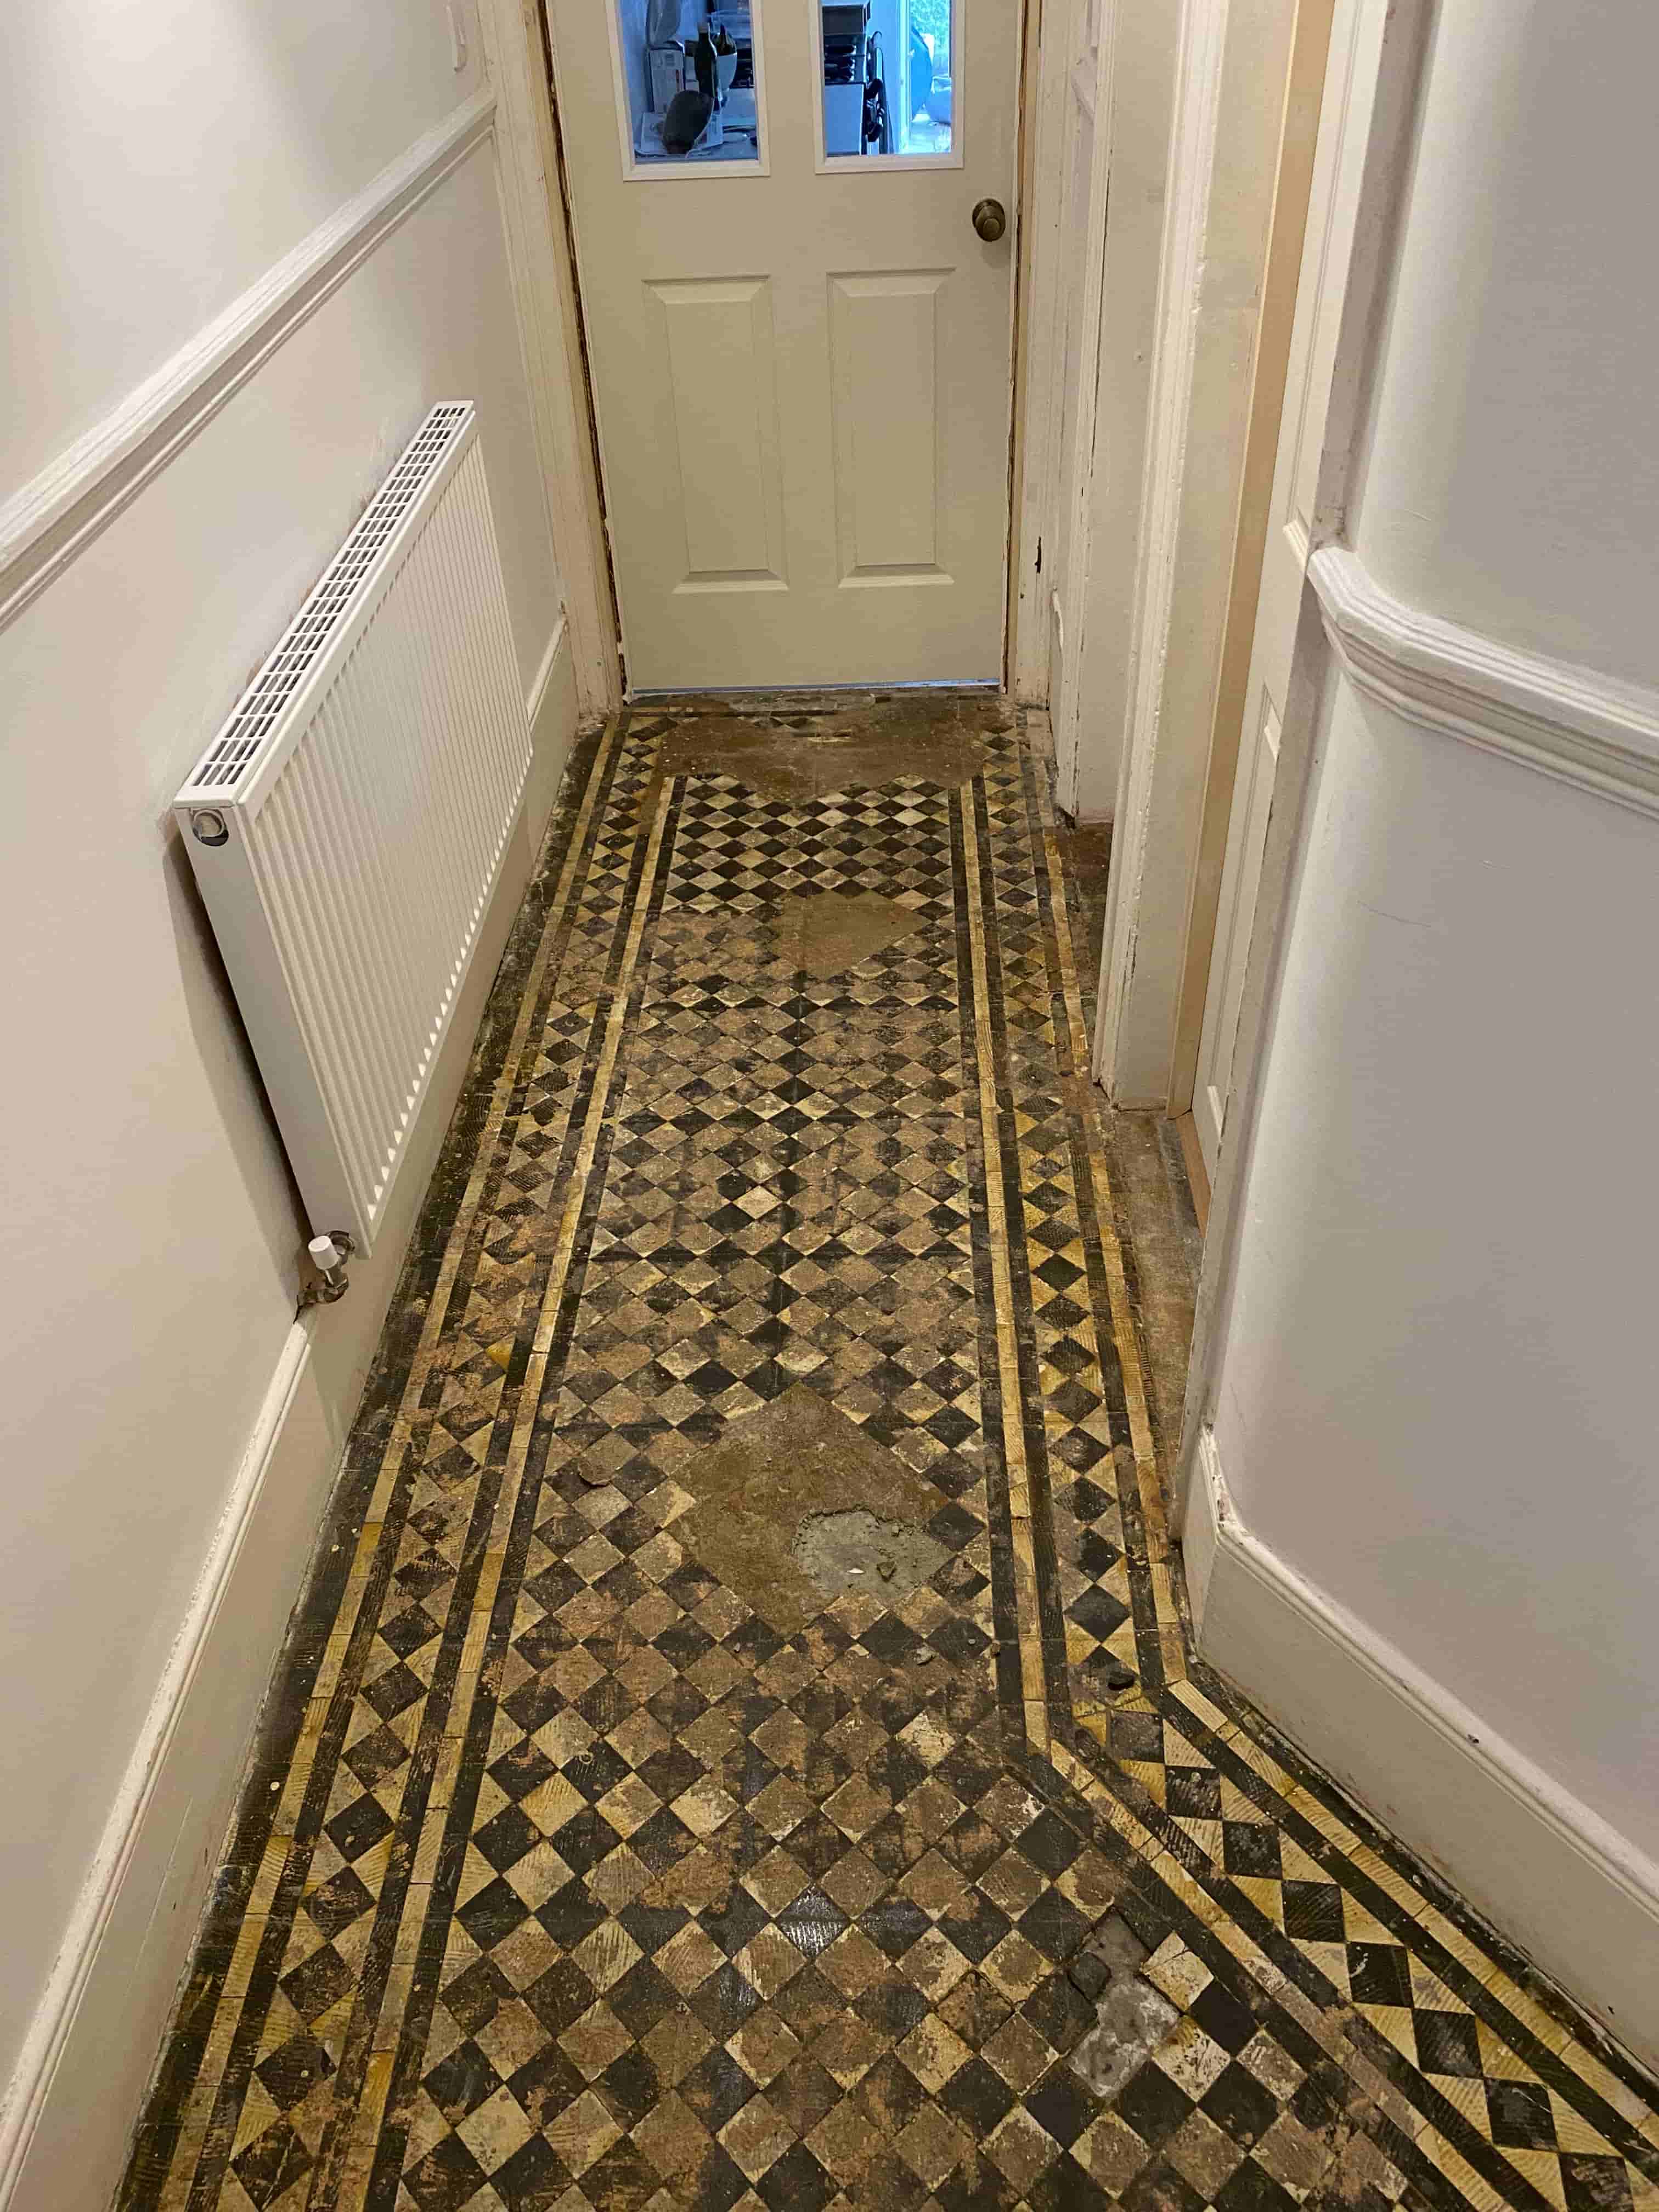
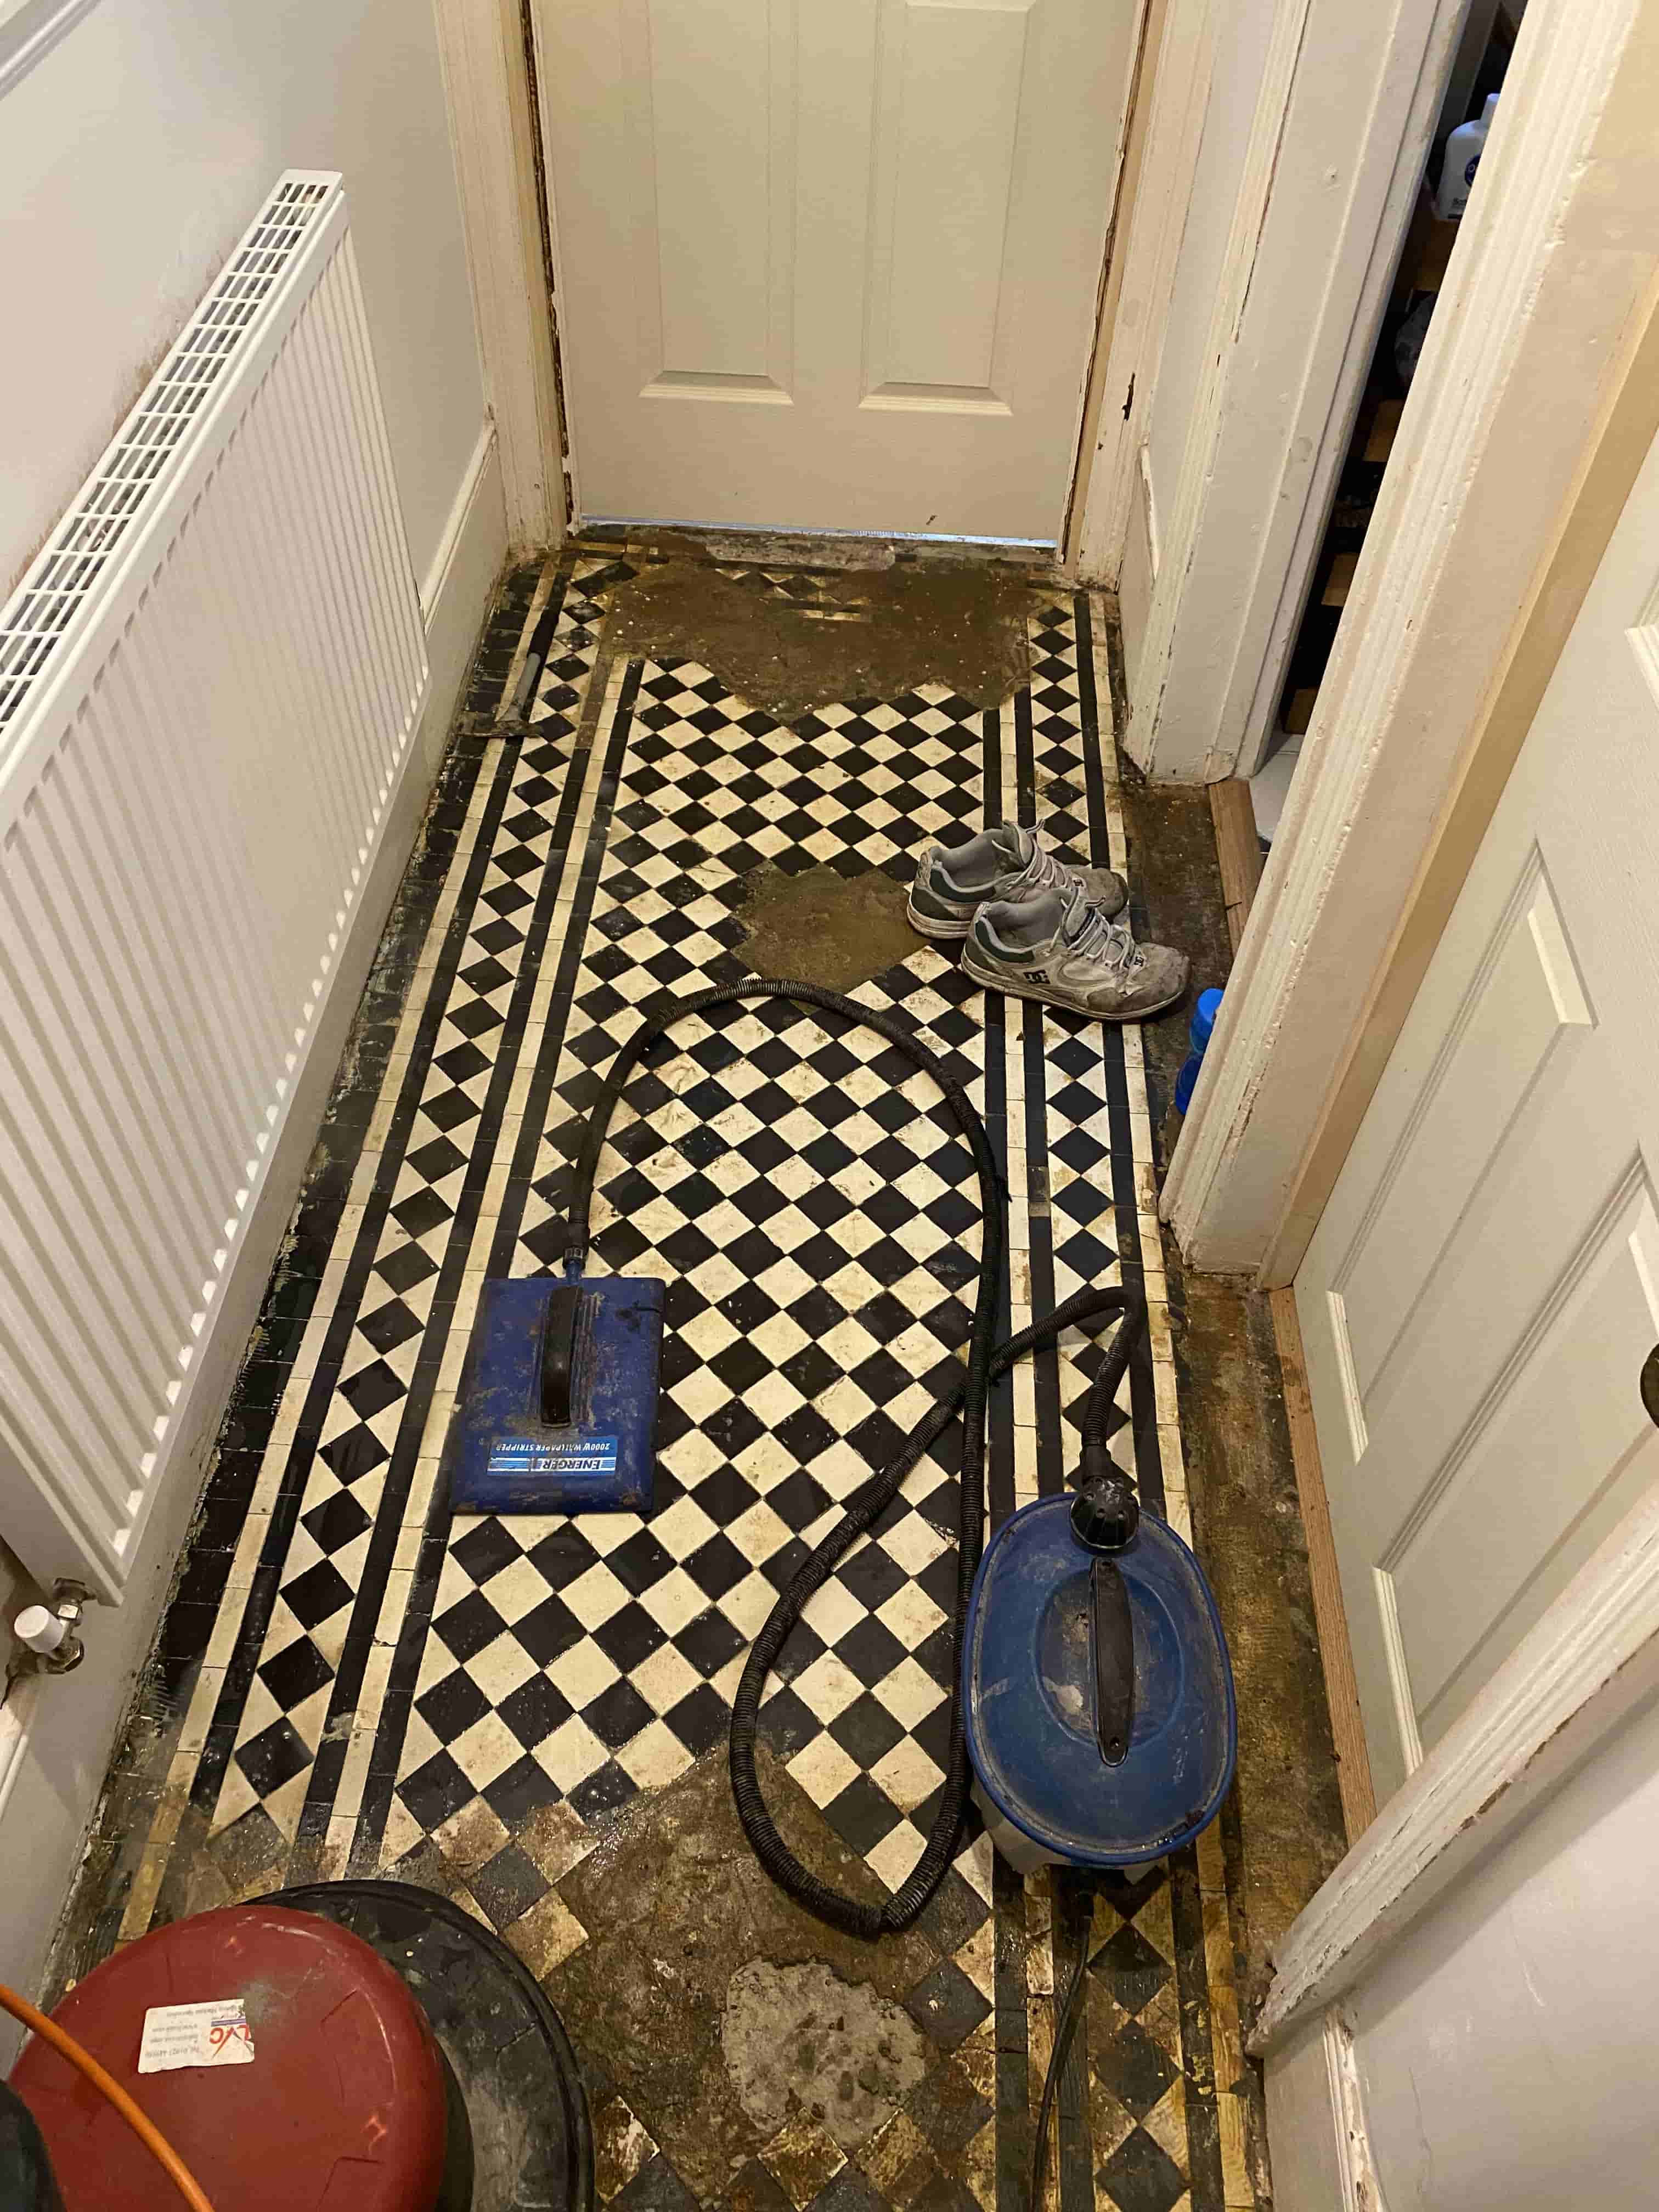
This property was in theLadbroke Grove area of West London near Kensington. The client had found an old and probably original black and white checkered pattern Victorian tiled floor under their cork tiled flooring. They also reported that it was badly damaged so I thought it would be best if I paid them a visit first to see how extensive the damage was and whether it was repairable. The floor was in a quite a state, the tiles were covered in glue from the cork and had several areas had been back filled with cement.

Black White Victorian Hallway Floor Before Restoration Ladbroke Grove

I reassured them that the damage could be rectified, and that it would be possible to completely restore the floor back to a good standard. I would have to remove the glue, remove the cement that had been used to level the floor and replace with reclaimed tiles to match. They were relieved to find out it could be done and happy with my quote I was instructed to go ahead with the work.

Black White Victorian Hallway Floor Before Restoration Ladbroke Grove

Removing Glue from a Victorian Tiled Hallway Floor

We started by taping up the skirting boards to protect the woodwork. With this done attention was turned to the glue which was softened using a strong dilution of Tile Doctor Remove and Go so it could be carefully scraped off. Multiple techniques and tools were needed to remove the glue including hand-held scrappers and a black pad fitted to a buffing machine. For the stubborn areas steam was applied to help lift the adhesive out the tile.

Black White Victorian Hallway Floor During Restoration Ladbroke Grove

Once all the glue was removed the floor was rinsed and the alkaline cleaner neutralised with Tile Doctor Grout Clean Up which further cleaned the tiles and removed old traces of grout from the floor. Old floors like this generally don’t have a damp proof membrane underneath so the acids in the Grout Clean-up also counter any efflorescent salts trapped in the tile.

Black White Victorian Hallway Floor During Restoration Ladbroke Grove

Once this was completed the slurry was removed with a wet vacuum and left to fully dry out overnight.

Repairing a Victorian Tiled Hallway Floor

The following day focus turned to repairing the areas of the floor where the tiles were missing or broken. The main issue being the cemented areas, we see this a lot with Victorian Hallways and generally what happens is a heating engineer digs out the floor to install pipework. Not being tilers, your average plumber then repairs the floor with a self-levelling cement that brings the level up to the surface of the tile so it can be covered with lino, carpet of in this case cork.

The sub floor was then rebuilt with rapid setting self-levelling compound but this time to below the level of the tile.

Once the new base was dry it was a just a question of re-tiling with the replacement tiles to match the original checkered pattern. The replacement reproduction tiles were sourced from Original Features in Crouch End North London. After grouting we left the floor to dry out over the weekend.

Sealing a Victorian Tiled Hallway Floor

When we returned to seal the floor our first step was to check the floor was dry using a moisture meter. This is critical as the sealant will not cure correctly if there is too much moisture in the floor. In this case the extra two days we had allowed had done its job and the test had confirmed it was ready to accept a sealer.

The client wanted the floor finish not to be too shiny once sealed so we opted to seal with two coats of Tile Doctor Seal and Go Extra. This is good choice for old Victorian floors such as this example as it’s special acrylic-based formula allows for moisture vapour transmission which as mentioned previously is a concern where no damp proof membrane has been installed.

Black White Victorian Hallway After Restoration Ladbroke Grove

I’m please to confirm my clients were delighted with the result, as you can see from the pictures the black and white floor restoration makes for a dramatic entrance well in keeping with the style of the property. For aftercare I recommended the use of Tile Doctor Neutral Tile Cleaner which will keep the tiles in good condition going forward without damaging the new sealer.

Black White Victorian Hallway fter Restoration Ladbroke Grove


Professional Restoration of a Victorian Tiled Hallway in Central London

Black and White Victorian Hallway Restoration in Ladbroke Grove Read More »

Slate Wall Tiled Bathroom Restoration Maida Vale

Slate Shower Wall Refurbished in Maida Vale W9 London

The photographs below are from a bathroom in Maida Vale W9 which had a lovely Slate tiled wall over a bath with shower. Unfortunately, the Slate tiles had been ruined by the use of harsh cleaning chemicals in an attempt to remove the limescale caused by hard water. The slate had now lost all its natural colour and looked completely washed out. The property had recently changed hands and the new owner was keen to have it renovated.

Slate Shower Before Refurb Maida Vale London

I went over to take a look and work out a solution, this in itself is a lot trickier these days with all the COVID precautions we need to take when working in someone’s house. It was clear that a strong acidic limescale remover had been used on the slate and this had etched the stone, leached all the natural oils away and generally ruined its appearance.

Fortunately, we have a solution for this (see below) and after conducting a small test I was able to confirm the problem could be resolved and gave them a quote which included a day’s labour, abrasive pads, stone oil and sealer. Our quote was gratefully accepted, and we booked a time in to carry out the work.

Cleaning a Slate Tiled Bathroom

I returned to the property and I set about burnishing the slate wall tiles using a very coarse 200-grit six-inch burnishing pad fitted to a handheld buffing machine. This process resurfaces the stone slightly to remove the etching caused by the limescale remover. I used a medium dilution of Tile Doctor Grout Clean-up to lubricate the process and to remove the remaining limescale. Once done the slurry that is generated is rinsed off with more water. In a bathroom, it is easy the slurry can just be drained away. In other areas we would use a wet vacuum.

After the 200-grit pad the surface of the Slate was further refined using a 400-grit pad and then an 800-grit pad, this time only using water and giving the stone a thorough rinse after each pad to remove the soil.

The slate was then left to dry off over lunch and given more encouragement with a heat gun afterwards so I could move onto the next step. This involved applying a coat of Tile Doctor Stone Oil which puts back the natural oils back into the stone improving its appearance.

Sealing a Slate Tiled Bathroom

Once the Stone Oil had fully dried, I moved onto sealing for which I applied two coats of Tile Doctor Ultra-Seal; this is penetrating sealer that soaks into the stone to provide maximum stain protection without changing the colour of the stone. It is also an excellent grout sealer which is a bonus.

Slate Shower After Refurb Maida Vale London

Before leaving I talked the client about how best to maintain the Slate and left them a complimentary bottle of Tile Doctor Aqua Pro tile cleaner which will help keep the limescale at bay. It is gentle enough to use every day but will help prevent the previous build-up and unlike the previous products used will not damage the newly applied sealer.


Professional Restoration of a Slate Tiled Bathroom in Central London

Slate Shower Wall Refurbished in Maida Vale W9 London Read More »

Large Limestone Floor Before After Polishing Hammersmith

Limestone Floor Cleaned and Polished in Hammersmith

Recently I paid a visit to a customer in Hammersmith whose whole ground floor was covered in Limestone tiles. It was a nicely situated Victorian house, but the Limestone floor was a big concern for the owner. The floor had been installed during a house renovation approximately seven years earlier and hadn’t been treated since. The Limestone was now looking dull and in need of a renovation to bring back the polished appearance.

Limestone Floor Before Polishing in Hammersmith
Limestone was used throughout the property including the Hallway and Kitchen which are typically the busiest area’s and so not surprisingly they had seen the biggest build-up of soiling. This is not an unusual situation for stone floors which will trap dirt in the pores of the stone once the sealer wears off. Sealer wear is inevitable and will usually last between three to five years depending on use and what is used to clean the floor.

Limestone Floor Before Polishing in Hammersmith
I explained the process of renovating and honing the Limestone and bringing back its appearance, after agreeing on details we chose the dates. The job was scheduled for 3 days to be completed.

Cleaning Limestone Floor Tile and Grout

When we arrived on the first day, we set about covering the skirting boards and furniture, to protect from any splashes. Then starting in the Kitchen and Dining area the first phase involved giving the floor an initial clean using a strong dilution of Tile Doctor Pro-Clean. The primary focus was on the grout lines which were hand scrubbed using a stiff grout brush.

Then the solution was spread all over the tiles and left for approximately ten minutes to allow it to soak into the pores of the stone and break down the dirt and what was left of the old sealer. I used a black scrubbing pad fitted to a rotary machine to work the solution into the floor. Then the floor was then carefully rinsed, and the soil extracted with a vacuum.

The floor was already showing improvement when I moved onto phase two which reconditions the stone using a set of diamond encrusted Burnishing Pads. There are four pads in the set, each one with a different grit from coarse 400-grit through to extra fine 3000-grit. I started with the 400 grit, followed by 800, 1500, 3000 grit to bring back the shine. Water is used to lubricate the process and the floor is rinsed well after each step to remove the fine slurry generated. At the end of the first day the Kitching and Dining section looked really good in comparison to the untouched areas and I hadn’t applied the sealer yet.

Sealing Limestone Floor Tiles

On the second day we started on the Limestone floor in the Hallway using the same technique as before. Being a smaller area, it didn’t take as long to complete, and we were able to make a start on applying a fresh sealer to the floor we cleaned the day before.
Underfloor heating was installed, and this is useful for helping to dry a wet floor however I don’t like to use it when sealing and I asked the owner to switch it off. In my experience you get a better result if the sealer is allowed to dry and cure naturally.

For this floor I used Tile Doctor Colour Grow, Limestone is a light stone and Colour Grow really brings out the brown shades in the stone. It actually works by penetrating into the pores of the stone thereby preventing dirt from becoming ingrained there. As well as protecting the stone it will also make regular cleaning much easier and for polished Limestone you should use Stone Soap which is designed for cleaning sealed stone floors and will help maintain the patina.

Limestone Floor After Polishing in Hammersmith
The job took 3 days to complete but to do it properly and to a high standard there is no place for a rush or cutting corners. The final result was transformational, and our customer was more than happy.

Limestone Floor After Polishing in Hammersmith
 

Professional Restoration of a Polished Limestone Floor in West London

Limestone Floor Cleaned and Polished in Hammersmith Read More »
Damaged Marble Shower Wall before and after Restoration Ealing

Restoration of Viakal Damaged Marble Shower Tiles in Ealing

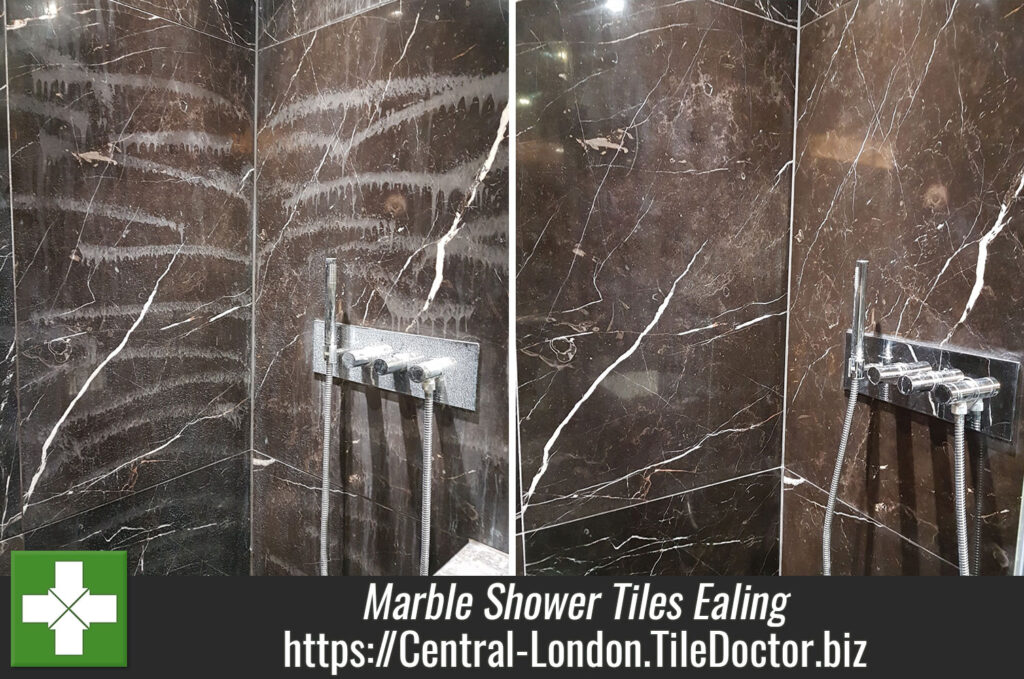
We recently received an enquiry from a customer in Ealing, East London who was concerned about their Marble Tiled Shower which had been damaged from the use of Viakal Limescale Remover. Unfortunately, this is a very common problem and we often receive calls from customers with similar issues. Limescale removal products such as Viakal and Cillit Bang are very effective but like any acidic product, they are very harmful to natural stone such as Limestone and Marble. With any cleaning product you should really read the label before use and in this case you will find they state the product should not be used on natural stone.

The Viakal had etched the surface of the Marble in several places where it had been applied and although the damage looked really bad I was happy to inform my customer there is a solution and that I could indeed restore the appearance of the stone.

Damaged Marble Shower Wall Before Restoration Ealing Damaged Marble Shower Wall Before Restoration Ealing

Polishing Damaged Marble Shower Tiles

My first task was to give the Marble tile and grout a good clean and remove any sealer and soap scum etc; to do this I used a strong dilution of Tile Doctor Pro-Clean scrubbed in with a small black scrubbing pad fitted to a hand-held machine. The Marble tiles were then rinsed with water to remove the soil generated by the cleaning process.

To fully restore the appearance of the Marble the next step required the application of coarse burnishing pads applied in sequence from very coarse to very fine using six-inch pads fitter to a handheld buffer. It’s a process that takes the polish off the stone and rebuilds it. A little water is needed to help lubricate with the coarser pads and the tiles are rinsed off between each one to remove any slurry generated during the process.

To achieve a very high shine the Marble tiles were then treated to an application of Tile Doctor Shine Powder which involves buffing crystallising polishing powder into the stone to build a deep durable finish

Sealing Marble Shower Tiles

The last step was to seal the Marble tile and grout to protect it going forward. Before sealing we needed to make sure that the tiles are dry and a damp meter is a very useful tool for this. A single coat of Tile Doctor Colour Grow was applied which is an impregnating sealer that occupies the pores in the stone whilst enhancing the natural colours in the Marble in the process.

Damaged Marble Shower Wall After Restoration Ealing Damaged Marble Shower Wall After Restoration Ealing

The work took three days in total but as you can see from the photographs on this page it was well worth the effort and the white streaky damage caused by the Viakal has now been removed and the stone has been transformed. My customer was very happy with the results and left the following feedback.

I had serious acid etchings from spraying Viakal on my marble shower box and basin. Didi and his partner did a good job of polishing out the majority of the acid etchings. It was a 3 day job for them, and over all I was happy with the result and service.
Edward T, London

Acid Etched Marble Shower Tiles Restored in London

Restoration of Viakal Damaged Marble Shower Tiles in Ealing Read More »

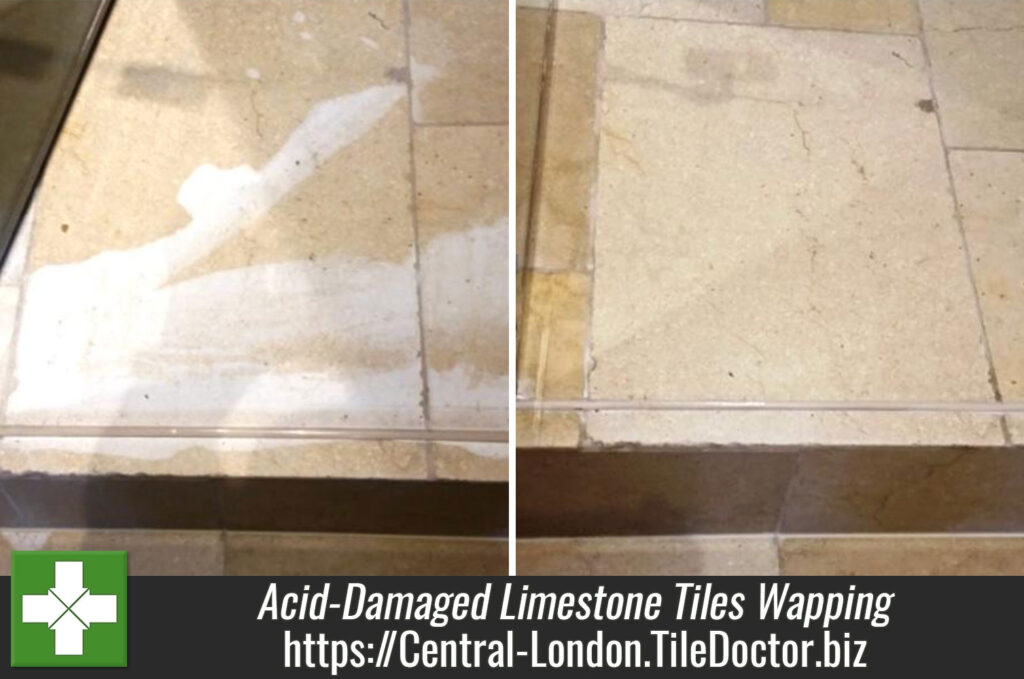
Limestone Floor Damaged by Acid before and after Restoration Wapping

Acid-Damaged Limestone Tiles Restored to New in Wapping

All carbonate materials, including those used in building and construction, are sensitive to acid deposition. A common example of this is the reaction that occurs when you combine bicarbonate of soda and vinegar. Another example of a material affected by this is Limestone, which is often used as tiled flooring. When exposed to acidic products, the damage caused to Limestone tiles is both material and aesthetic, and many property owners who suffer this kind of damage assume that they are beyond repair.

I was recently called to a property in Wapping, Central London, to take a look at a damaged Limestone tiled floor situated in a wet room. The surface of the stone had suffered heavily from corrosion due to the spillage of an acidic solution and the property owner was keen to see what could be done to restore the condition of the tiles. He had been told by another company that the floor was beyond repair, but I knew that with the right products and techniques that I could provide a full restoration.

Limestone Floor Damaged by Acid Before Restoration Wapping

Cleaning and Burnishing Acid-Damaged Limestone

My first attempt at reducing the acid stain was to apply Tile Doctor Reduxa, which is formulated to remove or significantly lighten stains caused by acidic beverages such as cola and white wine, as well as acid-based household cleaners.

I followed this by rinsing the tiles with water rinse and applying Tile Doctor Pro Clean solution, a high alkaline product that would neutralise the acid and stop it from causing any further damage. After leaving the Pro Clean to dwell on the Limestone for ten minutes, I used a handheld rotary buffer fitted with a small black scrubbing pad to remove any dirt, soap scum, and excess old sealer from the tiles and grout lines. Next, the floor was carefully rinsed with water to make sure no chemical residue remained from the cleaning products.

Although the situation was significantly improved, the stain remained visible, so the next step was to re-surface the tile using a set of diamond encrusted burnishing pads of different grades. I started with a Coarse grit diamond encrusted pad to grind away the damage layer of stone, and followed this by applying Medium, Fine and Very Fine pads to slowly hone and polish the floor, back to its original condition.

Sealing Limestone Tiles

I left the tiles to dry completely overnight before returning to the property the next day. With the acid stain removed, it was time to re-seal the floor using Tile Doctor Colour Grow, a colour- enhancing, impregnating sealer that is particularly effective at boosting the appearance of Limestone.

Limestone Floor Damaged by Acid After Restoration Wapping
The result was very satisfying for both myself and the customer. In fact, the customer even when so far as to leave the following feedback on the Tile Doctor Feedback System.

“Didi is indeed very knowledgeable and professional. I was more than a little worried by Limestone corrosion due to accidental spillage of a corrosive substance in our wet room. Didi came to sort it out for us and what to the layman looked like a catastrophe and possible new tiling operation was expertly repaired by Didi and his team. Our wet room now looks like new, much better than before in fact, and we are very grateful to Didi and also Tile Doctor for being able to head straight for the problem and sort it out so efficiently. Highly recommended!”

Professional Acid-Damaged Limestone Tiled Floor Restoration in London

Acid-Damaged Limestone Tiles Restored to New in Wapping Read More »

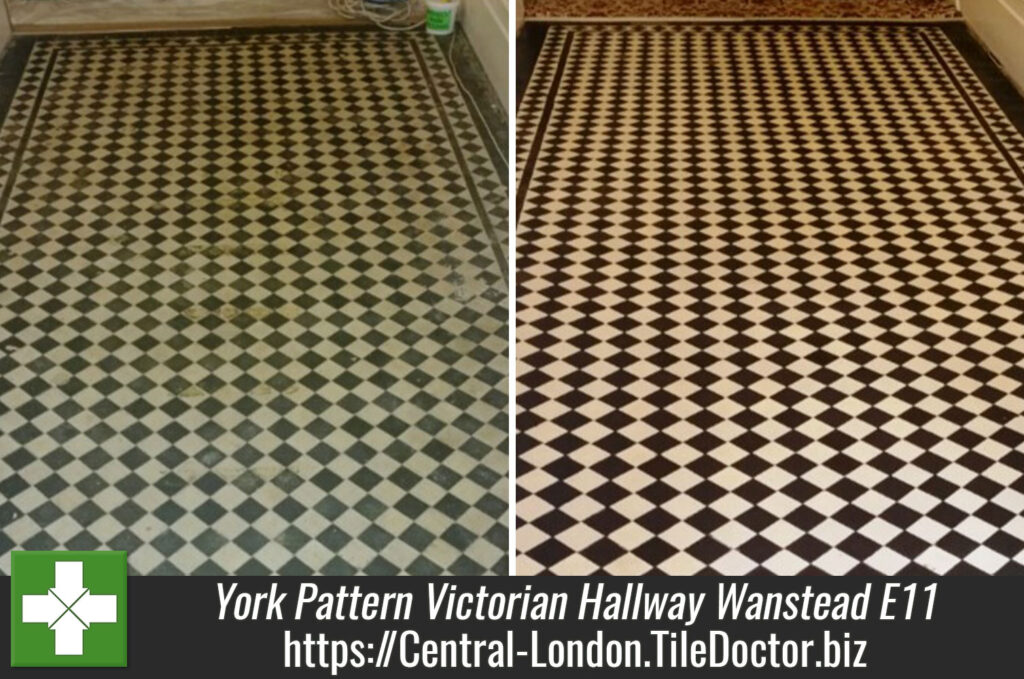
York Patten Victorian Floor Tiles Before and After Cleaning Wanstead

York Pattern Victorian Tiled Hallway Restored in Wanstead, E11

Victorian black and white tiles in the hallway of a house in Wanstead (E11), laid in what is often referred to as the York Pattern with a Kingsley Border, however sadly neglected for many years after being covered with a heavy underlay and carpet.

York Patten Victorian Floor Tiles Before Cleaning Wanstead

Restoring a Victorian Floor

First we cleaned the tiles with a dilution of Tile Doctor Pro-clean which releases the dirt stuck in the pores of the tiles; the solution was scrubbed into the floor with a buffer machine fitted with a black scrubbing pad and then the released soil extracted with a wet vacuum. The floor was then rinsed with water and extracted again with the wet vacuum. It was left to dry for thirty minutes and the floor inspected which revealed a few stubborn areas that were then treated using Nano-Tech Heavy Build-up remover (HBU) which was left to dwell for forty minutes and then scrubbed and then extracted again with water.

York Patten Victorian Floor Tiles Before and After Cleaning Wanstead
To Slow down or stop the possibility of an issue we sometimes have with older floors such as Victorian Tiles we often use a product developed by Tile Doctor called Acid Gel, this is left on the surface for 5 minutes and then removed with light agitation and water and a wet vac machine, the floor is then rinsed with water again just to make sure there is no Acid Gel left in the Tile or on the surface. The Acid Gel not only Keeps mineral salts (efflorescence) at bay but also helps as a bonding agent for the sealer to make sealing theses type of tiles a lot easier.

Sealing a Victorian Tiled Hallway

After leaving the floor to dry overnight I came back the next day to seal the floor using four coats of Tile Doctor Seal and Go which is ideal for Victorian tiled floors as it leaves a low sheen finish whilst providing excellent stain protection.

York Patten Victorian Floor Tiles After Cleaning Wanstead
 

Victorian Tiled floor Restoration in London

York Pattern Victorian Tiled Hallway Restored in Wanstead, E11 Read More »
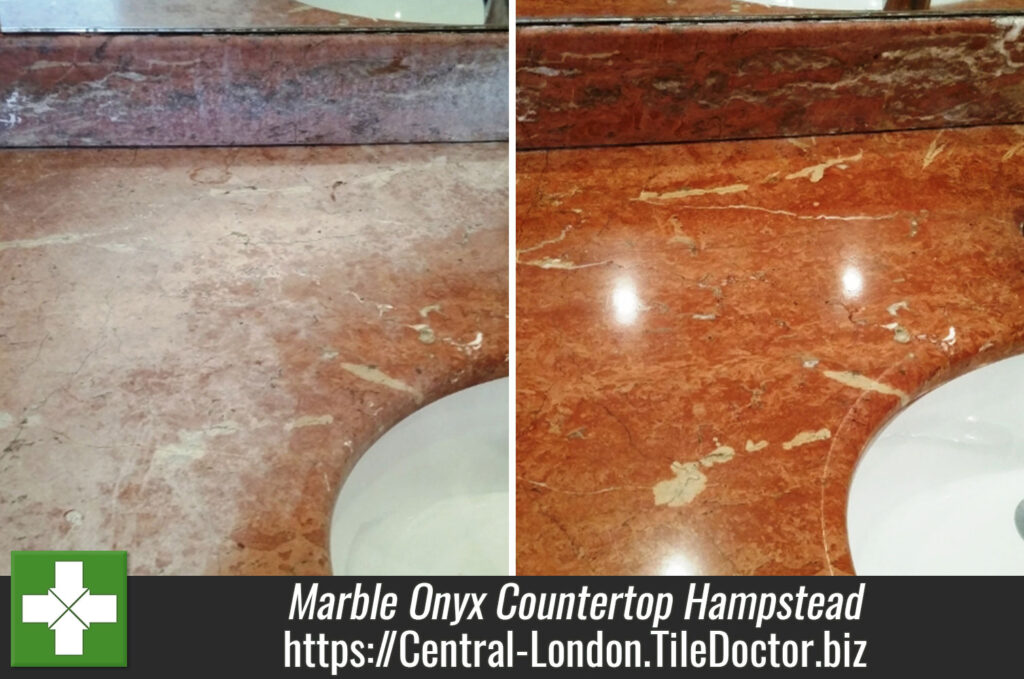
Marble Onyx Countertop London Before and After Cleaning

Refurbishing a Marble Onyx Countertop in Hampstead

My client asked me to take a look at a very dirty Marble Onyx countertop in her home in Hampstead which is located within the London Borough of Camden. Interestingly, Hampstead is home to more millionaires than any other area of the UK so if you’re going to find bathrooms of this standard this is the place.

Marble Onyx Countertop London Before and After Cleaning
This particular worktop had been heavily soiled by roughly fifteen years of soap scum and old sealer. It would take a thorough clean as well as a fresh seal to get this countertop back to looking its best. Marble is a fantastic type of stone which has, throughout history, been used to forge beautiful, yet resilient surfaces.

Cleaning a dirty Marble Onyx countertop

I immediately set to work cleaning the countertop using a strong solution of Tile Doctor Pro-Clean. Pro-Clean is an alkaline product and therefore suitable for use on natural stone, meaning that, along with Marble, it is also suitable for use on Limestone, Granite, Slate, Travertine, and others. After leaving it to dwell on the surface for a short period of time, I began scrubbing the solution of cleaner into the Marble, and gradually the years of soap scum, old sealer and ingrained dirt began to come off. It was amazing just how quickly I was able to remove many years of muck with a bit of elbow grease.

Following this, I rinsed off any excess cleaning product with clean water and then left the surface to dry, before I began the process of burnishing the Marble countertop using small six inch burnishing pads starting with a coarse pad and then moving up to super fine. After the burnishing process was complete, I gave the surface a rinse followed by an additional polish with a buffing pad until the shine was fully restored to the worktop.

Marble Onyx Countertop London Before and After Cleaning

Sealing a Marble Onyx countertop

After ensuring the countertop was fully dry following the cleaning and burnishing processes, I set about providing the surface with a fresh seal. My choice of sealer was Tile Doctor Colour Grow, an impregnating sealer which is designed to both provide durable surface protection, whilst also intensifying the natural colours within the stone. I applied a layer of Colour Grow carefully to the countertop, and the Onyx shades within the Marble really came to life once again.

Marble Onyx Countertop London Before and After Cleaning
I was very happy with the results overall, as was my client. It is very rewarding to think that hard work can go a long way to quickly restoring a surface which had been hidden for so long by many layers of muck.

Marble Countertop Restored in Hampstead

Refurbishing a Marble Onyx Countertop in Hampstead Read More »

Limestone Floor London NW8 After Cleaning Grout Lines with Oxy Pro

Cleaning, Burnishing and Sealing a Limestone Floor in St. John’s Wood

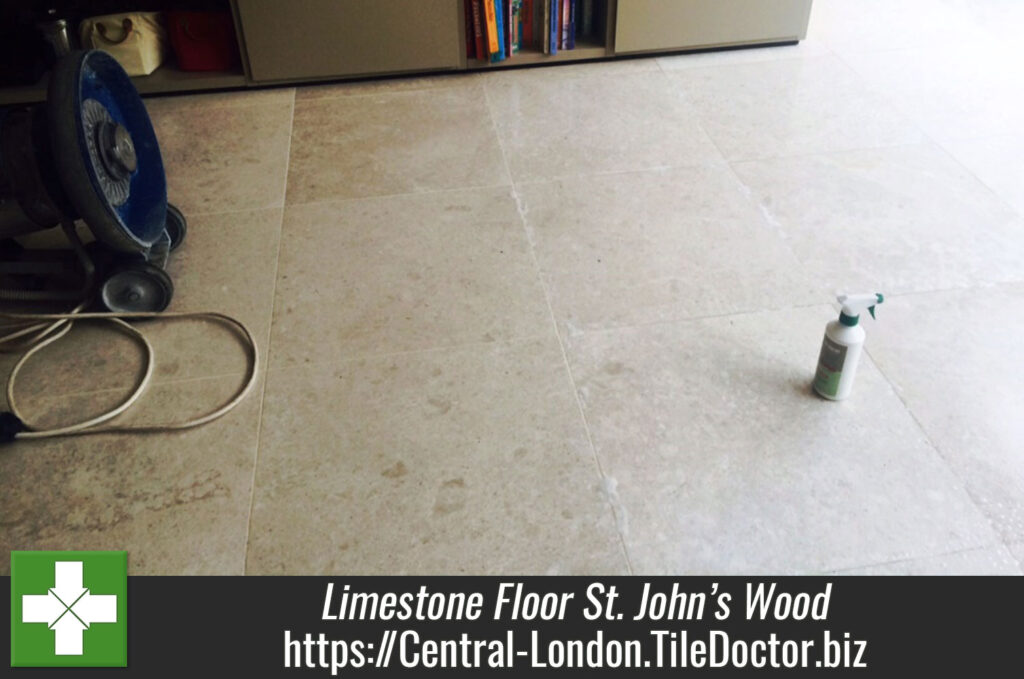
I was recently engaged to refresh the Limestone tiled floor at a house in St. John’s Wood, which is a very affluent area and apparently has the 5th most expensive postcode in London so as you can imagine this was a very expensive floor. The client had requested an improvement condition of the Limestone tiles in the living room and a thorough clean, polishing and seal was required. Over time, the floor in this busy living room – which was also used as a play area for young children – had become dirty and certainly worse for wear with all the use it had been getting. So, I set about my work to get this floor back to looking its best.

Cleaning and burnishing a Limestone floor

My initial task before beginning the cleaning process was to remove any furniture (as well as toys) from the room so I would have a clear area to work in. I then applied a layer of Tile Doctor Pro-Clean cleaner, diluted with water, to the floor. Pro-Clean is also suitable for use on other natural stone floors such as Slate, Granite and Travertine.

After leaving the solution to dwell for a period of a few minutes, I began to scrub the floor with a stiff hand brush. Whilst helping to remove a lot of the built up dirt on the surface of the tiles, the product also stripped off the old sealer and polish. Following this, I paid special attention to the dirty grout lines, cleaning them with Tile Doctor Oxy-Pro, a powerful, high-alkaline cleaner.

Limestone Floor London NW8 After Cleaning Grout Lines with Oxy Pro Limestone Floor London NW8 After Cleaning Grout Lines with Oxy Pro

After completing the cleaning, I rinsed the floor with clean water to remove any excess cleaning products. I then began to burnish the floor using Tile Doctor Diamond encrusted burnishing pads. This was done in four steps, as I used four different pads (coarse, medium, fine and very fine) rinsing the floor with water between each pad. I would recommend using this setup of four pads for restoring the appearance of polished stone floors; you starting with a coarse pad and the gradually work your way up to the very fine pad achieving a high polish finish in the process. I finished of the process with a quick rinse and a buffing pad to give the floor a final polish before I commenced the sealing.

Sealing a Limestone floor

My choice of sealer was Tile Doctor Colour Grow, which is specifically designed to not only provide durable surface protection, but also to intensify the colour of the tiles. The sealer penetrates deep into the pores of the stone, providing water resistance and long-term protection from ingrained dirt and stains. As you can see from the photos, the sealer really helped to accentuate the fantastic natural colours in the Limestone.

Limestone Floor London NW8 After Burnishing Limestone Floor London NW8 After Burnishing

My client was very pleased with the final result, and was amazed by how quickly I had been able to improve the state of her floor which, with a colourful and shiny finish, has really brightened up the living room.

Full Restoration on Limestone Floor in St. John’s Wood

Cleaning, Burnishing and Sealing a Limestone Floor in St. John’s Wood Read More »

Victorian Tile After Cleaning in London

Victorian Hallway Tile Restoration in London W2

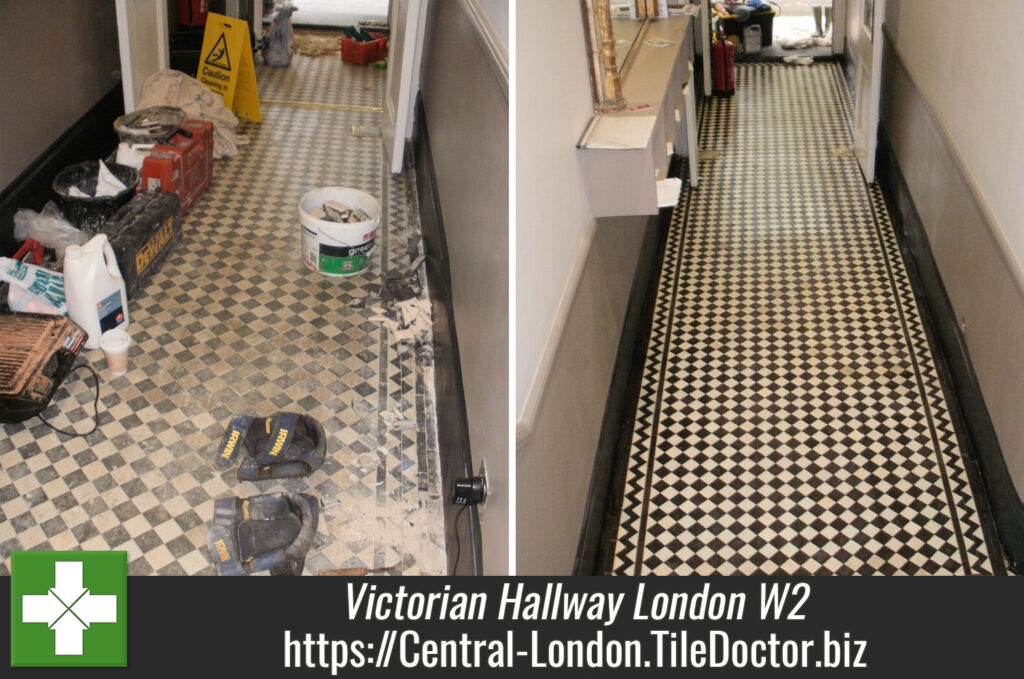
This large entrance hall tiled in Victorian black and white floor tiles in London W2 had been quite badly damaged in the past by having a carpet glued and nailed on to it. Many tiles were broken or missing and those missing had been replaced by cement.

Victorian-Tile-Before-Cleaning-in-London.jpg

Cleaning a Victorian Floor

On the first day of this three day job I removed the cement filling and extracted the nails that remained in the floor. I then stabilised the exposed area with a PVA solution before replacing the missing tiles with replica or salvaged ones to match the floor was swept out and vacuumed to remove all loose debris.

On the second day I cleaned the floor, removing the old carpet glue with Tile Doctor “Remove and Go” which was left to dwell onto the tile for a while to allow it to soak into the tile and break down the adhesive; this was then removed with a wet vacuum. The next step was to clean the tiles using Tile Doctor Pro-Clean which was worked in with a black srubbing pad to scrub the cleaning solution into the tile and finish off the cleaning process, again the soiled solution was removed with a wet vacuum. Normally by now the floor would of have been clean however In this case the levels of soaked-in old glue and ground-in dirt from decades of use were such that the floor also required steaming, scraping and wire brushing with a Spid brass wire brush before a final clean with another round of Pro-Clean and a black buffing pad fitted to a Numatic buffing machine. This had the desired affect and the last step was to wash the floor down with clean water to remove any remaining chemicals etc.

Sealing a Victorian Floor Sealing

After leaving the floor to dry overnight I came back the third day to seal the floor using four coats of Tile Doctor Seal and Go which is ideal for Victorian tiled floors as it leaves a low sheen finish whilst providing excellent stain protection.

Victorian-Tile-After-Cleaning-in-London
As you can see from the ‘before’ and ‘after’ photos the results were impressive and the customer described it as, “looking great”.

Victorian Tiled floor cleaned and sealed in West London

Victorian Hallway Tile Restoration in London W2 Read More »

Tumbled Marble London After

Cleaning a Tumbled Marble mosaic wet room floor in London SE1

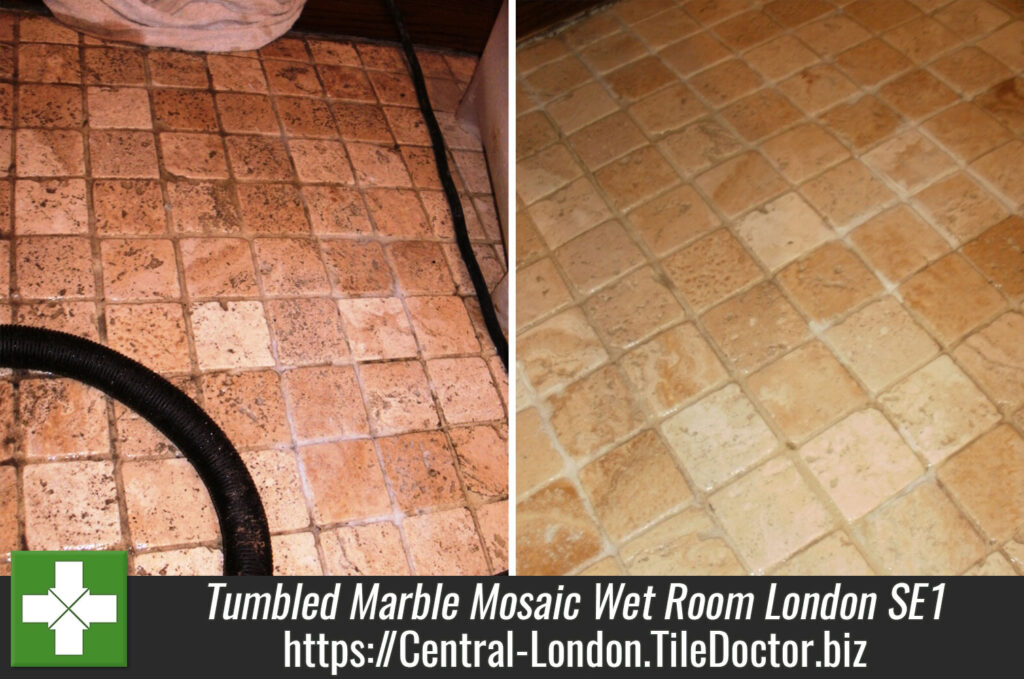
This Tumbled Marble mosaic wet room floor was installed in a house in London, SE1 four years before prior and was now looking a little tired. This was mostly caused by a build-up of Limescale which had then become grimy.

Tumbled-Marble-London-Before

Stripping a Tumbled Marble Floor

To treat the Limescale I used Tile Doctor Grout Clean Up which managed to remove most of the scale and to remove the remainder I steamed the tiles using an Earlex Steamer and carefully scraped any remaining Limescale residue away with a Stanley window scraper. To restore the marble itself I used Tile Doctor burnishing pads to re-polish the tiles using 17″ pads on the main area and 8″ pads on a hand-held Clarke polishing machine in the corners. These diamond encrusted pads come in a number of different colours and are applied one after another with each pad being a finer grade than the last. After thoroughly rinsing the stone again and removing the waste water with a wet vacuum. As the marble was naturally fast drying I used an Earlex heat gun to speed dry the floor and repeated this after lunch to ensure the floor was entirely dry before sealing.

Sealing Tumbled-Marble Tiles

Once the Marble tiles were dry I started to seal them using two coats of Tile Doctor Colour Grow sealer which is a great choice for natural stone as it enhances the natural colours in the tile as well as providing stain protection.

Tumbled-Marble-London-After
As the photographs show the results were very good and the customer was highly delighted.

Tumbled-Marble-London-After
 

Restoring Tumbled Marble Mosaic in a Wet Room

Cleaning a Tumbled Marble mosaic wet room floor in London SE1 Read More »
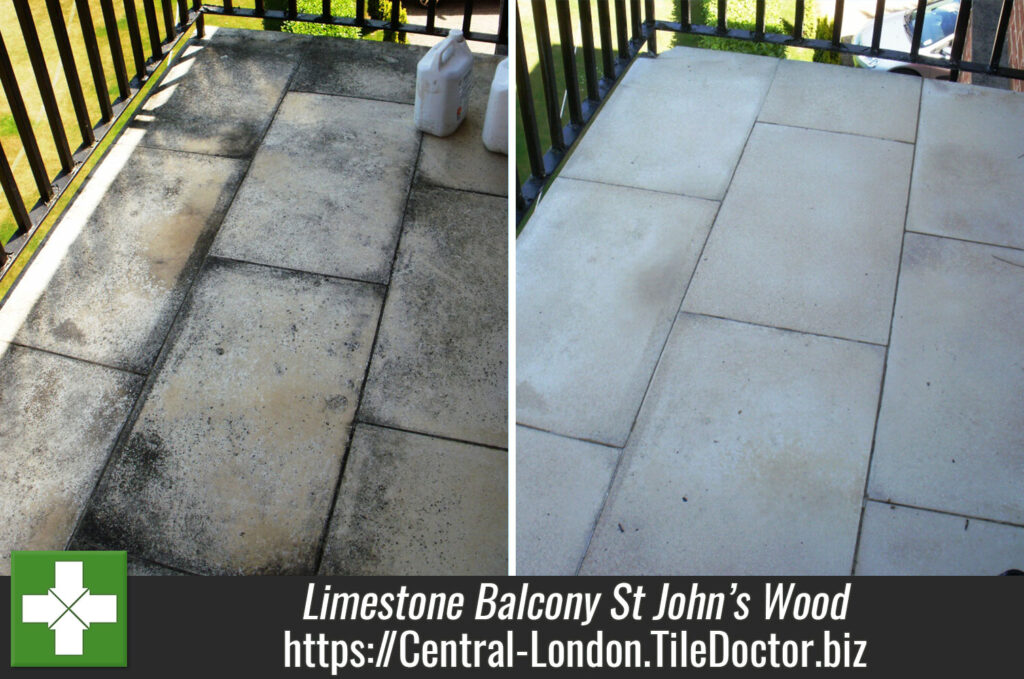
Limestone Balcony NW8 before and after Cleaning

Cleaning a Limestone Balcony in St John’s Wood

This balcony in St John’s Wood, London, NW8, which had been clad in Limestone floor tiles, had not been professionally cleaned for 15 years and was now covered in mould which the customer was unable to remove.

Limestone-Balcony-NW8-Before-Cleaning

Stripping the Limestone Tiled Floor

To get the Limestone clean I used a neat solution of Tile Doctor Pro-Clean with was left to soak into the stone before being worked in with rotary machine fitted with a black buffing pad. This process removed most of the mould but there were still some stubborn patches so I then used a further application of Pro-Clean this time mixed 50/50 with Nanotech Ultra Clean to add an abrasive element to what is a powerful alkaline cleaning product. This was scrubbed into the tile and then steamed off using a Bosch steamer followed by further scrubbing by hand.

The next step was to use a set of four Tile Doctor burnishing pads to polish the Limestone surface to a low sheen. These diamond encrusted pads come in a number of different colours and are applied one after another with each pad being a finer grade than the last. After thoroughly rinsing the stone again and removing the waste water with a Numatic aqua vacuum I left the tiles to dry off overnight. Luckily the weather remained fine.

Sealing Yorkshire Limestone Tile

The next day I sealed the Limestone tiles using two coats of Tile Doctor Colour Grow sealer which I prefer for Limestone as it enhances the natural colours in the Limestone floor as well as providing stain protection something I’m sure it’s going to need given the location.

Limestone-Balcony-NW8-After-Cleaning
Although not quite all the damage from the mould could be entirely removed the tile was 95% improved and the customer was very satisfied with what had been achieved.

Limestone Restoration in St John’s Wood

Cleaning a Limestone Balcony in St John’s Wood Read More »

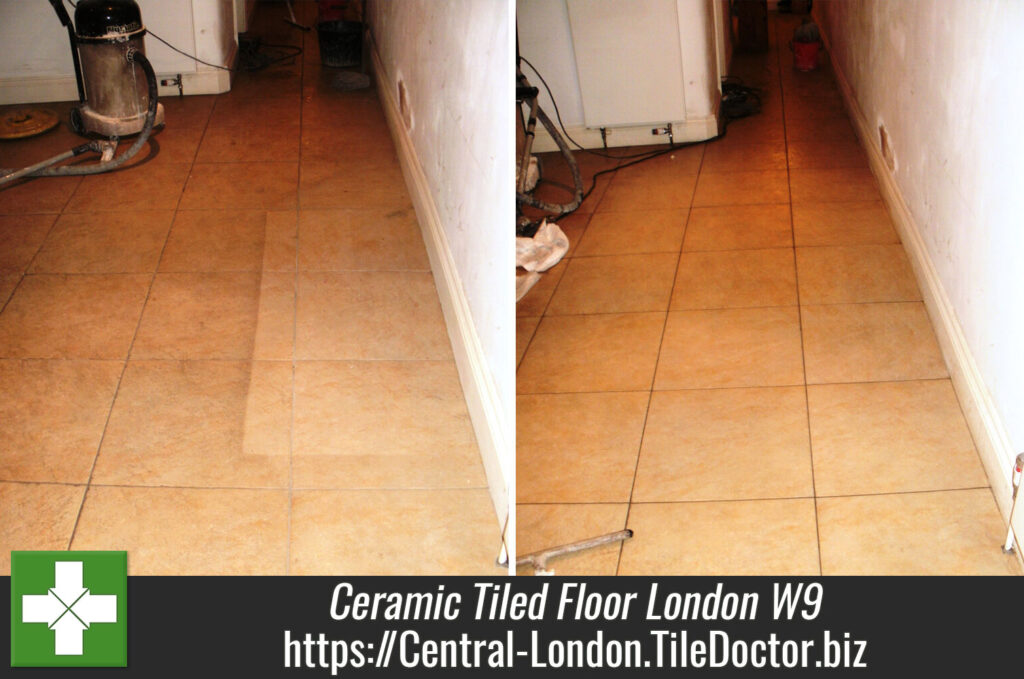
Ceramic Tile Cleaning before and after

Ceramic Tiled Floor Cleaned in London W9

These ceramic tiles situated in a large flat in Bravington Road W9 which is near Kensal Town in the City of Westminster, London. The tiles had been in place when the client moved into the flat some years ago and were badly in need of deep cleaning, attempts to remove the dirt using a steam cleaner had been successful but very slow. In the end the owner, realising that cleaning more than 75 square metres of tile herself in this way was going to take too long, decided to call in professional help from Tile Doctor.

Ceramic Tile Cleaning Before

Cleaning Ceramic Tiles

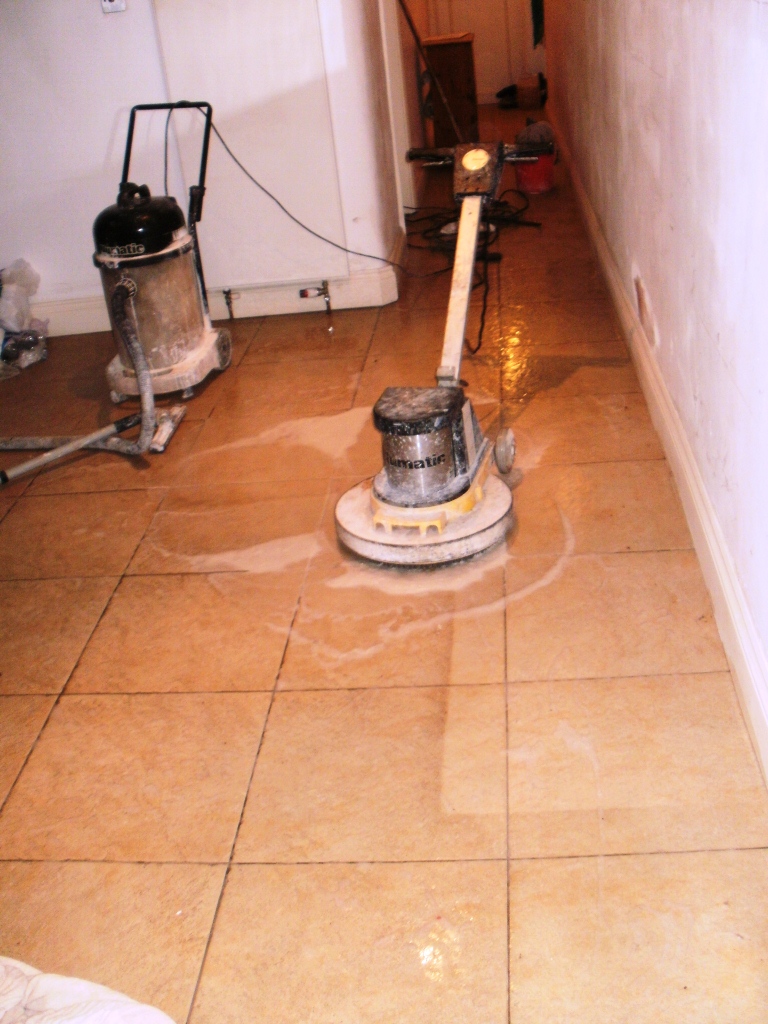
Using Tile Doctor Pro-Clean which is a heavy duty alkaline cleaning product and a medium brush on a Numatic buffing machine I lifted most of the ground-in dirt from the tiles before rinsing and scrubbing the floor again with a black buffing pad and scrubbing the grout clean by hand using a stiff grout brush.

Ceramic Tile Cleaning During
I then thoroughly washed the floor with a mop and fresh water which was then removed with an aqua vacuum, this process was repeated until I was satisfied the floor was clean. When the floor was dry it revealed an nearly as-new ceramic tiled floor with a pleasing sandstone imitation design.

The photos show the floor before cleaning with a mark around where a piece of furniture had been removed and then the uniformly clean floor after the cleaning process was complete. The customer was delighted with the restored condition of her floor and amazed that it could have been made so clean.

Ceramic Tile Cleaning After
 

Ceramic Tiles Deep Cleaned in London W9

Ceramic Tiled Floor Cleaned in London W9 Read More »

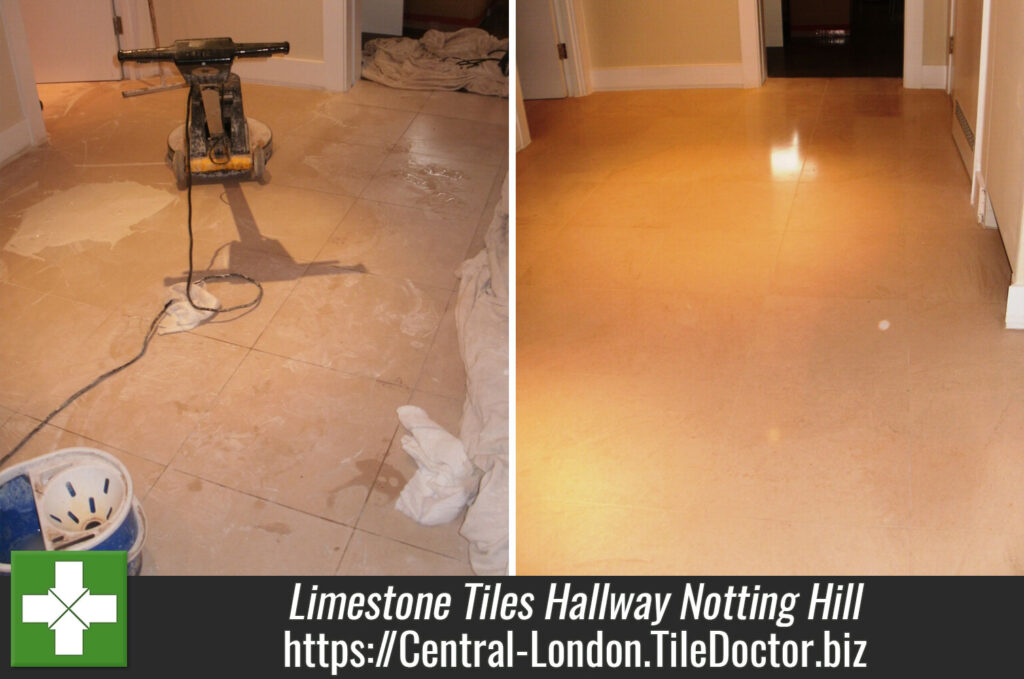
Limestone Tiles After Cleaning

Limestone tiles hallway cleaned and polished in Notting Hill

This was a Limestone tiled hallway at a house in Notting Hill, London W2 where extensive renovations had just been completed. The floor had been badly affected by being left uncovered during the building works as well as having a build-up of many years of dirt and stains on its surface. The tiles had been laid more than twenty years ago and had not been cleaned or sealed since.

The customer was considering replacing the floor as she believed that it was beyond restoring. As well as ingrained dirt there were several quite severe rust stains and large ring-shaped marks that looked as if they had come off the bottom of paint or varnish tins.

Limestone Tile Cleaning During

Cleaning the Limestone Tiled Floor

I used a black buffing pad on my Numatic buffing machine and neat Tile Doctor “Pro-Clean” to perform an initial deep clean on the floor. In order to re-polish the floor and not leave it too porous I then used the a red and then a white diamond encrusted burnishing pad. Even after this some stains remained, so at this point I used Tile Doctor “Reduxa” stone stain remover to attack the stubborn ingrained marks. All of these were successfully removed except for two very deep rust stains which, never-the-less, were reduced in size and intensity by about 70%.

After this I used a yellow burnishing pad to return the floor to its original finish.
At this point, as one of the tiles was broken at the edge and a piece missing, I used Akemi stone floor repair filler to fill in the broken piece with a filler that is stronger than the original stone.

Limestone Tiles After Cleaning

Sealing the Limestone Floor

The next day I returned to seal using Tile Doctor “Colour Grow” Sealer.
Unfortunately, I forgot to take a “before” picture until after I had started this job but still the transformation is clear from the photos that I took. When the limestone was fully restored it was found to have attractive bedding lines running through it and to be all-in-all a very nice looking floor.

Limestone Tiles After Cleaning
The customer was amazed by what had been achieved and very pleased that she had opted for restoration over the far more expensive option of replacement.

Limestone Floor Cleaned and Sealed in London

Limestone tiles hallway cleaned and polished in Notting Hill Read More »

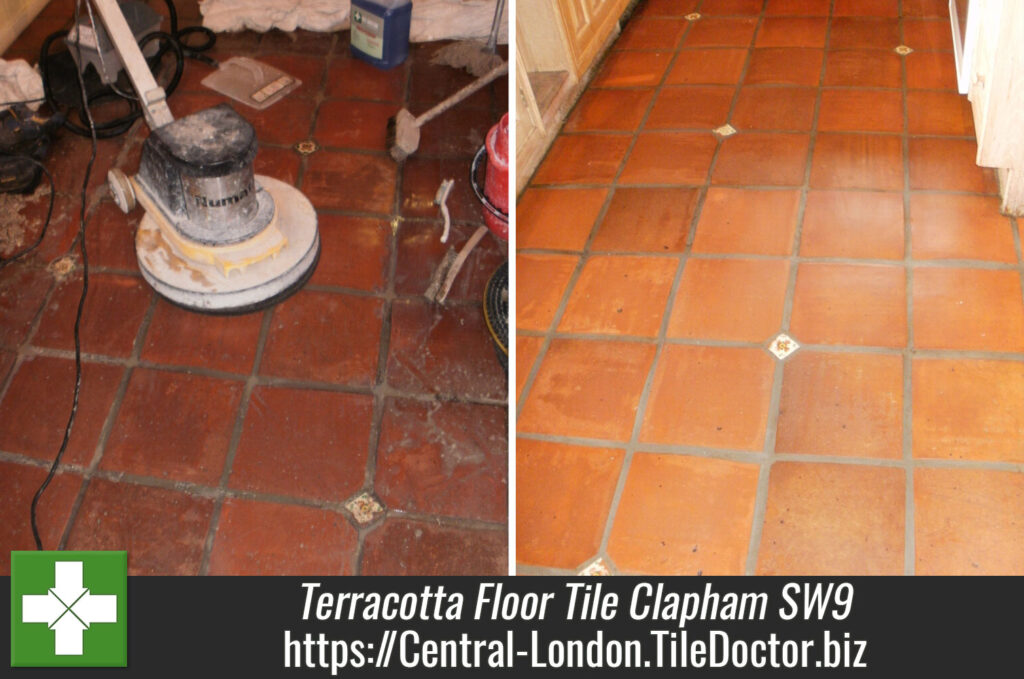
Terracotta Floor before and after

Terracotta Floor Tile Restoration in Clapham SW9

We had our work cut out for us restoring this Terracotta floor installed in the kitchen of a house in Clapham, south west London. Over the years it had been covered with many layers of metallised emulsion polish, this had been put on without a primer and Terracotta being porous it had soaked into the tile. Various efforts to remove it in the past had not been successful and had resulted in some damage to the floor. This had been covered by yet more layers of metallised emulsion which had yellowed and oxidised over time.

Terracotta Floor Before

Cleaning Terracotta Tiles

Working in stages, I laid down Tile Doctor Remove and Go, which is a powerful coating remover, to break down the layers of metallised emulsion and then steamed the tiles and scraped and wire-brushed the remnants of it away. Once this was done more Remove and Go was applied to the terracotta tile to remove the polish that had sunk deep into the tile when it was first applied more than twenty years before. Again a steamer was required to help bring out what was left of the original misused sealer! Once I was happy this was followed by a thorough clean with a dilution of Tile Doctor Pro-Clean scrubbed in with a black buffing pad fitted to a Numatic floor buffing machine. Last step was to give the floor a thorough rinse with water in order to remove any remaining chemical and neutralise the Terracotta.

Terracotta Floor During

Sealing Terracotta Floor Tiles

After two days work cleaning the floor I left it to dry out overnight and returned to seal on the third day using six coats of Tile Doctor Seal and Go which will protect the floor and also gives the surface an attractive low sheen. You can see the transformation in the floor and the customers were very impressed and preferred the lightened natural look compared to its previous appearance.

Terracotta Floor After
 

Terracotta Tiles Transformed in South London.

Terracotta Floor Tile Restoration in Clapham SW9 Read More »

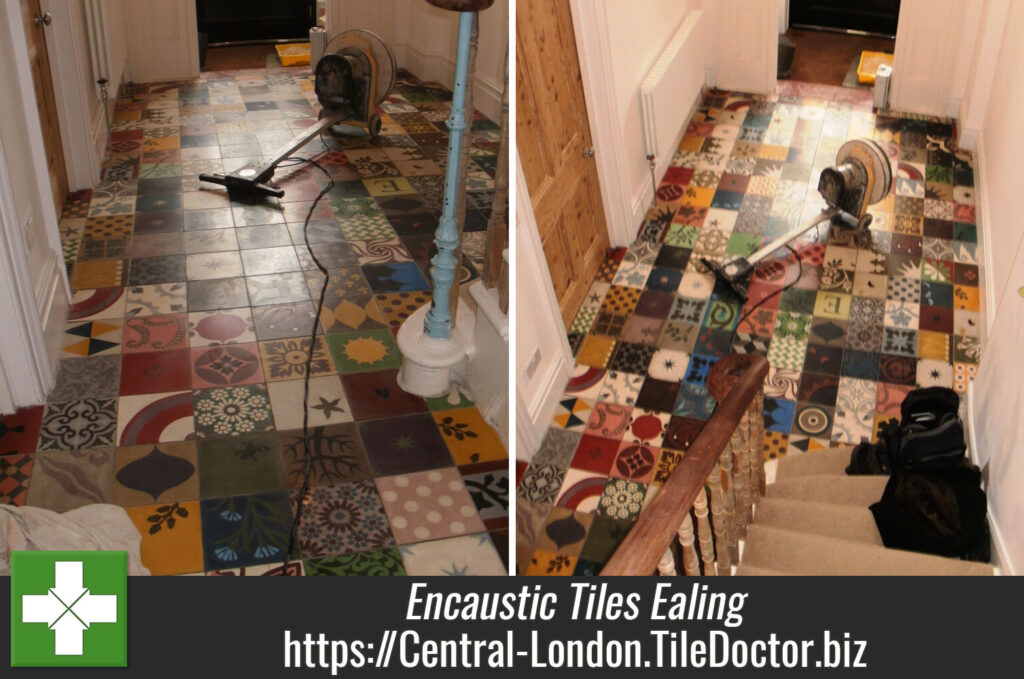
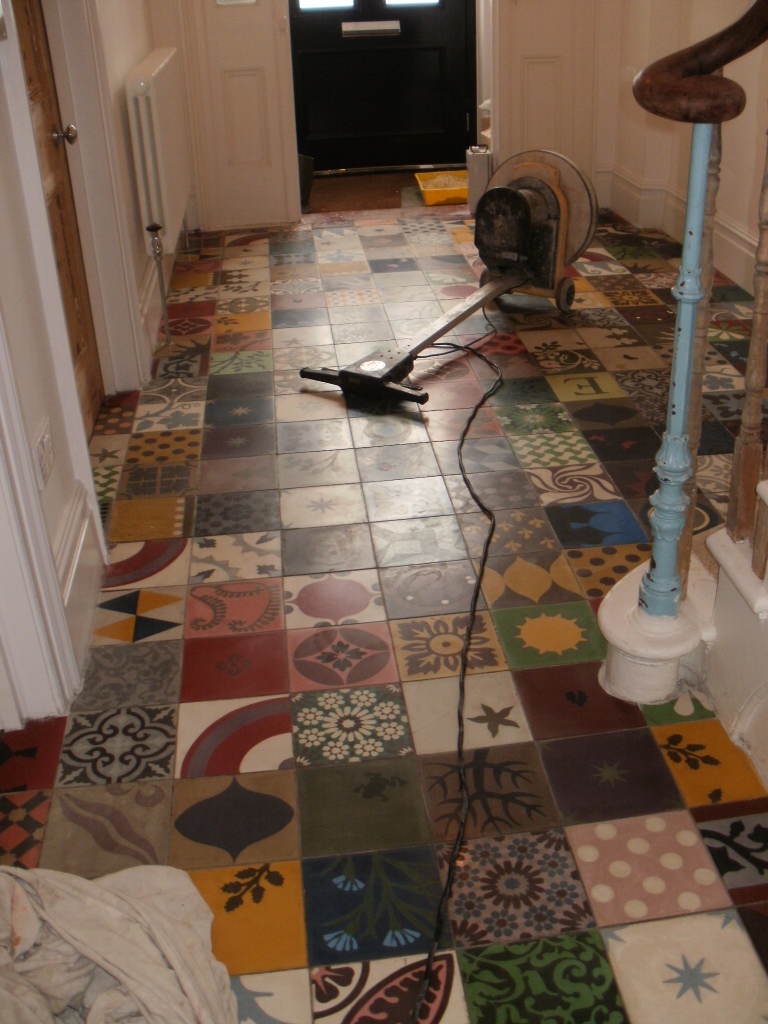
Emery and Cie Tiles After

Emery and Cie Cement Encaustic tiles Restored in Ealing

This unusual Emery and Cie Cement Encaustic tiled floor in Ealing W5 had been poorly installed by the tiler with grout haze on the tiles and the wrong sealer used. Cement encaustic tiles are quite delicate and difficult to restore.

Cleaning Cement Encaustic Tiles

I used a red burnishing pad fitted to a buffing machine to cut into the tile surface and remove the grout haze and old sealer. The next step was to apply a dilution of Tile Doctor Pro-Clean letting it soak into the tile before working it in to the tile with a red buffing pad. The soiled cleaning solution was then removed using a wet and dry Vacuum and the floor washed down with clean water. This cleaned up the floor well but there were some stubborn stains which were removed using a steamer.

Cement Encaustics Before Emery and Cie Tiles After

Sealing Cement Encaustic Tiles

Once the floor had dried it was sealed using three coats of Tile Doctor Colour Grow which is a colour intensifying sealer that provides durable surface protection. Last step was to burnish the tiles again with a green burnishing pad to bring up the shine.

Although the floor had been too damaged to be made perfect, it was very much better when I had finished and the customer was delighted with the result.

Cement Encaustic tiles cleaned and Sealed in London

Emery and Cie Cement Encaustic tiles Restored in Ealing Read More »

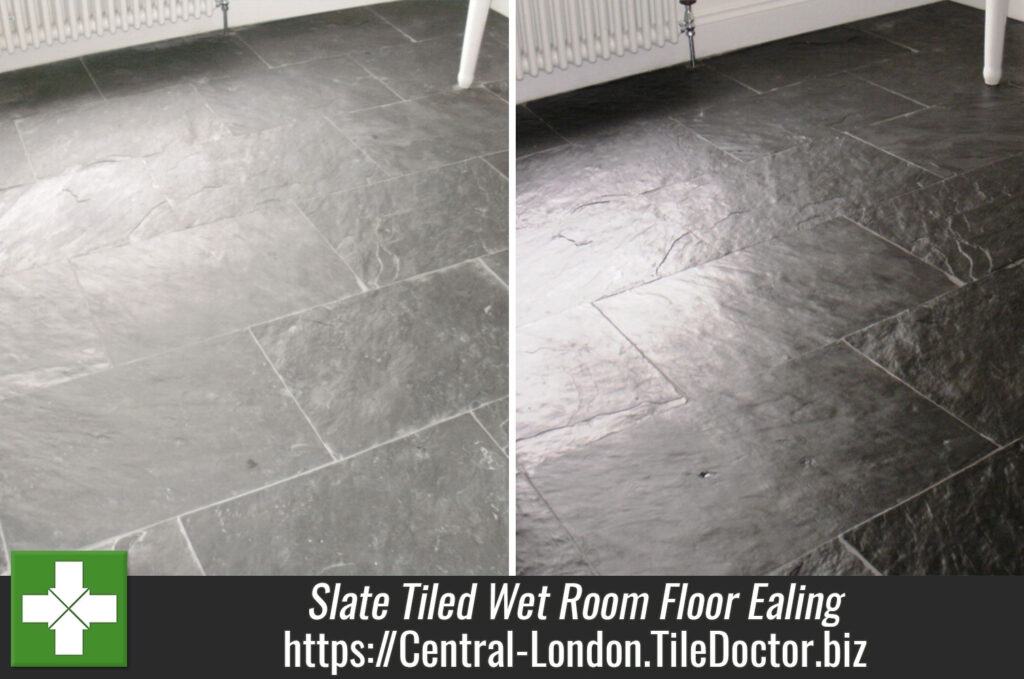
Semi Riven Slate Floor before and after

Slate Tiled Wet Room floor in Ealing

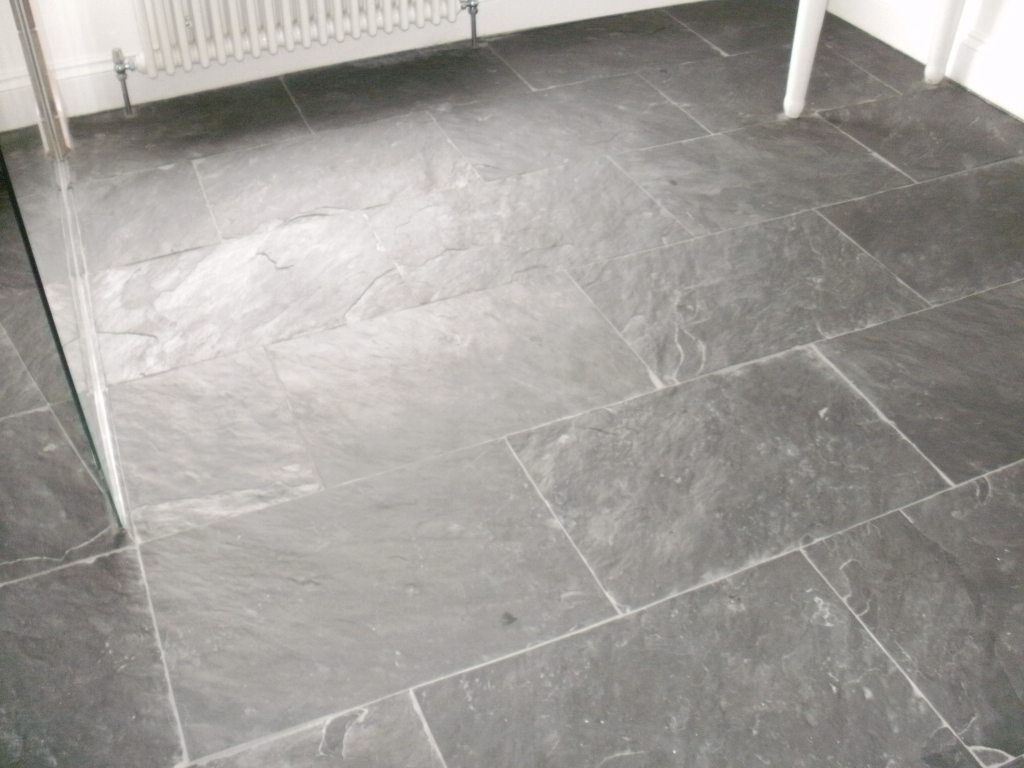
This was a slate floor in a wet room in a house in Ealing W5. The black semi-riven slate had originally been sealed by the tiler on installation but had never looked how the customer wanted it to.

Cleaning Semi-Riven Slate Tiles

To strip off what was left of the old sealer we used Tile Doctor Remove and Go leaving it to soak into the floor for a while before working it in with a rotary machine fitted with a black buffing pad. The solution was then removed using a wet and dry Vacuum and the floor washed down with clean water. This work removed any remaining sealer but we still needed to give the floor a deep clean and so the whole process was repeated this time using Tile Doctor Pro-Clean which is an effective heavy duty alkaline cleaning product ideal for cleaning up natural stone floors and grout. After we gave the floor a thorough rinse to remove any cleaning products and neutralise the floor ready for sealing, last step was to remove the water from the floor using the wet vacuum again and leave it to dry out overnight.

Semi Riven Slate Floor Before

Sealing Semi-Riven Slate Tiles

The next way came back and sealed the floor using two coats of Tile Doctor Colour Grow as you can see from the photographs did an excellent job lifting the colour out of the tile.

Semi Riven Slate Floor After
The customer was very pleased to have a well-sealed black slate with a slight sheen instead of the dull-looking grey floor she had had before.

Semi Riven Slate Tiled Bathroom floor Cleaned and Sealed in London

Slate Tiled Wet Room floor in Ealing Read More »

Edwardian Quarry tiled porch before and after cleaning and sealing

Cleaning an Edwardian Quarry Tiled Porch

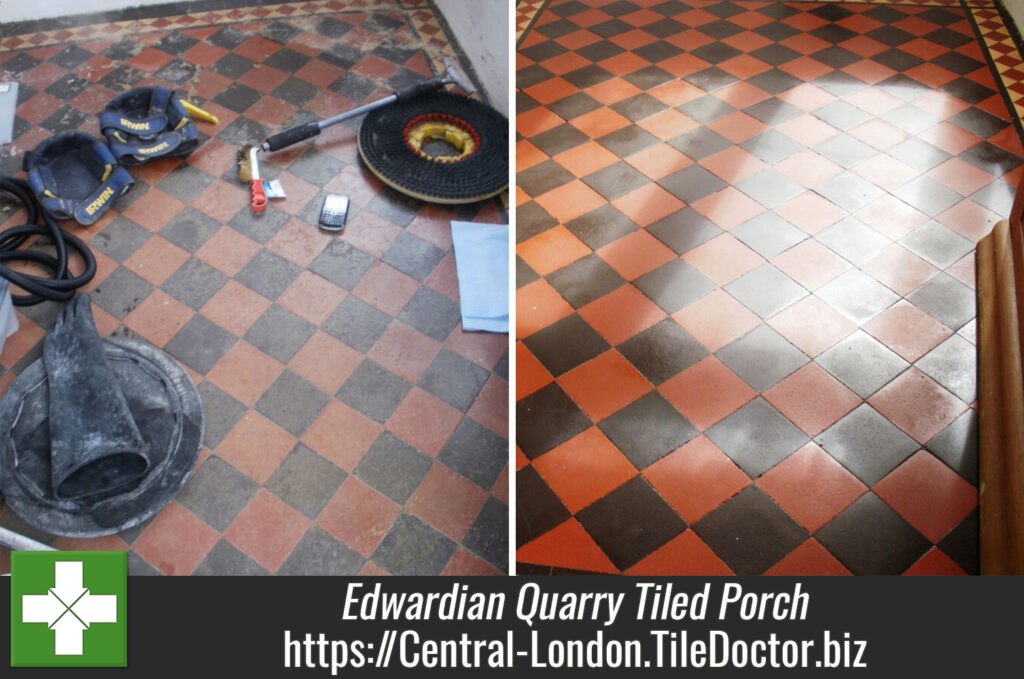
These photographs are from an Edwardian Quarry tiled porch at a house in central London. The tiles had previously been sealed with several layers of varnish which was now beginning to wear off in places and was making the entrance to the house look very untidy.

Cleaning Edwardian Quarry Tiles

I used a mixture of Tile Doctor Remove and Go and Nanotech Ultra Clean and left it to soak into the floor for an hour to break down the old varnish. The floor was then rinsed with clean water and steamed to remove any remaining residue. Following this I used a solution of Tile Doctor Pro-Clean cleaner worked into the floor with a rotary machine fitted with a black buffing pad to machine clean the floor giving it another rinse to neutralise the floor of any chemicals before leaving for the day

Edwardian Quarry Tiled Porch Before Cleaning

Sealing Quarry Floor Tiles

The next day the tiles had dried out overnight and were ready for sealing for which we used three coats of Tile Doctor Colour Grow which is a durable sealer that helps to lift the colour out of the tile.

Edwardian Quarry Tiled Porch After Cleaning and Sealing
You can see the difference in the floor from the photographs in fact the customer said that they had put up with the condition of the tiles in the porch for ten years and were very pleased to have found a solution with Tile Doctor.

Edwardian Quarry Tiled floor restoration in London

Cleaning an Edwardian Quarry Tiled Porch Read More »

Quarry Tiled Hallway before and after cleaning and sealing

Varnished Quarry Tiled Hallway Restored in London SW11

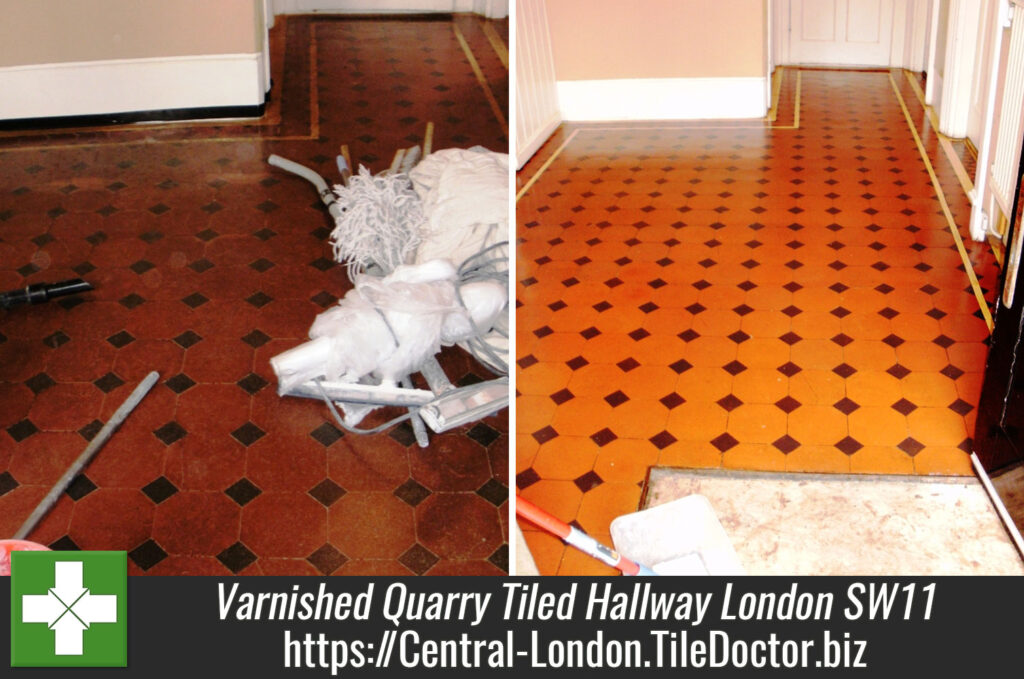
This Quarry tiled hallway installed in a house in South West London had been varnished many years previously and was worn through leaving a dark and uneven appearance and difficult to clean.

Cleaning the Quarry Tiled Floor

We started cleaning the Quarry Tiles by applying a strong solution of Tile Doctor Pro-Clean worked into the floor using a buffing machine fitted with a black scrubbing pad. Although this had an effect on the Varnish it was proving difficult to shift so using a scraper tool it was manually scraped off the floor. The floor was washed down with clean water and then cleaned again using Pro-Clean before finally washing down three more times using clean water in order to neutralise the floor and remove any trace of cleaning products before sealing.

Quarry-Tiled Hallway before cleaning

Sealing Quarry Floor Tiles

The floor was left to dry overnight and I came back the next day to apply the sealer. For sealing the Quarry tiles I used five coats of Tile Doctor Seal and Go, it’s recommended for Quarry tiles and adds a nice low sheen to the floor; sealing does take time as it’s necessary to allow each coat to dry before applying the next so it took most of the day to complete the job. You can see the difference in the floor which has come up a lot lighter and is now much easier to maintain.

Quarry-Tiled Hallway after cleaning and sealing
 

Removing Varnish from a Quarry Tiled Floor in London SW11

Varnished Quarry Tiled Hallway Restored in London SW11 Read More »

Granite and Limestone Kitchen floor before and after

Polishing a Granite & Limestone floor tile in Westminster

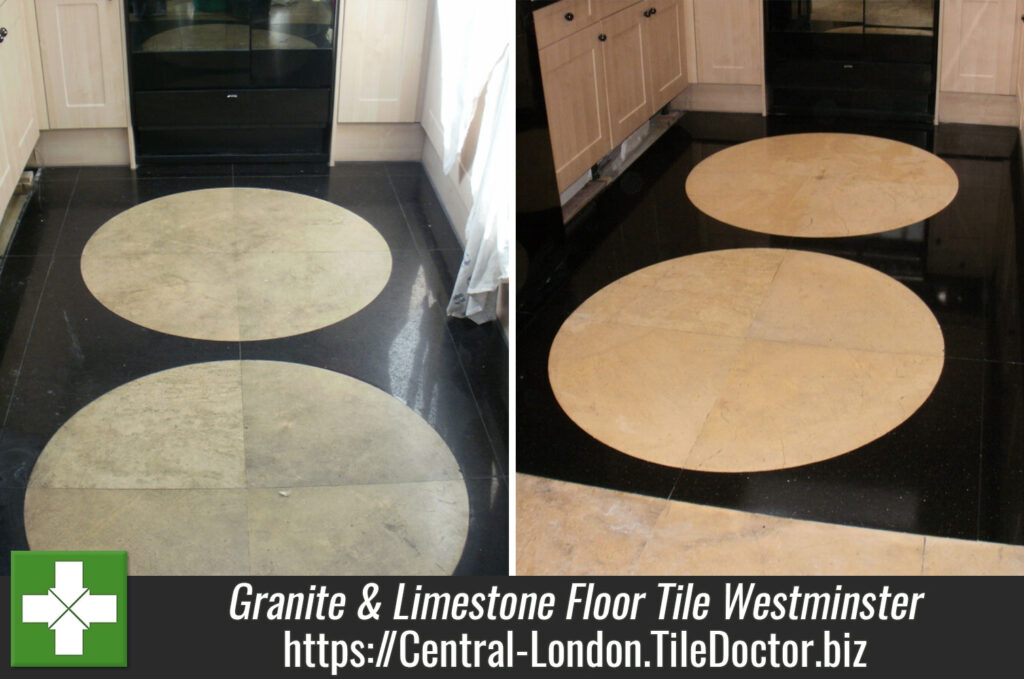
This interesting unusual Granite and Limestone tile combination was installed in the kitchen of a house in Westminster, London. The black Granite was looking Dull and the Limestone had a dirty appearance of the tile surface which had lost its shine and was looking dull.

Stripping the Granite and Limestone Tiled Floor

To resolve we had to strip back the Granite and Limestone surfaces using a set of burnishing pads, these diamond encrusted pads come in a number of different colours each one has a different grade of coarseness and does a different job from scrubbing to polishing. I started with the red pad together with water and then carried on with the white, then yellow pads using water. Finally when I had dried the floor I used a green pad to buff the floor up. This activity took most of the day so left the floor to dry overnight.

Granite and Limestone Kitchen floor before

Sealing Granite and Limestone Tiles

The next morning I arrived to find the floor had dried out sufficiently for it to be sealed which was done using a couple of coats of Tile Doctor Colour Grow. Colour Grow is a a great sealer for lifting the natural colours out in hard stone flooring such as Granite and Limestone floor as well as providing stain protection. Once the sealer had dried I then finished it all off with a quick buff using a white buffing pad.

Granite and Limestone Kitchen floor after
You can see from the photographs how the combination of the burnishing pads and sealer and really lifted the look of the floor.

Polishing a Granite & Limestone floor tile in Westminster Read More »

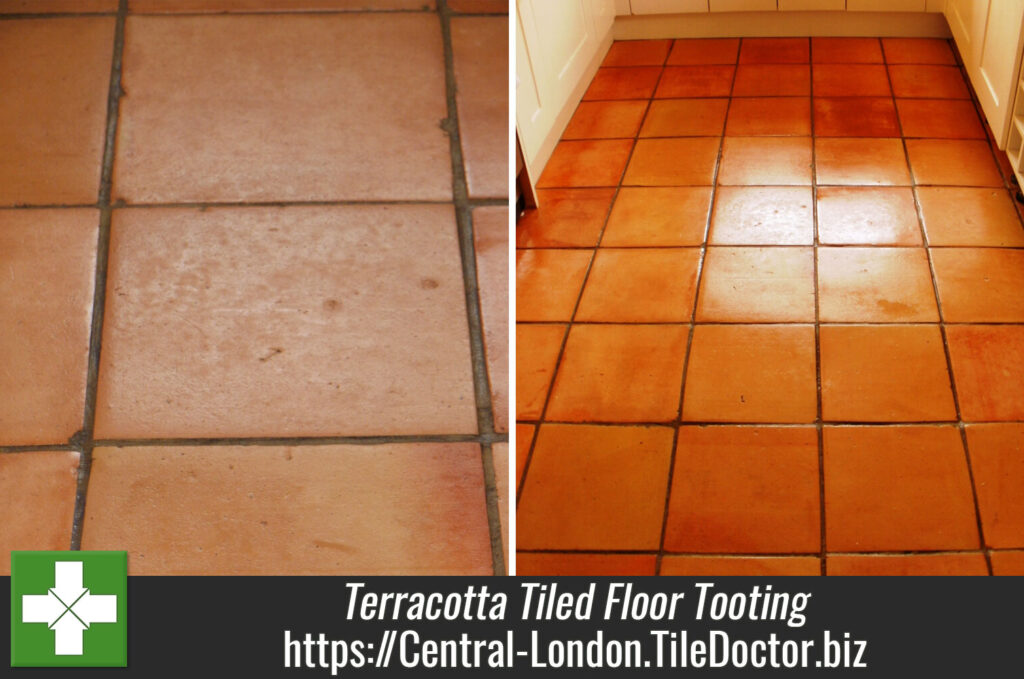
Terracotta Tile After Cleaning in Tooting

Terracotta Tiled Floor Cleaned and Sealed in Tooting

We were asked to take a look at this Terracotta Tiled floor in Tooting, South London which were becoming difficult to clean and in need of a good clean and seal.

Cleaning Terracotta Tile

We started the task by applying a strong solution of Tile Doctor Pro-Clean, which is a heavy duty alkaline product designed for cleaning tiles; this was scrubbed in with a black pad fitted to a rotary machine. I had to repeat this process a couple of times and also use a stiff brush along the grout lines which cleaning pads often struggle to reach. Once we were happy the floor was clean it was thoroughly rinsed the floor with clean water to remove any remaining chemical and it was left to dry overnight.

Terracotta Tile Before Cleaning in Tooting

Sealing Terracotta Tile

The following day we checked the floor was clean and dry and took care of any ugly spots that we have overlooked the day before and then proceed to seal. For Terracotta I recommend Tile Doctor Seal and Go, it’s a water based sealer so it doesn’t give off an odour when it’s drying and also offers durable stain protection together with a low sheen finish. Terracotta is a very porous material and in the end the floor actually needed seven coats of sealer applied with a paint pad before it was fully sealed, which naturally takes a long time to apply as you have to wait for it to dry before applying the next coat.

Terracotta Tile After Cleaning in Tooting
The customer delighted with results.

Terracotta Floor Cleaned and Sealed in London

Terracotta Tiled Floor Cleaned and Sealed in Tooting Read More »

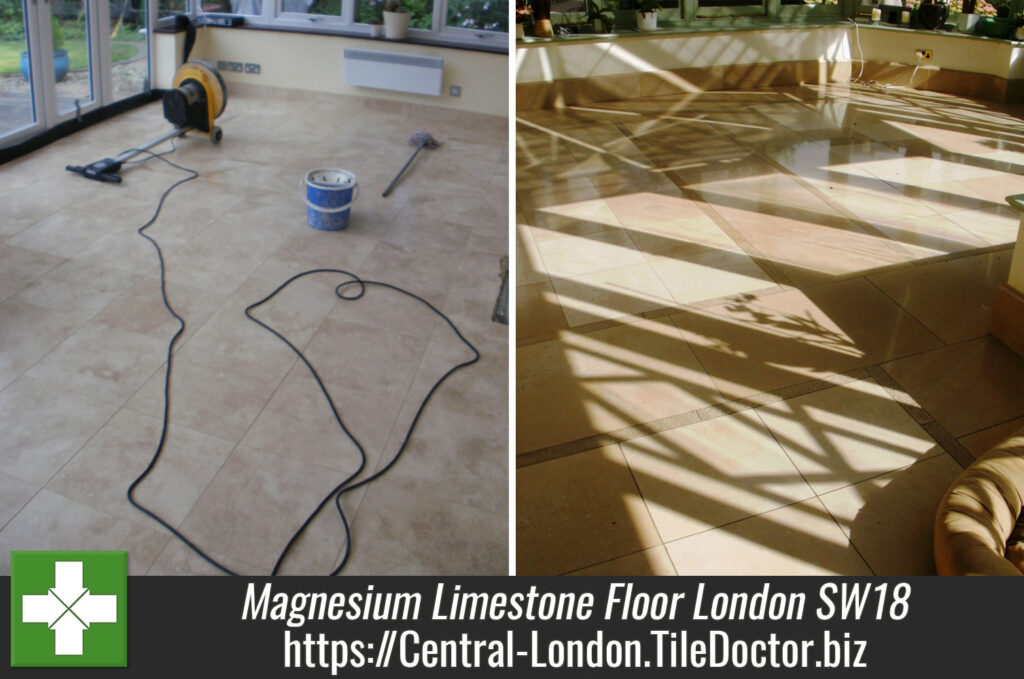
Imported hard magnesium limestone before and after

Polishing hard Magnesium Limestone floor tiles in London SW18

The owner of this house in Wandsworth had imported these hard magnesium Limestone tiles direct from Italy and fitted them into a conservatory three years prior; over they years however they had lost their shine and started to go dull and look uninviting. This is fairly normal for polished stone which does need to be re-polished for it to keep its appearance however the owner was unhappy with the finish and wanted it re-polished. There were also a number of naturally formed holes in the Limestone floor and these needed filling to give a completely even appearance.

Stripping and Polishing the Limestone Tiled Floor

To resolve we filled the holes using grout coloured to match the Limestone surface and then proceeded to strip back the tile surface using a set of burnishing pads. These diamond encrusted pads come in a number of different colours each one does a different job from scrubbing to polishing. I started with the red pad together with water and then carried on with the white, then yellow pads using water. Finally when I had dried the floor I used a green pad to buff the floor up. This activity took most of the day so left the floor to dry overnight.

Sealing Magnesium Limestone Tile

The next morning I arrived to find the floor had dried out and so began to seal it which was done using a couple of coats of Tile Doctor Colour Grow which does what it says on the bottle and as well as provided stain protection lifted the natural gold colour in the Limestone floor. Once the sealer had dried I then finished it all off with a quick buff using a white buffing pad.

Imported hard magnesium limestone after
Apologies for not capturing a good before photograph for comparison, I can tell you however that the owner was very pleased with the results and reported they looked better than when they were new.


Hard magnesium limestone tiled floor polished in Wandsworth SW18

Polishing hard Magnesium Limestone floor tiles in London SW18 Read More »

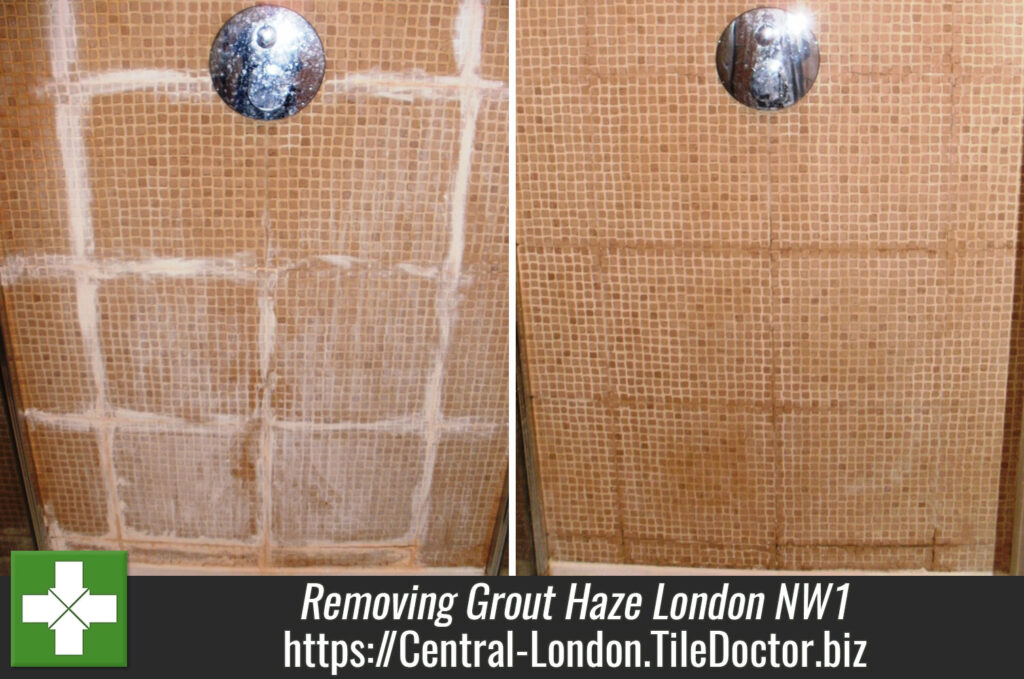
Ceramic Shower Cubicle Grout Haze before and after

Removing Grout Haze in a Shower Cubicle, London NW1

These ceramic mosaic tiles were fitted in square sheets in a shower cubicle at house in London NW1. You can clearly see from the first photograph that the tiler did not remove the grout from the tile before it set leaving grout haze on most of the tile and a nice white band of grout between the mosaic sheets.

Removing Grout Haze

To clean up the ceramic tiles and remove the grout we sprayed on Tile Doctor Grout Clean-up which is a specialist acid based product that penetrates below the surface of the grout to remove allowing it to be removed. It’s reasonably easy to apply, you need to wet the tile first and then apply a dilution of the Grout Clean-up, leave it dwell on the tile for a few minutes allowing it to get to work and then scrub it in. With it being an acid it’s important not to leave it on the tile very long and wash it off within five minutes and rinse down the tile with water.

Ceramic Shower Cubicle Grout Haze Before Ceramic Shower Cubicle Grout Haze After

Cleaning Ceramic Mosaic Tiles

Once the tiles were free of grout the next step was to clean the tiles for which we used Tile Doctor Pro-Clean which is a versatile alkaline tile cleaning product that can be diluted in different strengths depending on if your looking to clean the tile or strip sealers. In this case we could also of used Tile Doctor Oxy-Pro shower Tile and Grout Cleaner which is a ready to use tile and grout cleaner that comes with a spray nozzle attachment, the spray allows the cleaning agent to mix with air making it lighter and easier to stick to vertical surfaces. This is important as you need to let the cleaning agent dwell on the surface of the tile and grout for a few minutes before scrubbing it by hand with a stiff brush and then washing it off with clean water.

The ceramic mosaics did not need sealing so the renovation was now complete, grout removed and tiles cleaned, and naturally the customer was very pleased with the results and the cubicle was transformed.

Shower Cubicle Restored in London NW1

Removing Grout Haze in a Shower Cubicle, London NW1 Read More »

=================================

Central London Tile Doctor

================================= Read More »

Scroll to Top