Camden Tile Cleaning

Camden Tile Cleaning

Welcome to my Work History archive where you will find examples of the cleaning and renovation of tiles carried out in Camden.

Quarry Tiled Balcony Renovation Notting Hill W11

Quarry Tiled Balcony Patio Renovated for Notting Hill Landlord

The Quarry tiles in the photographs below were actually installed on the balcony of a flat in London’s famous Notting Hill W11. The property had been rented out and not surprisingly never maintained properly by the tenants.

Quarry Tiled Balcony Patio Before Cleaning Notting Hill W11

There was a lot of grime and algae on the tiles which made the patio look very uninviting. The landlord was keen to rent out the flat as soon as possible and the balcony needed a end of tenancy clean to sort it out before potential tenants were shown round.

Deep Cleaning a Quarry Tiled Balcony Patio Floor

Having been entrusted with the keys and having negotiated appropriate parking I went round on a warm day to renovate the tiles and get them in the best condition possible in advance of the viewing. Fortunately, the lift was working so after a couple of trips up and down with various items of equipment I was soon setup and ready to get going.

To get the quarry tiles clean I used a strong treatment of Tile Doctor Remove and Go which was sprayed onto the tiles and left to soak in for fifteen minutes to allow time for the solution to get to work breaking down the dirt and old sealers. Then, I ran over each tile multiple times with a floor buffer fitted with a Black scrubbing pad. I also used a stiff brush along the grout lines to get them clean, however, the staining was bad so short of grout colouring or re-grouting I was only able to make a modest improvement. The landlord just wanted the balcony to be presentable, so I stuck to getting them as clean as possible.

Once finished cleaning the now dirty cleaning solution was rinsed off with water and extracted using a wet vacuum. I was then able to inspect the floor and carry out spot cleaning where I felt more work was needed. One of the problems I found was the presence of limescale and to remove that I realised I needed to use an acidic product that would dissolve it.

To treat the limescale I gave the floor a second clean using Tile Doctor Acid Gel which was scrubbed in with handheld brushes and another fresh black pad. Once done, the tiles were rinsed again, and a wet vacuum was employed to get the tiles as dry as possible. Fortunately, the sun came around that side of the building towards the afternoon and the patio was bathed in sunlight allowing it to dry faster.

Sealing a Quarry Tiled Balcony Patio Floor

The quarry tiles needed to be completely dry before I could seal them and with the weather forecast looking good overnight and into the next day so I left them to dry off completely overnight.

The next day I returned and started by checking the tiles were dry using a damp meter. The readings were good, so I was able to start with the application of a protective sealer which for these tiles I used Tile Doctor Colour Grow.

Only a couple of coats were required however it is quite time consuming, and you have to wait 30 minutes between coats. This sealer has a breathable formula which is well suited for use on this patio, and it contains a colour enhancer which helps to bring out the colours in the Quarry tile.

Quarry Tiled Balcony Patio After Cleaning Sealing Notting Hill W11

For the regular cleaning of sealed Quarry tiles, I recommend Tile Doctor Neutral Clean which is supplied in a concentrate so a 1 litre bottle goes a long way. You can’t use strong cleaning products on sealed tiles as they will prematurely erode the sealer so Neutral Cleaner is an ideal choice.


Professional Renovation of Balcony Quarry Tiles in Central London

Quarry Tiled Balcony Patio Renovated for Notting Hill Landlord Read More »

Slate Wall Tiled Bathroom Restoration Maida Vale

Slate Shower Wall Refurbished in Maida Vale W9 London

The photographs below are from a bathroom in Maida Vale W9 which had a lovely Slate tiled wall over a bath with shower. Unfortunately, the Slate tiles had been ruined by the use of harsh cleaning chemicals in an attempt to remove the limescale caused by hard water. The slate had now lost all its natural colour and looked completely washed out. The property had recently changed hands and the new owner was keen to have it renovated.

Slate Shower Before Refurb Maida Vale London

I went over to take a look and work out a solution, this in itself is a lot trickier these days with all the COVID precautions we need to take when working in someone’s house. It was clear that a strong acidic limescale remover had been used on the slate and this had etched the stone, leached all the natural oils away and generally ruined its appearance.

Fortunately, we have a solution for this (see below) and after conducting a small test I was able to confirm the problem could be resolved and gave them a quote which included a day’s labour, abrasive pads, stone oil and sealer. Our quote was gratefully accepted, and we booked a time in to carry out the work.

Cleaning a Slate Tiled Bathroom

I returned to the property and I set about burnishing the slate wall tiles using a very coarse 200-grit six-inch burnishing pad fitted to a handheld buffing machine. This process resurfaces the stone slightly to remove the etching caused by the limescale remover. I used a medium dilution of Tile Doctor Grout Clean-up to lubricate the process and to remove the remaining limescale. Once done the slurry that is generated is rinsed off with more water. In a bathroom, it is easy the slurry can just be drained away. In other areas we would use a wet vacuum.

After the 200-grit pad the surface of the Slate was further refined using a 400-grit pad and then an 800-grit pad, this time only using water and giving the stone a thorough rinse after each pad to remove the soil.

The slate was then left to dry off over lunch and given more encouragement with a heat gun afterwards so I could move onto the next step. This involved applying a coat of Tile Doctor Stone Oil which puts back the natural oils back into the stone improving its appearance.

Sealing a Slate Tiled Bathroom

Once the Stone Oil had fully dried, I moved onto sealing for which I applied two coats of Tile Doctor Ultra-Seal; this is penetrating sealer that soaks into the stone to provide maximum stain protection without changing the colour of the stone. It is also an excellent grout sealer which is a bonus.

Slate Shower After Refurb Maida Vale London

Before leaving I talked the client about how best to maintain the Slate and left them a complimentary bottle of Tile Doctor Aqua Pro tile cleaner which will help keep the limescale at bay. It is gentle enough to use every day but will help prevent the previous build-up and unlike the previous products used will not damage the newly applied sealer.


Professional Restoration of a Slate Tiled Bathroom in Central London

Slate Shower Wall Refurbished in Maida Vale W9 London Read More »

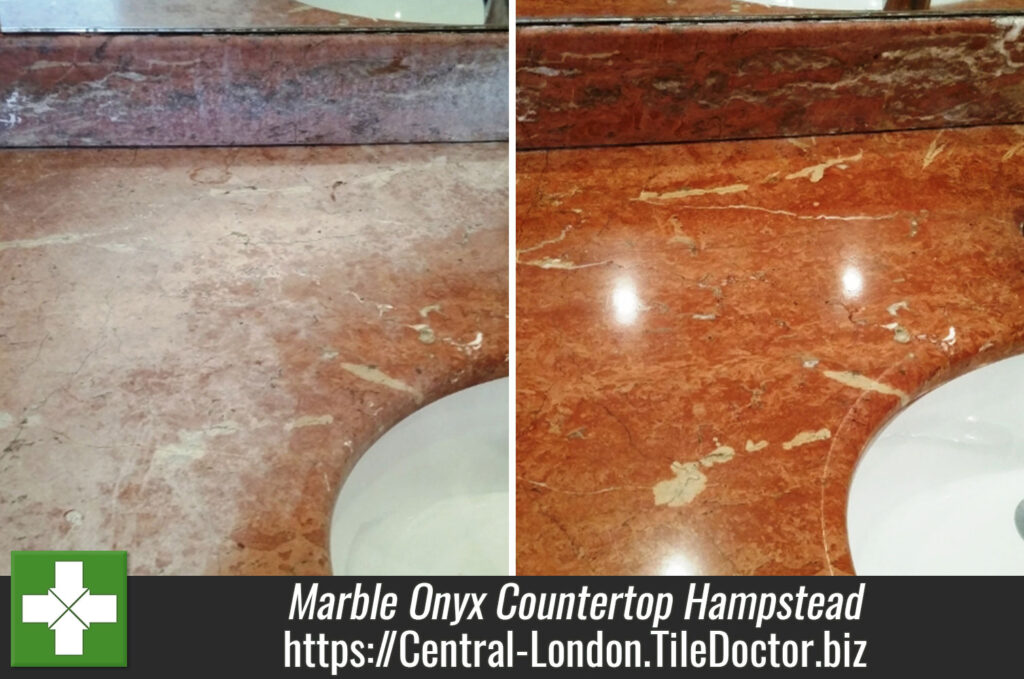
Marble Onyx Countertop London Before and After Cleaning

Refurbishing a Marble Onyx Countertop in Hampstead

My client asked me to take a look at a very dirty Marble Onyx countertop in her home in Hampstead which is located within the London Borough of Camden. Interestingly, Hampstead is home to more millionaires than any other area of the UK so if you’re going to find bathrooms of this standard this is the place.

Marble Onyx Countertop London Before and After Cleaning
This particular worktop had been heavily soiled by roughly fifteen years of soap scum and old sealer. It would take a thorough clean as well as a fresh seal to get this countertop back to looking its best. Marble is a fantastic type of stone which has, throughout history, been used to forge beautiful, yet resilient surfaces.

Cleaning a dirty Marble Onyx countertop

I immediately set to work cleaning the countertop using a strong solution of Tile Doctor Pro-Clean. Pro-Clean is an alkaline product and therefore suitable for use on natural stone, meaning that, along with Marble, it is also suitable for use on Limestone, Granite, Slate, Travertine, and others. After leaving it to dwell on the surface for a short period of time, I began scrubbing the solution of cleaner into the Marble, and gradually the years of soap scum, old sealer and ingrained dirt began to come off. It was amazing just how quickly I was able to remove many years of muck with a bit of elbow grease.

Following this, I rinsed off any excess cleaning product with clean water and then left the surface to dry, before I began the process of burnishing the Marble countertop using small six inch burnishing pads starting with a coarse pad and then moving up to super fine. After the burnishing process was complete, I gave the surface a rinse followed by an additional polish with a buffing pad until the shine was fully restored to the worktop.

Marble Onyx Countertop London Before and After Cleaning

Sealing a Marble Onyx countertop

After ensuring the countertop was fully dry following the cleaning and burnishing processes, I set about providing the surface with a fresh seal. My choice of sealer was Tile Doctor Colour Grow, an impregnating sealer which is designed to both provide durable surface protection, whilst also intensifying the natural colours within the stone. I applied a layer of Colour Grow carefully to the countertop, and the Onyx shades within the Marble really came to life once again.

Marble Onyx Countertop London Before and After Cleaning
I was very happy with the results overall, as was my client. It is very rewarding to think that hard work can go a long way to quickly restoring a surface which had been hidden for so long by many layers of muck.

Marble Countertop Restored in Hampstead

Refurbishing a Marble Onyx Countertop in Hampstead Read More »

Limestone Floor London NW8 After Cleaning Grout Lines with Oxy Pro

Cleaning, Burnishing and Sealing a Limestone Floor in St. John’s Wood

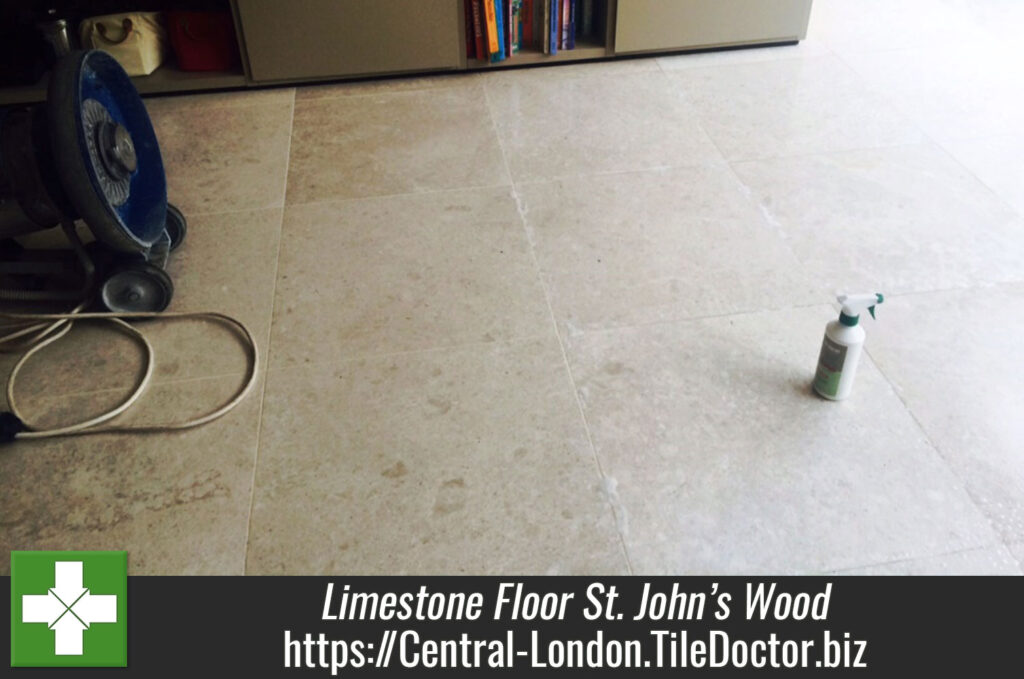
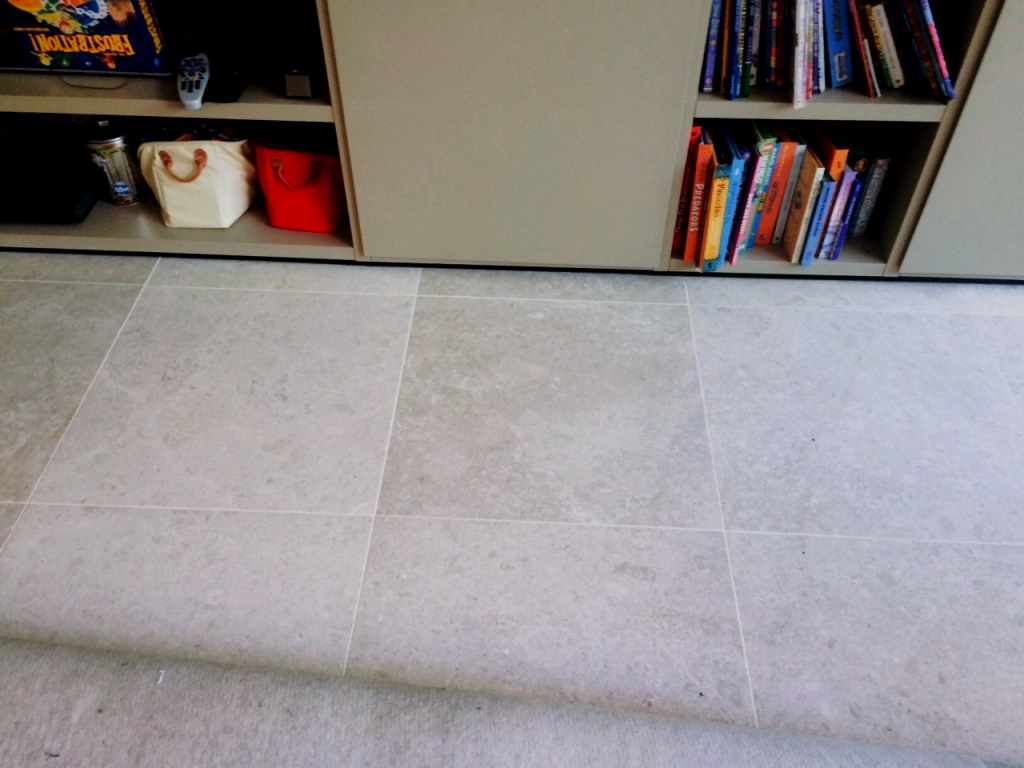
I was recently engaged to refresh the Limestone tiled floor at a house in St. John’s Wood, which is a very affluent area and apparently has the 5th most expensive postcode in London so as you can imagine this was a very expensive floor. The client had requested an improvement condition of the Limestone tiles in the living room and a thorough clean, polishing and seal was required. Over time, the floor in this busy living room – which was also used as a play area for young children – had become dirty and certainly worse for wear with all the use it had been getting. So, I set about my work to get this floor back to looking its best.

Cleaning and burnishing a Limestone floor

My initial task before beginning the cleaning process was to remove any furniture (as well as toys) from the room so I would have a clear area to work in. I then applied a layer of Tile Doctor Pro-Clean cleaner, diluted with water, to the floor. Pro-Clean is also suitable for use on other natural stone floors such as Slate, Granite and Travertine.

After leaving the solution to dwell for a period of a few minutes, I began to scrub the floor with a stiff hand brush. Whilst helping to remove a lot of the built up dirt on the surface of the tiles, the product also stripped off the old sealer and polish. Following this, I paid special attention to the dirty grout lines, cleaning them with Tile Doctor Oxy-Pro, a powerful, high-alkaline cleaner.

Limestone Floor London NW8 After Cleaning Grout Lines with Oxy Pro Limestone Floor London NW8 After Cleaning Grout Lines with Oxy Pro

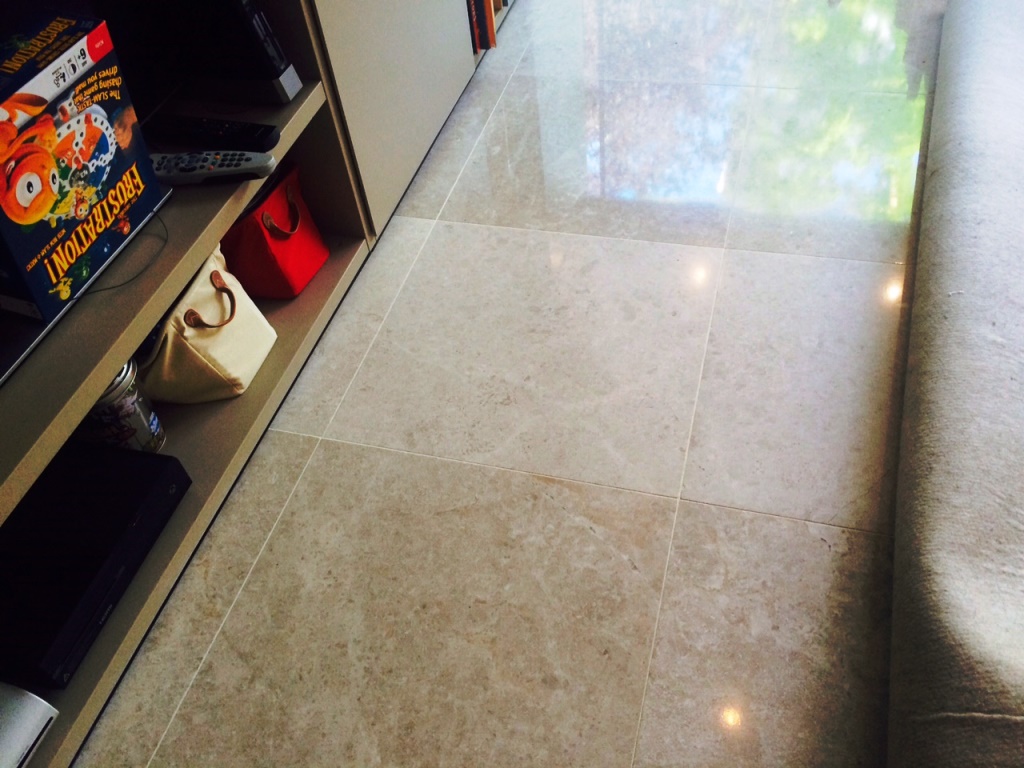
After completing the cleaning, I rinsed the floor with clean water to remove any excess cleaning products. I then began to burnish the floor using Tile Doctor Diamond encrusted burnishing pads. This was done in four steps, as I used four different pads (coarse, medium, fine and very fine) rinsing the floor with water between each pad. I would recommend using this setup of four pads for restoring the appearance of polished stone floors; you starting with a coarse pad and the gradually work your way up to the very fine pad achieving a high polish finish in the process. I finished of the process with a quick rinse and a buffing pad to give the floor a final polish before I commenced the sealing.

Sealing a Limestone floor

My choice of sealer was Tile Doctor Colour Grow, which is specifically designed to not only provide durable surface protection, but also to intensify the colour of the tiles. The sealer penetrates deep into the pores of the stone, providing water resistance and long-term protection from ingrained dirt and stains. As you can see from the photos, the sealer really helped to accentuate the fantastic natural colours in the Limestone.

Limestone Floor London NW8 After Burnishing Limestone Floor London NW8 After Burnishing

My client was very pleased with the final result, and was amazed by how quickly I had been able to improve the state of her floor which, with a colourful and shiny finish, has really brightened up the living room.

Full Restoration on Limestone Floor in St. John’s Wood

Cleaning, Burnishing and Sealing a Limestone Floor in St. John’s Wood Read More »

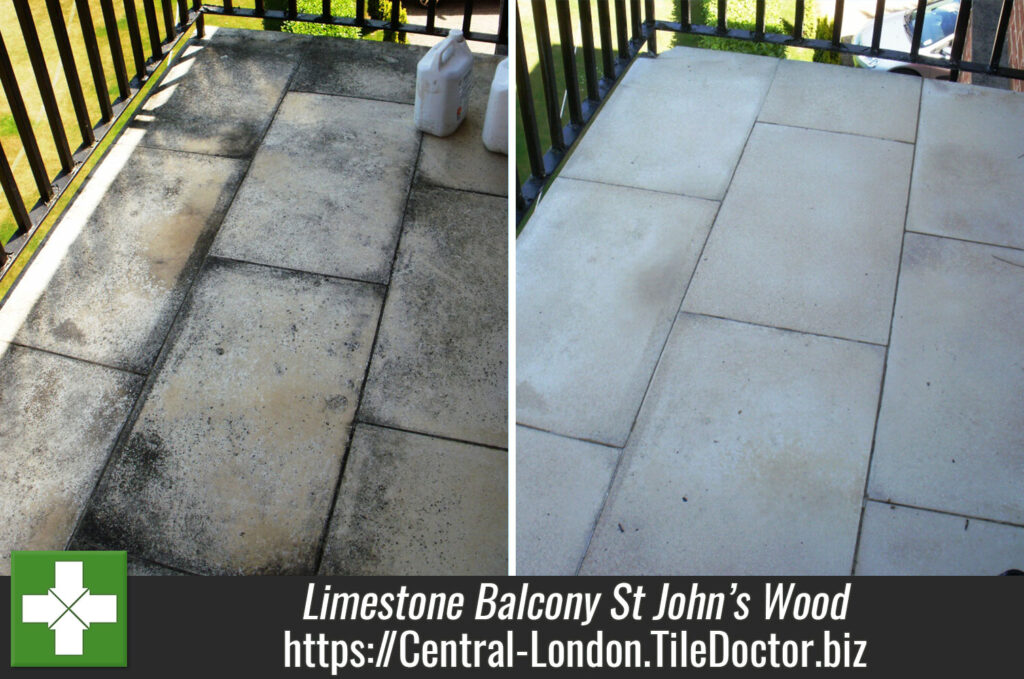
Limestone Balcony NW8 before and after Cleaning

Cleaning a Limestone Balcony in St John’s Wood

This balcony in St John’s Wood, London, NW8, which had been clad in Limestone floor tiles, had not been professionally cleaned for 15 years and was now covered in mould which the customer was unable to remove.

Limestone-Balcony-NW8-Before-Cleaning

Stripping the Limestone Tiled Floor

To get the Limestone clean I used a neat solution of Tile Doctor Pro-Clean with was left to soak into the stone before being worked in with rotary machine fitted with a black buffing pad. This process removed most of the mould but there were still some stubborn patches so I then used a further application of Pro-Clean this time mixed 50/50 with Nanotech Ultra Clean to add an abrasive element to what is a powerful alkaline cleaning product. This was scrubbed into the tile and then steamed off using a Bosch steamer followed by further scrubbing by hand.

The next step was to use a set of four Tile Doctor burnishing pads to polish the Limestone surface to a low sheen. These diamond encrusted pads come in a number of different colours and are applied one after another with each pad being a finer grade than the last. After thoroughly rinsing the stone again and removing the waste water with a Numatic aqua vacuum I left the tiles to dry off overnight. Luckily the weather remained fine.

Sealing Yorkshire Limestone Tile

The next day I sealed the Limestone tiles using two coats of Tile Doctor Colour Grow sealer which I prefer for Limestone as it enhances the natural colours in the Limestone floor as well as providing stain protection something I’m sure it’s going to need given the location.

Limestone-Balcony-NW8-After-Cleaning
Although not quite all the damage from the mould could be entirely removed the tile was 95% improved and the customer was very satisfied with what had been achieved.

Limestone Restoration in St John’s Wood

Cleaning a Limestone Balcony in St John’s Wood Read More »

=================================

Central London Tile Doctor

================================= Read More »

Scroll to Top