City of London Tile Cleaning

City of London Tile Cleaning

Welcome to my Work History archive where you will find examples of the cleaning and renovation of tiles carried out in City of London.

Victorian Tile After Cleaning in London

Victorian Hallway Tile Restoration in London W2

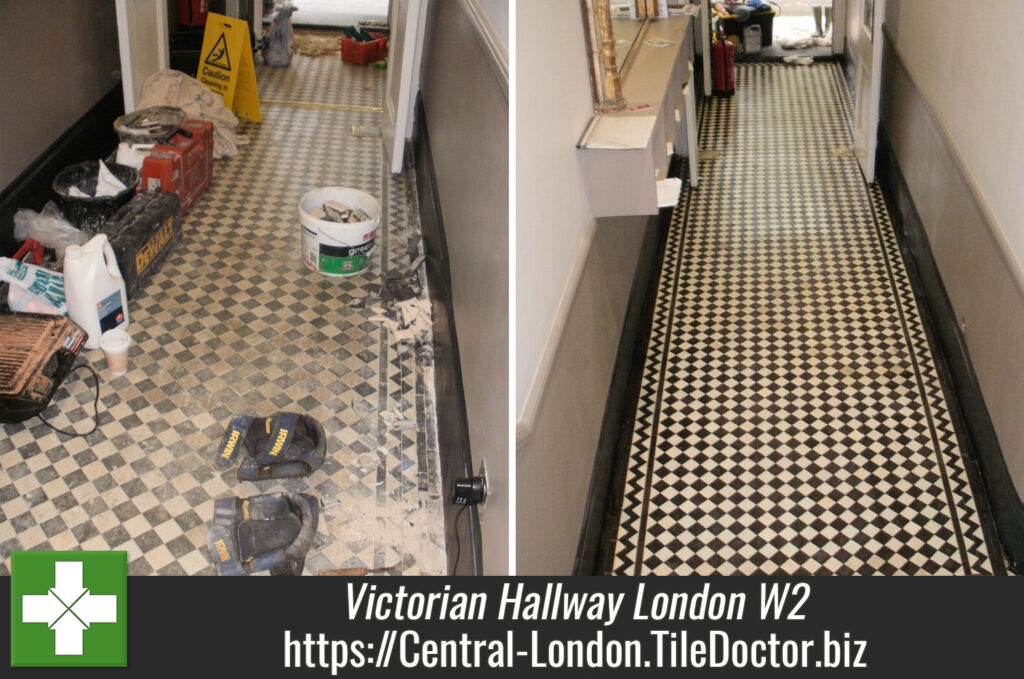
This large entrance hall tiled in Victorian black and white floor tiles in London W2 had been quite badly damaged in the past by having a carpet glued and nailed on to it. Many tiles were broken or missing and those missing had been replaced by cement.

Victorian-Tile-Before-Cleaning-in-London.jpg

Cleaning a Victorian Floor

On the first day of this three day job I removed the cement filling and extracted the nails that remained in the floor. I then stabilised the exposed area with a PVA solution before replacing the missing tiles with replica or salvaged ones to match the floor was swept out and vacuumed to remove all loose debris.

On the second day I cleaned the floor, removing the old carpet glue with Tile Doctor “Remove and Go” which was left to dwell onto the tile for a while to allow it to soak into the tile and break down the adhesive; this was then removed with a wet vacuum. The next step was to clean the tiles using Tile Doctor Pro-Clean which was worked in with a black srubbing pad to scrub the cleaning solution into the tile and finish off the cleaning process, again the soiled solution was removed with a wet vacuum. Normally by now the floor would of have been clean however In this case the levels of soaked-in old glue and ground-in dirt from decades of use were such that the floor also required steaming, scraping and wire brushing with a Spid brass wire brush before a final clean with another round of Pro-Clean and a black buffing pad fitted to a Numatic buffing machine. This had the desired affect and the last step was to wash the floor down with clean water to remove any remaining chemicals etc.

Sealing a Victorian Floor Sealing

After leaving the floor to dry overnight I came back the third day to seal the floor using four coats of Tile Doctor Seal and Go which is ideal for Victorian tiled floors as it leaves a low sheen finish whilst providing excellent stain protection.

Victorian-Tile-After-Cleaning-in-London
As you can see from the ‘before’ and ‘after’ photos the results were impressive and the customer described it as, “looking great”.

Victorian Tiled floor cleaned and sealed in West London

Victorian Hallway Tile Restoration in London W2 Read More »
Tumbled Marble London After

Cleaning a Tumbled Marble mosaic wet room floor in London SE1

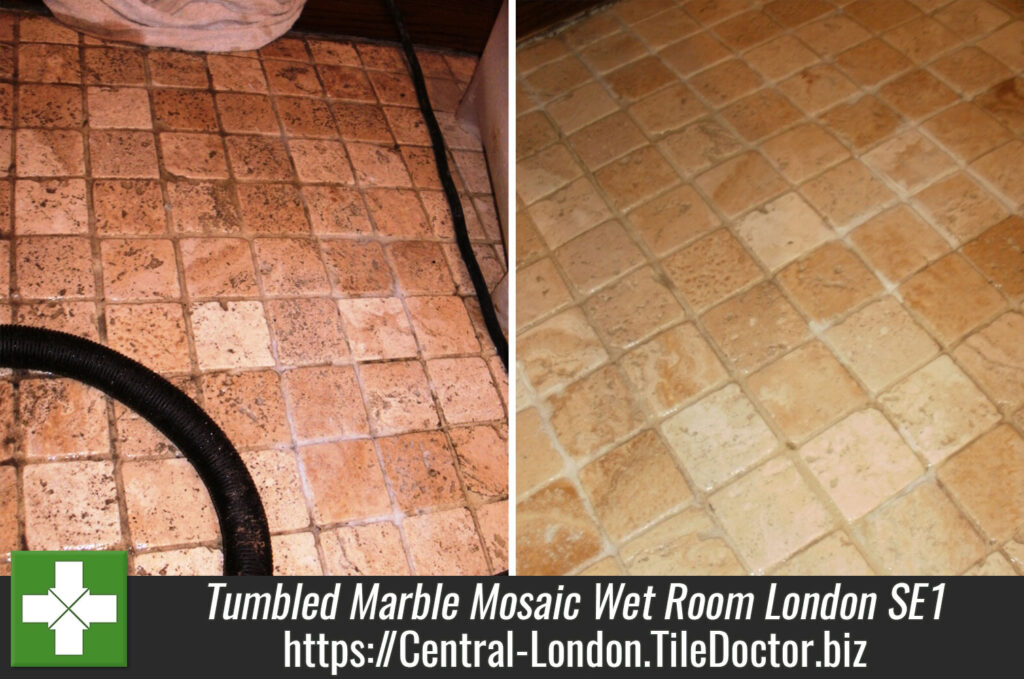
This Tumbled Marble mosaic wet room floor was installed in a house in London, SE1 four years before prior and was now looking a little tired. This was mostly caused by a build-up of Limescale which had then become grimy.

Tumbled-Marble-London-Before

Stripping a Tumbled Marble Floor

To treat the Limescale I used Tile Doctor Grout Clean Up which managed to remove most of the scale and to remove the remainder I steamed the tiles using an Earlex Steamer and carefully scraped any remaining Limescale residue away with a Stanley window scraper. To restore the marble itself I used Tile Doctor burnishing pads to re-polish the tiles using 17″ pads on the main area and 8″ pads on a hand-held Clarke polishing machine in the corners. These diamond encrusted pads come in a number of different colours and are applied one after another with each pad being a finer grade than the last. After thoroughly rinsing the stone again and removing the waste water with a wet vacuum. As the marble was naturally fast drying I used an Earlex heat gun to speed dry the floor and repeated this after lunch to ensure the floor was entirely dry before sealing.

Sealing Tumbled-Marble Tiles

Once the Marble tiles were dry I started to seal them using two coats of Tile Doctor Colour Grow sealer which is a great choice for natural stone as it enhances the natural colours in the tile as well as providing stain protection.

Tumbled-Marble-London-After
As the photographs show the results were very good and the customer was highly delighted.

Tumbled-Marble-London-After
 

Restoring Tumbled Marble Mosaic in a Wet Room

Cleaning a Tumbled Marble mosaic wet room floor in London SE1 Read More »

Ceramic Tile Cleaning before and after

Ceramic Tiled Floor Cleaned in London W9

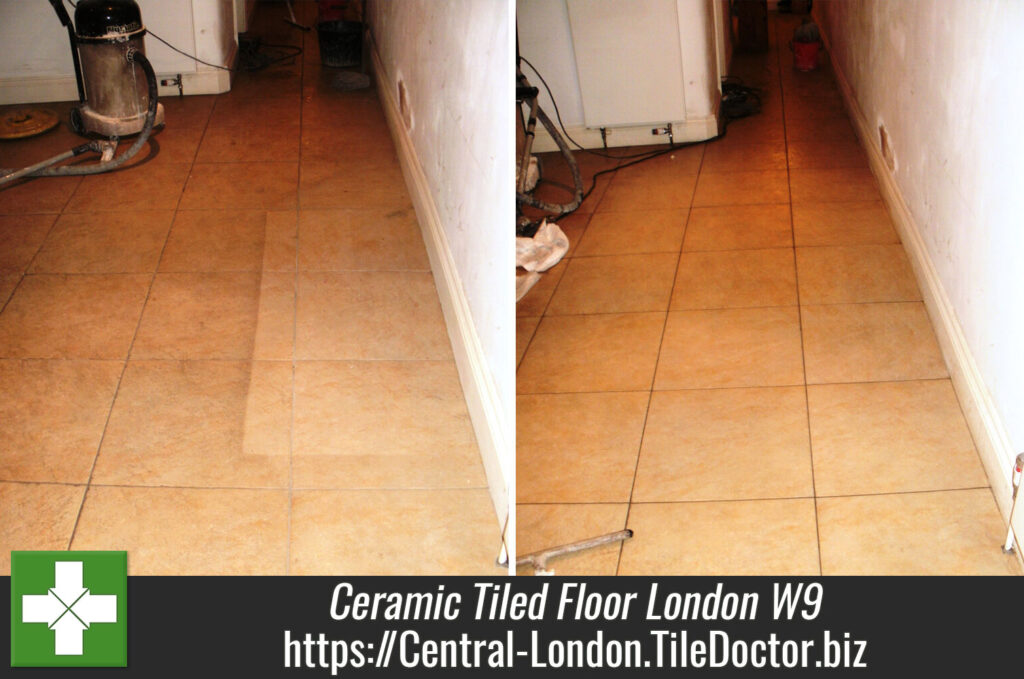
These ceramic tiles situated in a large flat in Bravington Road W9 which is near Kensal Town in the City of Westminster, London. The tiles had been in place when the client moved into the flat some years ago and were badly in need of deep cleaning, attempts to remove the dirt using a steam cleaner had been successful but very slow. In the end the owner, realising that cleaning more than 75 square metres of tile herself in this way was going to take too long, decided to call in professional help from Tile Doctor.

Ceramic Tile Cleaning Before

Cleaning Ceramic Tiles

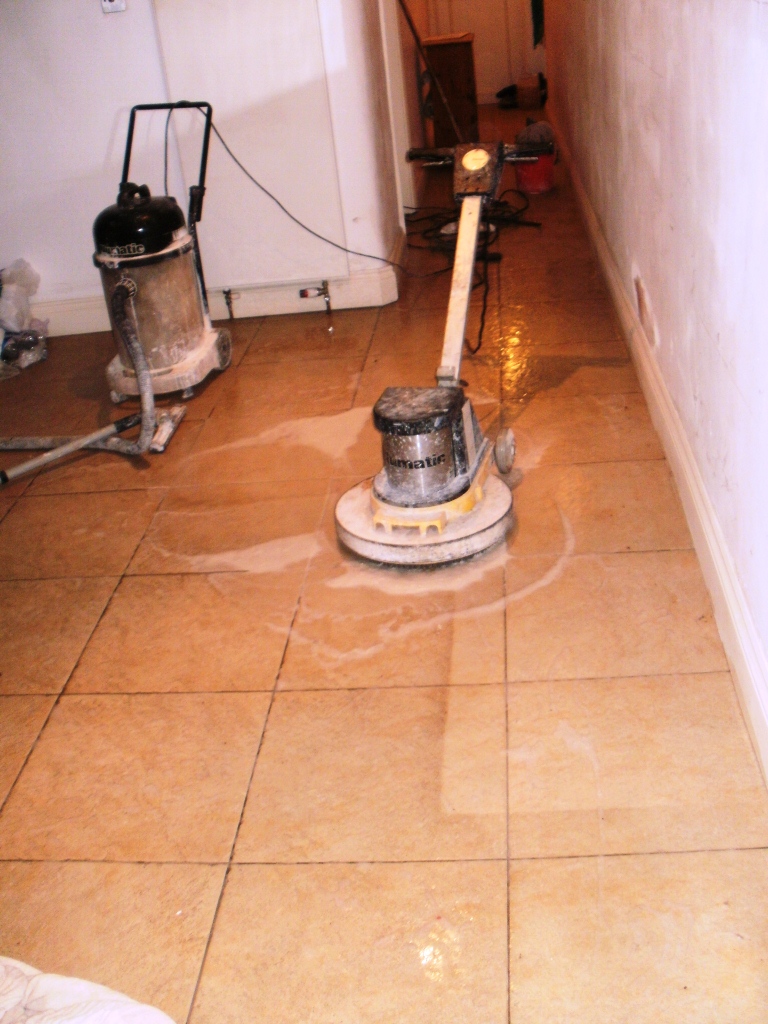
Using Tile Doctor Pro-Clean which is a heavy duty alkaline cleaning product and a medium brush on a Numatic buffing machine I lifted most of the ground-in dirt from the tiles before rinsing and scrubbing the floor again with a black buffing pad and scrubbing the grout clean by hand using a stiff grout brush.

Ceramic Tile Cleaning During
I then thoroughly washed the floor with a mop and fresh water which was then removed with an aqua vacuum, this process was repeated until I was satisfied the floor was clean. When the floor was dry it revealed an nearly as-new ceramic tiled floor with a pleasing sandstone imitation design.

The photos show the floor before cleaning with a mark around where a piece of furniture had been removed and then the uniformly clean floor after the cleaning process was complete. The customer was delighted with the restored condition of her floor and amazed that it could have been made so clean.

Ceramic Tile Cleaning After
 

Ceramic Tiles Deep Cleaned in London W9

Ceramic Tiled Floor Cleaned in London W9 Read More »

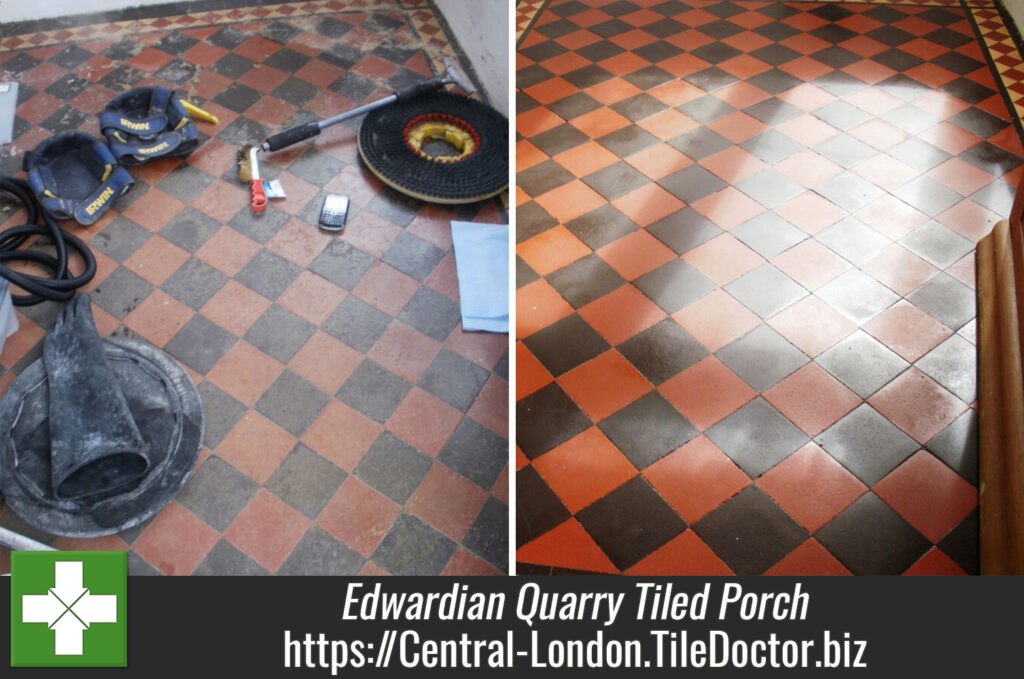
Edwardian Quarry tiled porch before and after cleaning and sealing

Cleaning an Edwardian Quarry Tiled Porch

These photographs are from an Edwardian Quarry tiled porch at a house in central London. The tiles had previously been sealed with several layers of varnish which was now beginning to wear off in places and was making the entrance to the house look very untidy.

Cleaning Edwardian Quarry Tiles

I used a mixture of Tile Doctor Remove and Go and Nanotech Ultra Clean and left it to soak into the floor for an hour to break down the old varnish. The floor was then rinsed with clean water and steamed to remove any remaining residue. Following this I used a solution of Tile Doctor Pro-Clean cleaner worked into the floor with a rotary machine fitted with a black buffing pad to machine clean the floor giving it another rinse to neutralise the floor of any chemicals before leaving for the day

Edwardian Quarry Tiled Porch Before Cleaning

Sealing Quarry Floor Tiles

The next day the tiles had dried out overnight and were ready for sealing for which we used three coats of Tile Doctor Colour Grow which is a durable sealer that helps to lift the colour out of the tile.

Edwardian Quarry Tiled Porch After Cleaning and Sealing
You can see the difference in the floor from the photographs in fact the customer said that they had put up with the condition of the tiles in the porch for ten years and were very pleased to have found a solution with Tile Doctor.

Edwardian Quarry Tiled floor restoration in London

Cleaning an Edwardian Quarry Tiled Porch Read More »

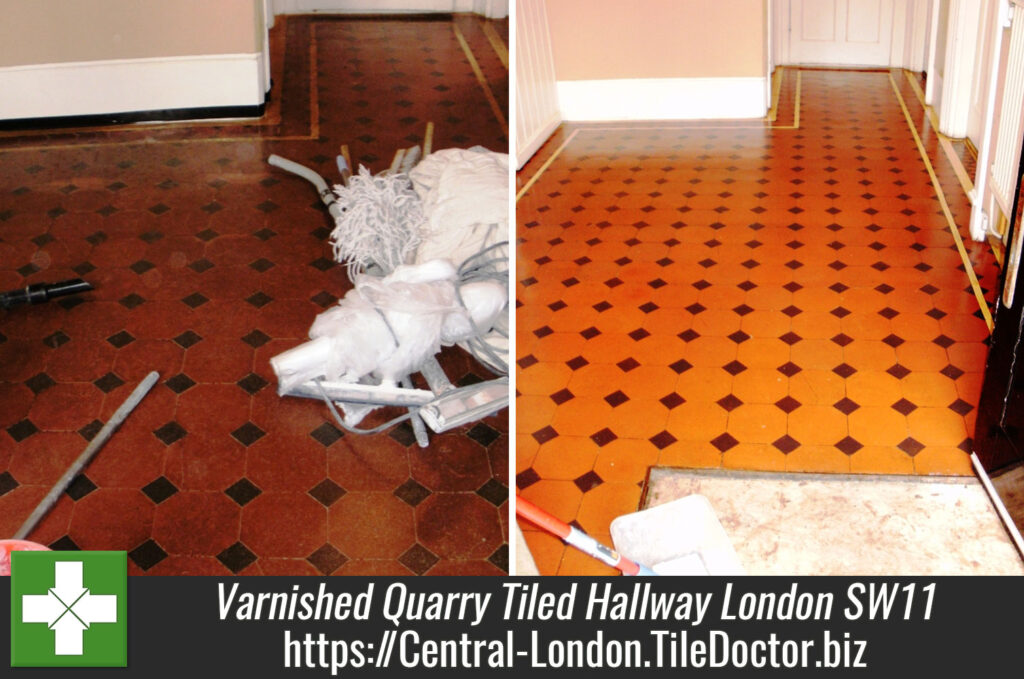
Quarry Tiled Hallway before and after cleaning and sealing

Varnished Quarry Tiled Hallway Restored in London SW11

This Quarry tiled hallway installed in a house in South West London had been varnished many years previously and was worn through leaving a dark and uneven appearance and difficult to clean.

Cleaning the Quarry Tiled Floor

We started cleaning the Quarry Tiles by applying a strong solution of Tile Doctor Pro-Clean worked into the floor using a buffing machine fitted with a black scrubbing pad. Although this had an effect on the Varnish it was proving difficult to shift so using a scraper tool it was manually scraped off the floor. The floor was washed down with clean water and then cleaned again using Pro-Clean before finally washing down three more times using clean water in order to neutralise the floor and remove any trace of cleaning products before sealing.

Quarry-Tiled Hallway before cleaning

Sealing Quarry Floor Tiles

The floor was left to dry overnight and I came back the next day to apply the sealer. For sealing the Quarry tiles I used five coats of Tile Doctor Seal and Go, it’s recommended for Quarry tiles and adds a nice low sheen to the floor; sealing does take time as it’s necessary to allow each coat to dry before applying the next so it took most of the day to complete the job. You can see the difference in the floor which has come up a lot lighter and is now much easier to maintain.

Quarry-Tiled Hallway after cleaning and sealing
 

Removing Varnish from a Quarry Tiled Floor in London SW11

Varnished Quarry Tiled Hallway Restored in London SW11 Read More »

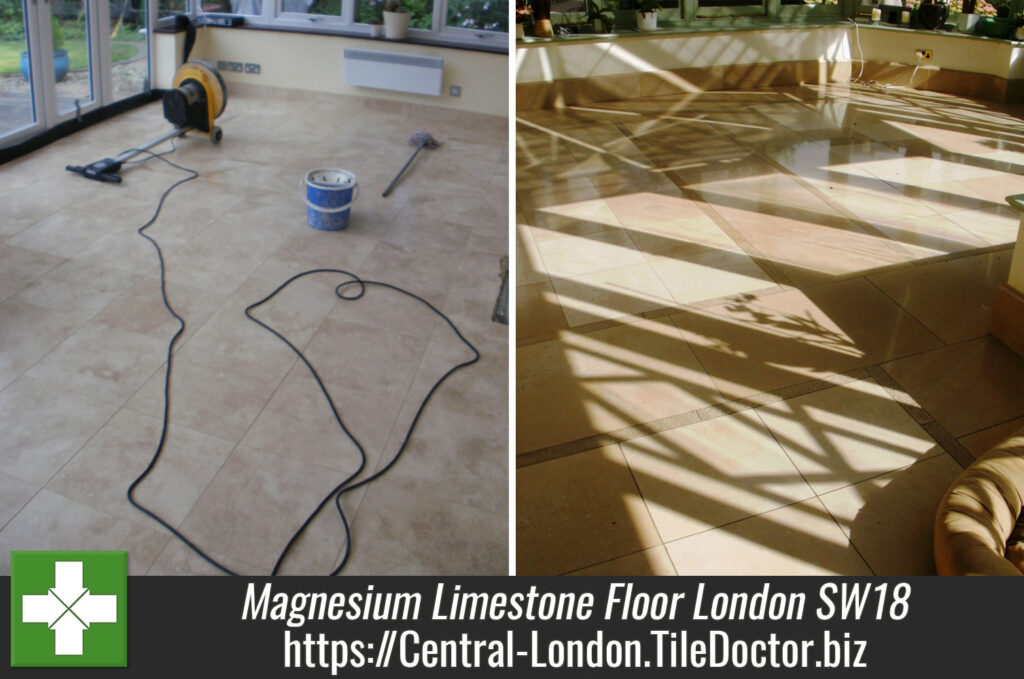
Imported hard magnesium limestone before and after

Polishing hard Magnesium Limestone floor tiles in London SW18

The owner of this house in Wandsworth had imported these hard magnesium Limestone tiles direct from Italy and fitted them into a conservatory three years prior; over they years however they had lost their shine and started to go dull and look uninviting. This is fairly normal for polished stone which does need to be re-polished for it to keep its appearance however the owner was unhappy with the finish and wanted it re-polished. There were also a number of naturally formed holes in the Limestone floor and these needed filling to give a completely even appearance.

Stripping and Polishing the Limestone Tiled Floor

To resolve we filled the holes using grout coloured to match the Limestone surface and then proceeded to strip back the tile surface using a set of burnishing pads. These diamond encrusted pads come in a number of different colours each one does a different job from scrubbing to polishing. I started with the red pad together with water and then carried on with the white, then yellow pads using water. Finally when I had dried the floor I used a green pad to buff the floor up. This activity took most of the day so left the floor to dry overnight.

Sealing Magnesium Limestone Tile

The next morning I arrived to find the floor had dried out and so began to seal it which was done using a couple of coats of Tile Doctor Colour Grow which does what it says on the bottle and as well as provided stain protection lifted the natural gold colour in the Limestone floor. Once the sealer had dried I then finished it all off with a quick buff using a white buffing pad.

Imported hard magnesium limestone after
Apologies for not capturing a good before photograph for comparison, I can tell you however that the owner was very pleased with the results and reported they looked better than when they were new.


Hard magnesium limestone tiled floor polished in Wandsworth SW18

Polishing hard Magnesium Limestone floor tiles in London SW18 Read More »

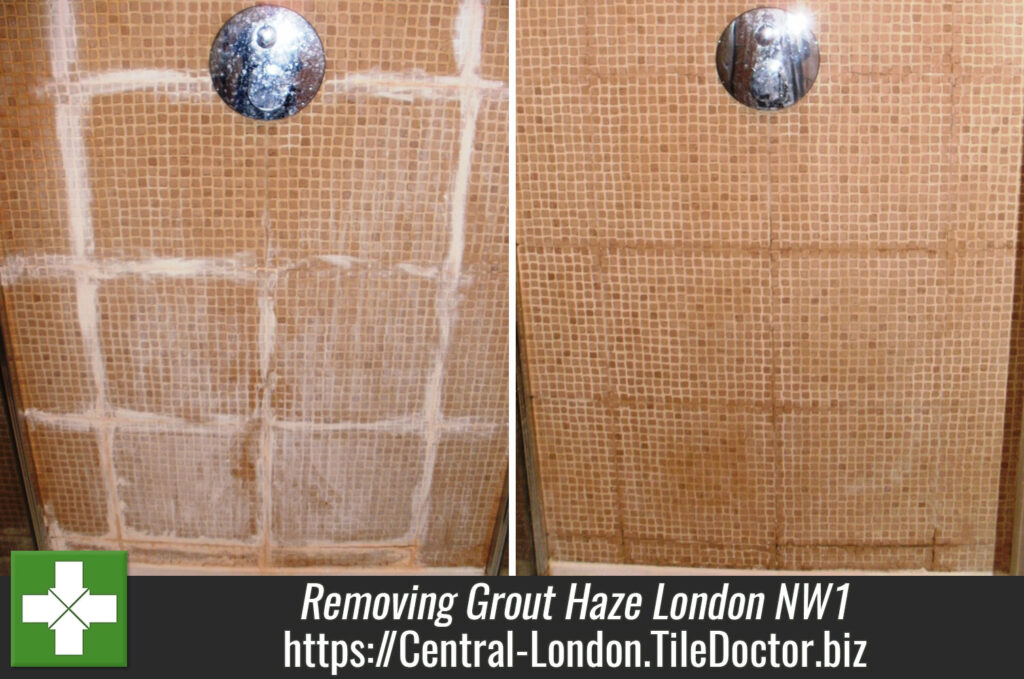
Ceramic Shower Cubicle Grout Haze before and after

Removing Grout Haze in a Shower Cubicle, London NW1

These ceramic mosaic tiles were fitted in square sheets in a shower cubicle at house in London NW1. You can clearly see from the first photograph that the tiler did not remove the grout from the tile before it set leaving grout haze on most of the tile and a nice white band of grout between the mosaic sheets.

Removing Grout Haze

To clean up the ceramic tiles and remove the grout we sprayed on Tile Doctor Grout Clean-up which is a specialist acid based product that penetrates below the surface of the grout to remove allowing it to be removed. It’s reasonably easy to apply, you need to wet the tile first and then apply a dilution of the Grout Clean-up, leave it dwell on the tile for a few minutes allowing it to get to work and then scrub it in. With it being an acid it’s important not to leave it on the tile very long and wash it off within five minutes and rinse down the tile with water.

Ceramic Shower Cubicle Grout Haze Before Ceramic Shower Cubicle Grout Haze After

Cleaning Ceramic Mosaic Tiles

Once the tiles were free of grout the next step was to clean the tiles for which we used Tile Doctor Pro-Clean which is a versatile alkaline tile cleaning product that can be diluted in different strengths depending on if your looking to clean the tile or strip sealers. In this case we could also of used Tile Doctor Oxy-Pro shower Tile and Grout Cleaner which is a ready to use tile and grout cleaner that comes with a spray nozzle attachment, the spray allows the cleaning agent to mix with air making it lighter and easier to stick to vertical surfaces. This is important as you need to let the cleaning agent dwell on the surface of the tile and grout for a few minutes before scrubbing it by hand with a stiff brush and then washing it off with clean water.

The ceramic mosaics did not need sealing so the renovation was now complete, grout removed and tiles cleaned, and naturally the customer was very pleased with the results and the cubicle was transformed.

Shower Cubicle Restored in London NW1

Removing Grout Haze in a Shower Cubicle, London NW1 Read More »

=================================

Central London Tile Doctor

================================= Read More »

Scroll to Top