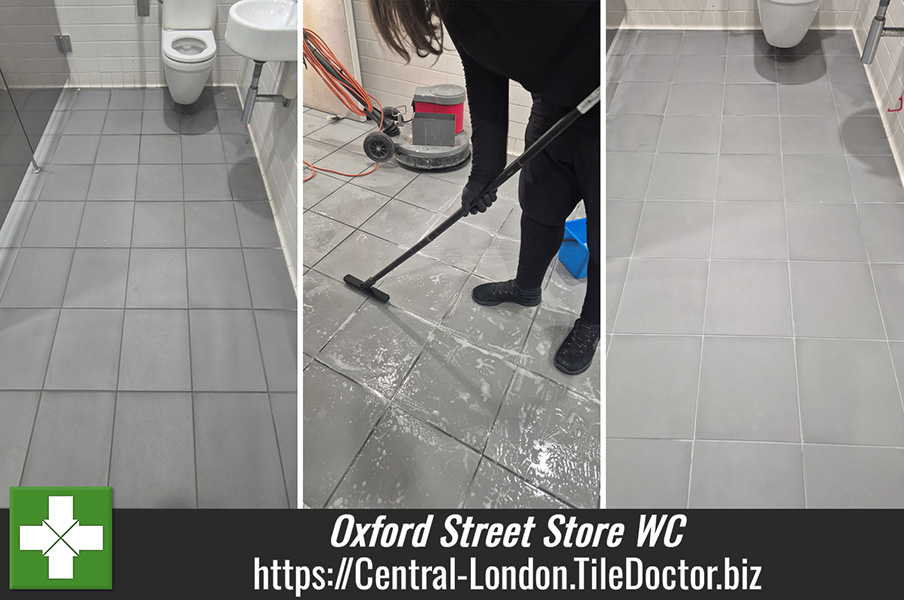
Grout Cleaning

Welcome to my Work History archive where you will find detailed examples of the cleaning and renovation of Grout carried out in Central London

Cleaning and Renovating Grout

The top layer of grout is porous and can absorb grease, dirt and limescale. Spillages such as wine, lemonades or greasy substances will cause marks and patches in the joints in the floor. Grout between wall-tiles particularly in damp areas like bathrooms will become dirty and unattractive as a result of Mould, Mildew and Limescale.

Mould is one of the most unsightly problems, which usually starts off in the wettest area of the room, this could be the bottom of the shower or bath, then starts to spread and if left unchecked could cover a large area of the wall.

Another common issue we find is a problem known as Grout Haze or Grout Smearing where a thin layer of grout has been left to set on the surface of the tile. Once grout has set it is difficult to remove.

Discolouration of grout joints in bath or shower areas due to continued use of acid formulated shampoos and soaps. This causes yellow orange and pink stains to the grout over even a short period of time. Whilst Grout Joints can be cleaned, badly stained grout may need to be re-coloured.

Protecting your grout in advance with a sealer will prevent most of these issues and although relatively unknown in the UK, protection awareness is growing. Sealing forms an invisible barrier between the grout and the surface, this will then protect your investment for years to come.

We have solutions for all the problems listed above and below you will find detailed examples of work we have carried out in the past to resolve many of these issues. It should give you some idea of what’s involved and what can be achieved with the right techniques and products.


Limestone Kitchen Floor Renovation Marylebone

Gruby Limestone Kitchen Floor Renovated in Marylebone

The pictures below are of a Limestone tiled kitchen floor at a property just off Marylebone High Street in Central London. My client has a dog, and years of walking back from Regents Park through West London streets back into the kitchen floor has led to it becoming very dirty.

Over the year the sealer had worn down and this had allowed dirt to become lodged in the natural pits that are common with Limestone. The dirt had then become ingrained in the stone turning it black in places and resulting in a very undesirable appearance. The other problem that can play a part here is dog urine which is naturally acidic (uric acid) and can weaken a sealer.

Limestone Kitchen Floor Marylebone Before Cleaning

As usual I arranged a visit to the property to survey the floor and work out which method and products would be best for renovating it. From that I was able to work out an accurate quote for its renovation and later I emailed a quotation across to my client which was accepted.

Cleaning a Limestone Tiled Kitchen Floor

To get the floor clean I started by spraying a strong dilution of Tile Doctor Pro-Clean onto the Limestone tile and grout and left it to soak in for ten minutes to give it time to break down the dirt. Then the floor was thoroughly scrubbed with a rotary floor buffer fitted with a poly brush, this was followed up with hand scrubbing with Tile Doctor Pro-Clean along the grout lines. The floor was then rinsed with water and all the soiling extracted with a wet vacuum.

To further refine the appearance of the limestone a 400-grit diamond encrusted burnishing pad was run over each tile using water to lubricate. After another rinse and extraction with the wet vacuum the process was repeated with the finer 800-grit pad. My client didn’t want a high shine, so I finished on the 800-grit pad and gave the floor another rinse.

Sealing a Limestone Tiled Kitchen Floor

The floor was left to dry off overnight and the next day I returned and dry burnished the floor with a 3000-grit pad to improve its appearance even further. Dry burnishing is done using only a few drops of water and leaves the floor completely dry and ready for sealing.

To protect the now clean Limestone tile and grout from ingrained dirt it was sealed using Tile Doctor Colour Grow sealer which is an impregnating sealer containing a colour enhancing formula. A couple of coats were applied allowing thirty minutes of drying time between each coat. Impregnators work by occupying the pores within the stone thereby preventing dirt from taking up residence there.

Limestone Kitchen Floor Marylebone After Renovation

The client was very happy with the work we carried out. We recommended the use of Tile Doctor Neutral Tile Cleaner which is pH neutral and will help maintain the floor and the newly applied sealant, it is mild enough to use daily, so will keep those muddy paw prints at bay!


Professional Renovation of a Limestone Tiled Kitchen in Central London

Gruby Limestone Kitchen Floor Renovated in Marylebone Read More »

Quarry Tiled Balcony Renovation Notting Hill W11

Quarry Tiled Balcony Patio Renovated for Notting Hill Landlord

The Quarry tiles in the photographs below were actually installed on the balcony of a flat in London’s famous Notting Hill W11. The property had been rented out and not surprisingly never maintained properly by the tenants.

Quarry Tiled Balcony Patio Before Cleaning Notting Hill W11

There was a lot of grime and algae on the tiles which made the patio look very uninviting. The landlord was keen to rent out the flat as soon as possible and the balcony needed a end of tenancy clean to sort it out before potential tenants were shown round.

Deep Cleaning a Quarry Tiled Balcony Patio Floor

Having been entrusted with the keys and having negotiated appropriate parking I went round on a warm day to renovate the tiles and get them in the best condition possible in advance of the viewing. Fortunately, the lift was working so after a couple of trips up and down with various items of equipment I was soon setup and ready to get going.

To get the quarry tiles clean I used a strong treatment of Tile Doctor Remove and Go which was sprayed onto the tiles and left to soak in for fifteen minutes to allow time for the solution to get to work breaking down the dirt and old sealers. Then, I ran over each tile multiple times with a floor buffer fitted with a Black scrubbing pad. I also used a stiff brush along the grout lines to get them clean, however, the staining was bad so short of grout colouring or re-grouting I was only able to make a modest improvement. The landlord just wanted the balcony to be presentable, so I stuck to getting them as clean as possible.

Once finished cleaning the now dirty cleaning solution was rinsed off with water and extracted using a wet vacuum. I was then able to inspect the floor and carry out spot cleaning where I felt more work was needed. One of the problems I found was the presence of limescale and to remove that I realised I needed to use an acidic product that would dissolve it.

To treat the limescale I gave the floor a second clean using Tile Doctor Acid Gel which was scrubbed in with handheld brushes and another fresh black pad. Once done, the tiles were rinsed again, and a wet vacuum was employed to get the tiles as dry as possible. Fortunately, the sun came around that side of the building towards the afternoon and the patio was bathed in sunlight allowing it to dry faster.

Sealing a Quarry Tiled Balcony Patio Floor

The quarry tiles needed to be completely dry before I could seal them and with the weather forecast looking good overnight and into the next day so I left them to dry off completely overnight.

The next day I returned and started by checking the tiles were dry using a damp meter. The readings were good, so I was able to start with the application of a protective sealer which for these tiles I used Tile Doctor Colour Grow.

Only a couple of coats were required however it is quite time consuming, and you have to wait 30 minutes between coats. This sealer has a breathable formula which is well suited for use on this patio, and it contains a colour enhancer which helps to bring out the colours in the Quarry tile.

Quarry Tiled Balcony Patio After Cleaning Sealing Notting Hill W11

For the regular cleaning of sealed Quarry tiles, I recommend Tile Doctor Neutral Clean which is supplied in a concentrate so a 1 litre bottle goes a long way. You can’t use strong cleaning products on sealed tiles as they will prematurely erode the sealer so Neutral Cleaner is an ideal choice.


Professional Renovation of Balcony Quarry Tiles in Central London

Quarry Tiled Balcony Patio Renovated for Notting Hill Landlord Read More »

Large Limestone Floor Before After Polishing Hammersmith

Limestone Floor Cleaned and Polished in Hammersmith

Recently I paid a visit to a customer in Hammersmith whose whole ground floor was covered in Limestone tiles. It was a nicely situated Victorian house, but the Limestone floor was a big concern for the owner. The floor had been installed during a house renovation approximately seven years earlier and hadn’t been treated since. The Limestone was now looking dull and in need of a renovation to bring back the polished appearance.

Limestone Floor Before Polishing in Hammersmith
Limestone was used throughout the property including the Hallway and Kitchen which are typically the busiest area’s and so not surprisingly they had seen the biggest build-up of soiling. This is not an unusual situation for stone floors which will trap dirt in the pores of the stone once the sealer wears off. Sealer wear is inevitable and will usually last between three to five years depending on use and what is used to clean the floor.

Limestone Floor Before Polishing in Hammersmith
I explained the process of renovating and honing the Limestone and bringing back its appearance, after agreeing on details we chose the dates. The job was scheduled for 3 days to be completed.

Cleaning Limestone Floor Tile and Grout

When we arrived on the first day, we set about covering the skirting boards and furniture, to protect from any splashes. Then starting in the Kitchen and Dining area the first phase involved giving the floor an initial clean using a strong dilution of Tile Doctor Pro-Clean. The primary focus was on the grout lines which were hand scrubbed using a stiff grout brush.

Then the solution was spread all over the tiles and left for approximately ten minutes to allow it to soak into the pores of the stone and break down the dirt and what was left of the old sealer. I used a black scrubbing pad fitted to a rotary machine to work the solution into the floor. Then the floor was then carefully rinsed, and the soil extracted with a vacuum.

The floor was already showing improvement when I moved onto phase two which reconditions the stone using a set of diamond encrusted Burnishing Pads. There are four pads in the set, each one with a different grit from coarse 400-grit through to extra fine 3000-grit. I started with the 400 grit, followed by 800, 1500, 3000 grit to bring back the shine. Water is used to lubricate the process and the floor is rinsed well after each step to remove the fine slurry generated. At the end of the first day the Kitching and Dining section looked really good in comparison to the untouched areas and I hadn’t applied the sealer yet.

Sealing Limestone Floor Tiles

On the second day we started on the Limestone floor in the Hallway using the same technique as before. Being a smaller area, it didn’t take as long to complete, and we were able to make a start on applying a fresh sealer to the floor we cleaned the day before.
Underfloor heating was installed, and this is useful for helping to dry a wet floor however I don’t like to use it when sealing and I asked the owner to switch it off. In my experience you get a better result if the sealer is allowed to dry and cure naturally.

For this floor I used Tile Doctor Colour Grow, Limestone is a light stone and Colour Grow really brings out the brown shades in the stone. It actually works by penetrating into the pores of the stone thereby preventing dirt from becoming ingrained there. As well as protecting the stone it will also make regular cleaning much easier and for polished Limestone you should use Stone Soap which is designed for cleaning sealed stone floors and will help maintain the patina.

Limestone Floor After Polishing in Hammersmith
The job took 3 days to complete but to do it properly and to a high standard there is no place for a rush or cutting corners. The final result was transformational, and our customer was more than happy.

Limestone Floor After Polishing in Hammersmith
 

Professional Restoration of a Polished Limestone Floor in West London

Limestone Floor Cleaned and Polished in Hammersmith Read More »

Emery and Cie Tiles After

Emery and Cie Cement Encaustic tiles Restored in Ealing

This unusual Emery and Cie Cement Encaustic tiled floor in Ealing W5 had been poorly installed by the tiler with grout haze on the tiles and the wrong sealer used. Cement encaustic tiles are quite delicate and difficult to restore.

Cleaning Cement Encaustic Tiles

I used a red burnishing pad fitted to a buffing machine to cut into the tile surface and remove the grout haze and old sealer. The next step was to apply a dilution of Tile Doctor Pro-Clean letting it soak into the tile before working it in to the tile with a red buffing pad. The soiled cleaning solution was then removed using a wet and dry Vacuum and the floor washed down with clean water. This cleaned up the floor well but there were some stubborn stains which were removed using a steamer.

Cement Encaustics Before Emery and Cie Tiles After

Sealing Cement Encaustic Tiles

Once the floor had dried it was sealed using three coats of Tile Doctor Colour Grow which is a colour intensifying sealer that provides durable surface protection. Last step was to burnish the tiles again with a green burnishing pad to bring up the shine.

Although the floor had been too damaged to be made perfect, it was very much better when I had finished and the customer was delighted with the result.

Cement Encaustic tiles cleaned and Sealed in London

Emery and Cie Cement Encaustic tiles Restored in Ealing Read More »

Ceramic Shower Cubicle Grout Haze before and after

Removing Grout Haze in a Shower Cubicle, London NW1

These ceramic mosaic tiles were fitted in square sheets in a shower cubicle at house in London NW1. You can clearly see from the first photograph that the tiler did not remove the grout from the tile before it set leaving grout haze on most of the tile and a nice white band of grout between the mosaic sheets.

Removing Grout Haze

To clean up the ceramic tiles and remove the grout we sprayed on Tile Doctor Grout Clean-up which is a specialist acid based product that penetrates below the surface of the grout to remove allowing it to be removed. It’s reasonably easy to apply, you need to wet the tile first and then apply a dilution of the Grout Clean-up, leave it dwell on the tile for a few minutes allowing it to get to work and then scrub it in. With it being an acid it’s important not to leave it on the tile very long and wash it off within five minutes and rinse down the tile with water.

Ceramic Shower Cubicle Grout Haze Before Ceramic Shower Cubicle Grout Haze After

Cleaning Ceramic Mosaic Tiles

Once the tiles were free of grout the next step was to clean the tiles for which we used Tile Doctor Pro-Clean which is a versatile alkaline tile cleaning product that can be diluted in different strengths depending on if your looking to clean the tile or strip sealers. In this case we could also of used Tile Doctor Oxy-Pro shower Tile and Grout Cleaner which is a ready to use tile and grout cleaner that comes with a spray nozzle attachment, the spray allows the cleaning agent to mix with air making it lighter and easier to stick to vertical surfaces. This is important as you need to let the cleaning agent dwell on the surface of the tile and grout for a few minutes before scrubbing it by hand with a stiff brush and then washing it off with clean water.

The ceramic mosaics did not need sealing so the renovation was now complete, grout removed and tiles cleaned, and naturally the customer was very pleased with the results and the cubicle was transformed.

Shower Cubicle Restored in London NW1

Removing Grout Haze in a Shower Cubicle, London NW1 Read More »

=================================

Central London Tile Doctor

================================= Read More »

Scroll to Top