Kensington and Chelsea Tile Cleaning

Kensington and Chelsea Tile Cleaning

Welcome to my Work History archive where you will find examples of the cleaning and renovation of tiles carried out in Kensington and Chelsea.

Bleach Stained Multicoloured Sandstone Patio Renovation Little Venice

Bleach Discoloured Sandstone Patio Renovated in Little Venice

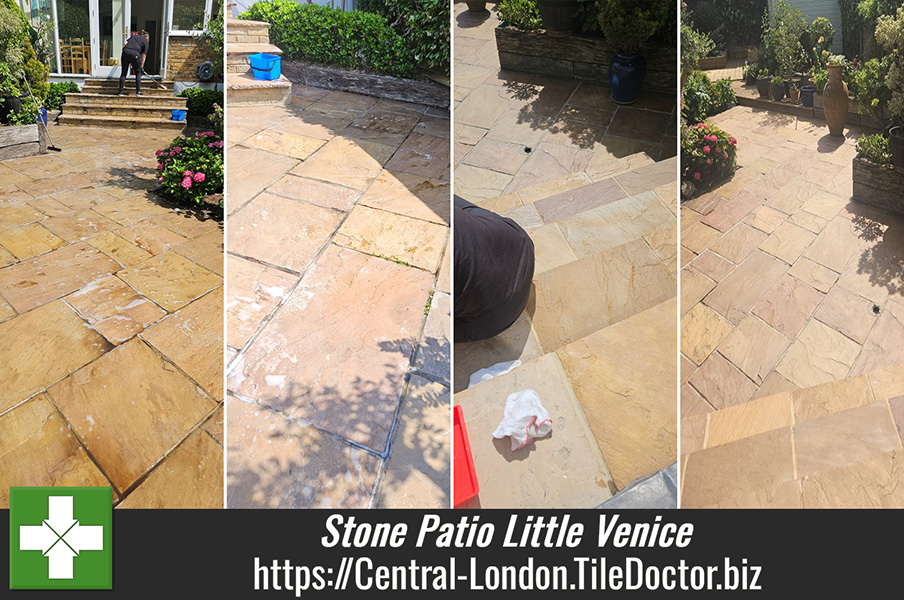
Earlier this year the owner of this Sandstone patio at a property in Little Venice wanted to spruce up the stone ready for summer and so cleaned it with bleach. Unfortunately, the sandstone flagstones didn’t respond as expected and became discoloured leaving them in a worse condition.

Multicoloured Sandstone Patio During Cleaning Little Venice

This was a real shame as these Sandstone pavers were of the multicoloured variety which are really lovely and usually full of colour and character. Fortunately, I was able to re-assure the owner that natural stone is a very forgiving material and I was confident of restoring the beauty to the patio. I worked out a detailed quote for the work which included materials which was accepted. The weather was excellent back then, so it wasn’t long before I was able to return to work on the patio.

Cleaning a Multicoloured Sandstone Tiled Patio

The owner had already done a reasonable job of removing dirt and algae from the stone, so we were able to move straight onto making sure it was free of any previous protective coatings. To do this I used a strong dilution of Tile Doctor Remove and Go which was left to soak into the stone for ten minutes before being worked in with a black scrubbing pad fitted to a rotary machine. It was clear to me some sort of topical sealer had been used in the past, and it took a while with several re-applications to make sure all of it was removed.

Multicoloured Sandstone Patio During Cleaning Little Venice

During the various stages of cleaning and scrubbing the patio was being rinsed with water to remove the soiling which was extracted with a wet vacuum. Once finished the patio was inspected and any stubborn areas spot cleaned with Tile Doctor Pro-Clean. Once done the patio and mortar looked really clean but all that scrubbing and cleaning had removed all the colour from the stone turning it almost grey. I wasn’t worried about that though as I knew the new sealer would put the colour back in the stone.

A lot of water was used during the cleaning so after that was complete the patio was left to dry off in the baking sun.

Sealing a Multicoloured Sandstone Tiled Patio

On our return the Sandstone was tested with a moisture meter to confirm it was dry and then sealed with a coat of Tile Doctor X-Tra Seal which is an oil-based impregnating sealer that soaks into the stone to protect it from within. The oil content of the sealer also does a great job of putting the life back into the stone and bringing out the colours.

Multicoloured Sandstone Patio During Sealing Little Venice

Once complete the patio looked fantastic and the owner was super excited about the new look. With the Patio being sealed I warned the client about using bleach again to clean to stone as this would damage the sealer, however I don’t think this is likely to happen again. Instead, I recommended using Tile Doctor Neutral Tile Cleaner which is a mild yet effective product that won’t impact the sealer.

Multicoloured Sandstone Patio After Renovation Little Venice


Professional Restoration of a Multicoloured Sandstone Patio in London

Bleach Discoloured Sandstone Patio Renovated in Little Venice Read More »

Limestone Kitchen Floor Renovation Marylebone

Gruby Limestone Kitchen Floor Renovated in Marylebone

The pictures below are of a Limestone tiled kitchen floor at a property just off Marylebone High Street in Central London. My client has a dog, and years of walking back from Regents Park through West London streets back into the kitchen floor has led to it becoming very dirty.

Over the year the sealer had worn down and this had allowed dirt to become lodged in the natural pits that are common with Limestone. The dirt had then become ingrained in the stone turning it black in places and resulting in a very undesirable appearance. The other problem that can play a part here is dog urine which is naturally acidic (uric acid) and can weaken a sealer.

Limestone Kitchen Floor Marylebone Before Cleaning

As usual I arranged a visit to the property to survey the floor and work out which method and products would be best for renovating it. From that I was able to work out an accurate quote for its renovation and later I emailed a quotation across to my client which was accepted.

Cleaning a Limestone Tiled Kitchen Floor

To get the floor clean I started by spraying a strong dilution of Tile Doctor Pro-Clean onto the Limestone tile and grout and left it to soak in for ten minutes to give it time to break down the dirt. Then the floor was thoroughly scrubbed with a rotary floor buffer fitted with a poly brush, this was followed up with hand scrubbing with Tile Doctor Pro-Clean along the grout lines. The floor was then rinsed with water and all the soiling extracted with a wet vacuum.

To further refine the appearance of the limestone a 400-grit diamond encrusted burnishing pad was run over each tile using water to lubricate. After another rinse and extraction with the wet vacuum the process was repeated with the finer 800-grit pad. My client didn’t want a high shine, so I finished on the 800-grit pad and gave the floor another rinse.

Sealing a Limestone Tiled Kitchen Floor

The floor was left to dry off overnight and the next day I returned and dry burnished the floor with a 3000-grit pad to improve its appearance even further. Dry burnishing is done using only a few drops of water and leaves the floor completely dry and ready for sealing.

To protect the now clean Limestone tile and grout from ingrained dirt it was sealed using Tile Doctor Colour Grow sealer which is an impregnating sealer containing a colour enhancing formula. A couple of coats were applied allowing thirty minutes of drying time between each coat. Impregnators work by occupying the pores within the stone thereby preventing dirt from taking up residence there.

Limestone Kitchen Floor Marylebone After Renovation

The client was very happy with the work we carried out. We recommended the use of Tile Doctor Neutral Tile Cleaner which is pH neutral and will help maintain the floor and the newly applied sealant, it is mild enough to use daily, so will keep those muddy paw prints at bay!


Professional Renovation of a Limestone Tiled Kitchen in Central London

Gruby Limestone Kitchen Floor Renovated in Marylebone Read More »

Limsescale Stained Slate Shower Renovation Bayswater W2

Limescale Stained Slate Tiled Shower renovated in Bayswater W2

My client had rented their property in Bayswater out while they were working abroad for a year or so; on their return they discovered the tenants had not looked after it properly and had allowed lots of limescale to build up on the Slate shower tiles. The staining was so bad It was putting them off using the shower and they were very disappointed that the tenants had not taken more care.

Limescale Stained Slate Shower Before Renovation Bayswater W2

London is a hard water area which basically means the water contains a high level of calcium and magnesium which is results in limescale deposits. Thankfully Tile Doctor has several solutions for this problem including the use of acidic cleaning products. You do have to be careful with these however as some types of stone can be etched by these making the problem worse.

Limescale Stained Slate Shower Before Renovation Bayswater W2

I made an initial visit to work out the best approach to resolve the Limescale and provided a written quote to do the work. The quote was accepted and a date arranged to carry out the work.

Removing Limescale from Slate Shower Tiles

The first step in the renovation was to decant a strong dilution of Tile Doctor Remove and Go into a spray bottle and spray it onto the shower wall. Combining the product with air makes it stick better to vertical surfaces where it can dwell and break down old sealers and general dirt. This was worked into the tile using a stiff brush and then rinsed off.

Next Tile Doctor Acid Gel was applied to the tiles and worked in with a stiff brush to remove the ingrained limescale. Gel products are ideal for cleaning wall tiles as they stick to the tiles easily. Once done the slurry was rinsed off again.

At this point the stone was looking clean and free of limescale and old sealers but was still looking very unappealing. To bring back the appearance of the slate it needed resurfacing with a set of coarse diamond pads. To do this I started with the application of a very coarse 6-inch 100-grit pad fitted to a handheld buffer and lubricated with water. After rinsing away the slurry that had been generated, I changed pads to the 200-grit and repeated the process, finally moving onto a 400-grit pad. One last rinse and the tiles were left to dry out.

Sealing Slate Shower Tiles

Once the tiles were all dried out, I applied a single coat of Tile Doctor X-Tra Seal. This is a breathable impregnating sealer that soaks into the stone and being oil based adds colour and improves appearance. It’s a good idea to seal Slate used in a shower as it adds water repellency and stain protection. One coat revived the colour of the tiles, in this instance a second coat was not needed, but if applied it would have added a subtle sheen finish.

Limescale Stained Slate Shower After Renovation Bayswater W2

There was a lot of work to do, however, I managed to complete the whole area in a single but very long day. Once completed however the slate tiles looked transformed so it was well worth the effort. Certainly, my client was very happy with the work we had completed and now felt happy to use the shower again!

For aftercare cleaning it’s important not to use strong chemical cleaning products on sealed stone as they will strip off the sealer. So, I recommended the use of Tile Doctor Aqua-Pro for cleaning. This tile cleaning product is pH neutral so mild enough to use every day which will help keep the limescale and grime at bay. It has a pleasant fragrance and with a trigger spray it is easy to use for both all the family and indeed the new tenants if they go down this route again.


Professional Restoration of Limescale Stained Slate Shower Tiles in London

Limescale Stained Slate Tiled Shower renovated in Bayswater W2 Read More »

Victorian Tiled Hallway Floor Restored Ladbroke Grove

Black and White Victorian Hallway Restoration in Ladbroke Grove

This property was in theLadbroke Grove area of West London near Kensington. The client had found an old and probably original black and white checkered pattern Victorian tiled floor under their cork tiled flooring. They also reported that it was badly damaged so I thought it would be best if I paid them a visit first to see how extensive the damage was and whether it was repairable. The floor was in a quite a state, the tiles were covered in glue from the cork and had several areas had been back filled with cement.

Black White Victorian Hallway Floor Before Restoration Ladbroke Grove

I reassured them that the damage could be rectified, and that it would be possible to completely restore the floor back to a good standard. I would have to remove the glue, remove the cement that had been used to level the floor and replace with reclaimed tiles to match. They were relieved to find out it could be done and happy with my quote I was instructed to go ahead with the work.

Black White Victorian Hallway Floor Before Restoration Ladbroke Grove

Removing Glue from a Victorian Tiled Hallway Floor

We started by taping up the skirting boards to protect the woodwork. With this done attention was turned to the glue which was softened using a strong dilution of Tile Doctor Remove and Go so it could be carefully scraped off. Multiple techniques and tools were needed to remove the glue including hand-held scrappers and a black pad fitted to a buffing machine. For the stubborn areas steam was applied to help lift the adhesive out the tile.

Black White Victorian Hallway Floor During Restoration Ladbroke Grove

Once all the glue was removed the floor was rinsed and the alkaline cleaner neutralised with Tile Doctor Grout Clean Up which further cleaned the tiles and removed old traces of grout from the floor. Old floors like this generally don’t have a damp proof membrane underneath so the acids in the Grout Clean-up also counter any efflorescent salts trapped in the tile.

Black White Victorian Hallway Floor During Restoration Ladbroke Grove

Once this was completed the slurry was removed with a wet vacuum and left to fully dry out overnight.

Repairing a Victorian Tiled Hallway Floor

The following day focus turned to repairing the areas of the floor where the tiles were missing or broken. The main issue being the cemented areas, we see this a lot with Victorian Hallways and generally what happens is a heating engineer digs out the floor to install pipework. Not being tilers, your average plumber then repairs the floor with a self-levelling cement that brings the level up to the surface of the tile so it can be covered with lino, carpet of in this case cork.

The sub floor was then rebuilt with rapid setting self-levelling compound but this time to below the level of the tile.

Once the new base was dry it was a just a question of re-tiling with the replacement tiles to match the original checkered pattern. The replacement reproduction tiles were sourced from Original Features in Crouch End North London. After grouting we left the floor to dry out over the weekend.

Sealing a Victorian Tiled Hallway Floor

When we returned to seal the floor our first step was to check the floor was dry using a moisture meter. This is critical as the sealant will not cure correctly if there is too much moisture in the floor. In this case the extra two days we had allowed had done its job and the test had confirmed it was ready to accept a sealer.

The client wanted the floor finish not to be too shiny once sealed so we opted to seal with two coats of Tile Doctor Seal and Go Extra. This is good choice for old Victorian floors such as this example as it’s special acrylic-based formula allows for moisture vapour transmission which as mentioned previously is a concern where no damp proof membrane has been installed.

Black White Victorian Hallway After Restoration Ladbroke Grove

I’m please to confirm my clients were delighted with the result, as you can see from the pictures the black and white floor restoration makes for a dramatic entrance well in keeping with the style of the property. For aftercare I recommended the use of Tile Doctor Neutral Tile Cleaner which will keep the tiles in good condition going forward without damaging the new sealer.

Black White Victorian Hallway fter Restoration Ladbroke Grove


Professional Restoration of a Victorian Tiled Hallway in Central London

Black and White Victorian Hallway Restoration in Ladbroke Grove Read More »

=================================

Central London Tile Doctor

================================= Read More »

Scroll to Top